G Suite IDM Driver 4.2
Legal Notices
Concensus Consulting, LLC makes no representations or warranties with respect to the contents or use of this documentation, and specifically disclaims any express or implied warranties of merchantability or fitness for any particular purpose. Further, Concensus Consulting, LLC reserves the right to revise this publication and to make changes to its content, at any time, without obligation to notify any person or entity of such revisions or changes.
Further, Concensus Consulting, LLC makes no representations or warranties with respect to any software, and specifically disclaims any express or implied warranties of merchantability or fitness for any particular purpose. Further, Concensus Consulting, LLC reserves the right to make changes to any and all parts of Concensus Consulting software, at any time, without any obligation to notify any person or entity of such changes.
Any products or technical information provided under this Agreement may be subject to U.S. export controls and the trade laws of other countries. You agree to comply with all export control regulations and to obtain any required licenses or classification to export, re-export or import deliverables. You agree not to export or re-export to entities on the current U.S. export exclusion lists or to any embargoed or terrorist countries as specified in the U.S. export laws. You agree to not use deliverables for prohibited nuclear, missile, or chemical biological weaponry end uses.
Copyright © 2005-2022 Concensus Consulting, LLC All rights reserved. No part of this publication may be reproduced, photocopied, stored on a retrieval system, or transmitted without the express written consent of the publisher.
Concensus Consulting, LLC
2009 Mackenzie Way Suite 100
Cranberry TWP, PA 16066
Overview
The G Suite driver (Google Apps) for Micro Focus Identity Manager can create, update, and delete users, groups, organizational units, and contacts from an Identity Vault to the G Suite cloud application, keeping the user identity information consistent across the Identity Vault and the cloud application. The G Suite driver supports secure password synchronization across Identity Vault and G Suite cloud server. The G Suite driver for Identity Manager is a Subscriber channel only driver and offers out-of-the-box random password generation policy for the newly provisioned users. The G Suite driver uses a combination of language and protocols to enable identity provisioning and data synchronization between an Identity Vault with G Suite Driver.
Driver Concepts
Data Transfer Between Systems
IDM drivers support two data transfer channels between the Identity Vault and the connected system, called the Publisher and Subscriber channels. The Publisher channel handles data and events from the connected system into the Identity Vault. The Subscriber channel handles data and events from the Identity Vault into the connected system.
The G Suite Driver only supports data transfers from the Identity Vault into Google Apps. Communication is one-way only. Communication channels are discussed in the following sections.
The Publisher Channel
The Publisher Channel is not currently supported by this driver.
The Subscriber Channel
Monitors the Identity Vault for new objects and changes to existing objects.
Any relevant changes are sent to the shim to be executed in the Google Apps system.
Through the use of filters and policies, the driver can be configured to control and manage what changes are detected and sent to Google Apps.
How the Driver Works
The following diagram illustrates the data flow between Identity Manager and Google Apps API’s:

The Identity Manager engine uses XDS, a specialized form of XML, to represent events in the Identity Vault. Identity Manager passes the XDS to the driver policy, which can consist of basic policies, DirXML Script, and XSLT style sheets.
After driver policy has been applied, the driver shim communicates securely over https to the Google Apps API's for your domain. The results are then communicated back to the driver. The driver then processes that information converting it into an appropriate XDS that is reported back to the Identity Manager engine.
Understanding the Google APIs
Google has many different APIs available for managing data into and out of the many different Google applications. API Access must be turned on in the G Suite Admin Console. The driver supports the following APIs:
Directory API – The Directory API is responsible for creating users and group objects. It is required to turn this API on inside the G Suite Admin Console.
Contacts API * – The Contacts API creates a Domain Contact inside of the Address Book (Contacts).
Groups Settings API – The Groups Settings API provides enhanced control of permissions and other group attributes.
GMAIL API – Gmail user account settings, labels, forwarding, send as, and delegation
* NOTE: The Contact API Add events may not show in the G Suite Admin Console and Address Book (Contacts) for up to 24 hours even though they are usable objects right away. Modify events will show immediately.
Driver Features
The G Suite driver can use the local installation of Identity Manager or the Remote Loader Service. The driver can be installed on either Linux or Windows where the Identity Manager Engine or Remote Loader Service resides.
The following sections provide information about how the G Suite Driver supports these standard driver features.
Supported Operations
The basic configuration files for the G Suite Driver are capable of performing the following operations:
User Objects – Add, Modify, Delete, Query, Rename, Set/Change Password
Group Objects – Add, Modify, Delete, Query
Contact Objects – Add, Modify, Delete, Query
Organization Unit Objects – Add, Modify, Delete, Query
Entitlement Support
The driver has support for both RBE and RBPMs entitlements under Identity Manager 4.x. These entitlements may be used for User account, placement, and group membership.
Multiple E-Mail Domain Support
The driver is capable of managing multiple email domains within the same G Suite domain. It is, however, a best practice recommendation to use one driver instance per domain, even when the domains are within the same Google account. The one instance per domain model allows discrete IDV objects to be provisioned into each domain as per business requirements. When one instance is used for multiple domains, IDV objects, such as users, can only be in one domain at a time. Please see Appendix A – Multi E-Mail Domain Support on how to configure the driver.
Driver Installation
The driver is installed from a zip file that can be obtained from the Concensus Technologies download site. Please ensure you have obtained the most up to date version of the driver; earlier versions may not work properly due to Google API service changes since the media was created. It is also necessary to obtain a license from Consensus Technologies to activate the driver. The driver will not start without a valid license from Concensus.
Driver Requirements
The driver requires a supported version of Micro Focus Identity Manager. Currently Identity Manager versions 4.5 or later are supported. The driver is supported on Windows and Linux where Identity Manager is supported. The driver requires a patch and version level of IDM which provides at least a Java 7 (1.7) virtual machine.
A base configuration requires:
Driver license obtained from Concensus
Identity Manager Engine or Remote Loader system with access to the internet *
iManager with the Identity Manager plugins installed
Updated eDirectory Schema
Universal Password enabled on your eDirectory users
G Suite API Access must be turned on
* NOTE: The driver does not support connections to Google through an Internet Proxy Server. Port HTTPS/443 must be open from the driver system outbound.
Configuring Google Authentication
All the Google services used by the G Suite Driver are authorized using OAuth2 via a Service Account Flow. In order to use a Service Account credential, you must have an administrative user account available.
NOTE: Google frequently updates the user interfaces of their web consoles. Your screens may differ from the ones shown in this guide.
Creating a G Suite Administrative Account
In order to be able to configure OAuth2 and properly authorize a Service Account credential, a G Suite domain account with Super Admin access will be required. It is a recommended best practice to create and dedicate an account specifically for use by the driver. This allows for tighter controls and better auditing of domain events.
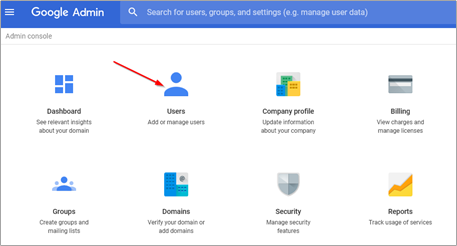
To create a new admin in the G Suite Domain:
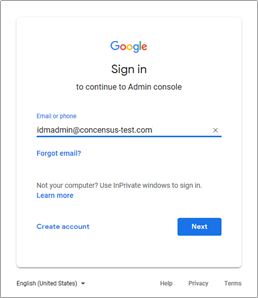
Create a new admin user in the Google Admin Dashboard at https://admin.google.com
Click on the Users icon.
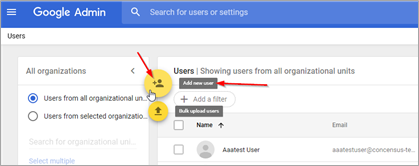
Add a new user.
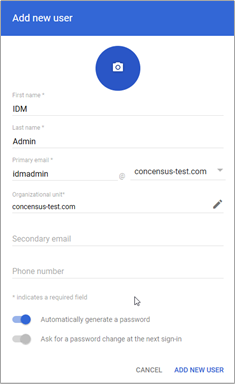
Name the account something memorable and indicative of its role and purpose. Set or generate a password.
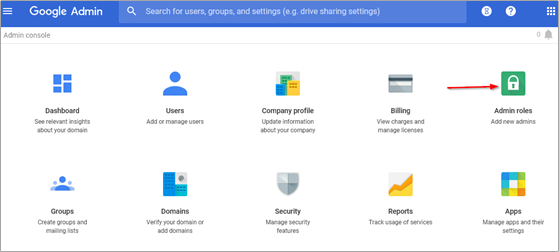
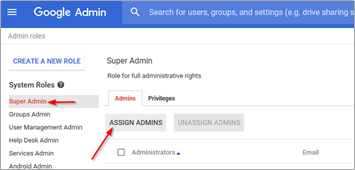
Make the new user a super admin.

Log into the G Suite Admin Console with the new admin user to confirm proper set up.
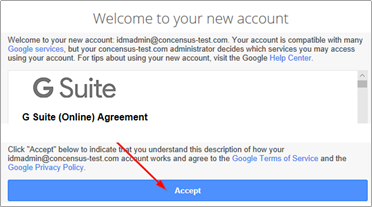
Accept the terms and conditions. The account will not work until this step is completed.
It is recommended to set up a recovery phone number and/or email address for this new admin account.
NOTE: It is necessary to log in to the admin console with the new admin user via a web browser at least once to fully activate the account. Until that step is done, the driver will not function.
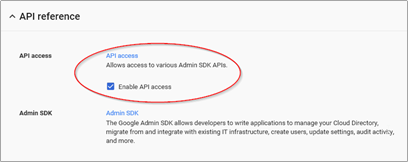
Enabling the G Suite API Access
The driver will provision users, groups, organizations, and shared contacts into G Suite. It is necessary to enable API Access in your G Suite domain before the driver can perform its work.
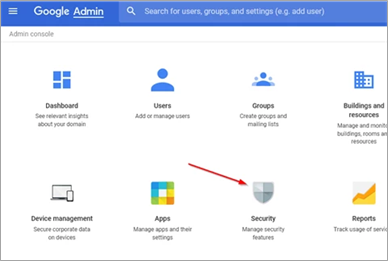
To enable API Access in G Suite:
Using a web browser, log into the G Suite Admin Console. From the Dashboard select “Security.”
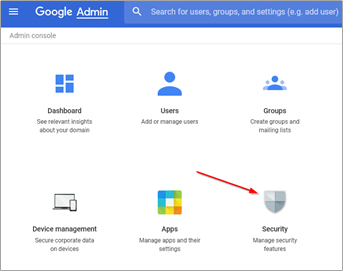
From the Security management page, select “API Reference."
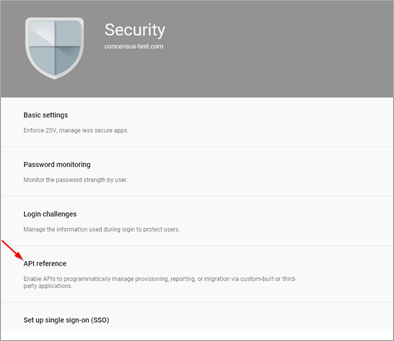
Check the box labeled “Enable API Access.”
Configuring API and Service Account
NOTE: Google frequently updates the user interfaces of their web consoles. Your screens may differ from the ones shown in this guide.
The next step is to set up a developer project in the developer console. After creating the developer project, it is a recommended best practice to add additional administrators/owners of the project beyond the G Suite Driver account created earlier. This can prevent losing access to the project should changes be needed in the future.
Create Developer Project
- Go to the Google developers console at https://console.developers.google.com. If possible, using a new tab on your browser is recommended. You should be logged in with the same admin account created earlier. Agree to the terms of service, if needed.
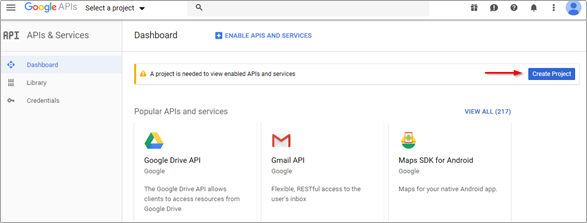
- Create a new project within the developer's console.
- Fill in the Project Name field. The Project ID field is generated by Google.
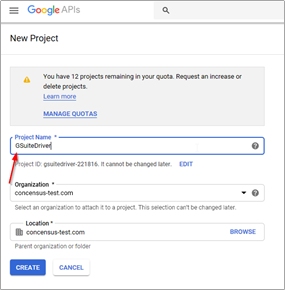
- Click "Create." The new project may take 1 to 2 minutes to create.
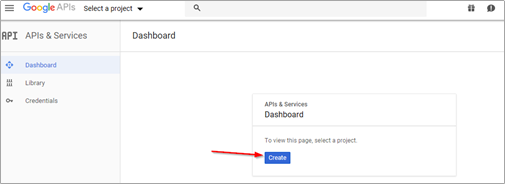
Once the new project is created, there are several steps which must be performed:
- Enable the relevant APIs
- Create an OAuth ClientID
- Create a service account
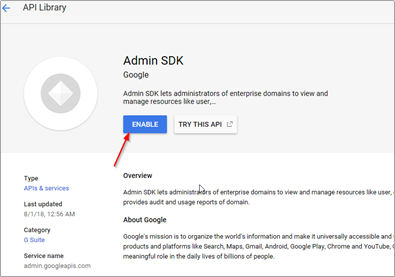
Enable Admin SDK API
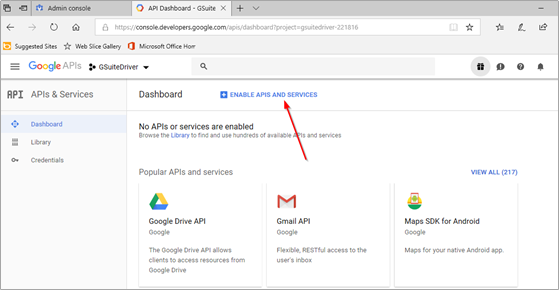
Once the project is created, from the developer's console, proceed to enable the Admin SDK API. The Admin SDK exposes the majority of the necessary API endpoints that the driver needs. When this API is enabled, we will be given an opportunity to create the needed credentials for the connector.
From the project created in the previous step:
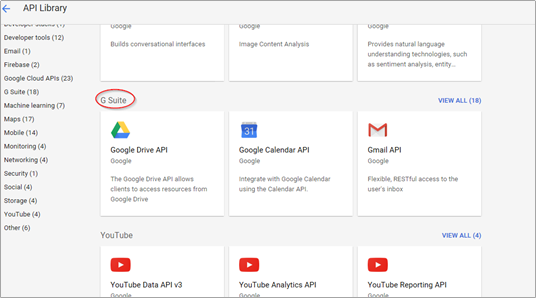
- Select "Enable APIs and Services."
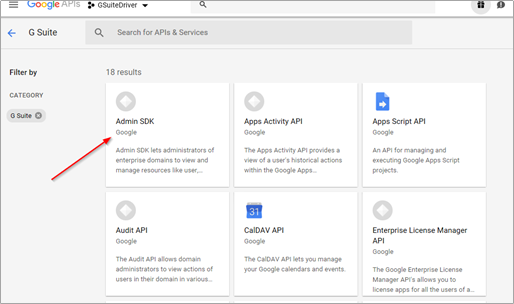
- Scroll to the G Suite APIs, select View All, if needed.
- Select and Enable the Admin SDK. The interface will prompt you to create credentials, which will be needed for the driver to connect to Google's servers.
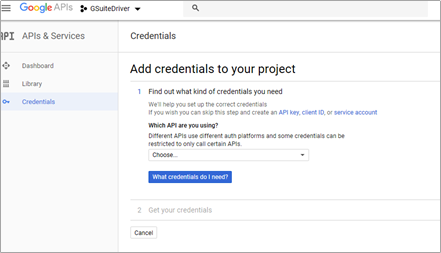
Create Service Account Credentials
From the "create credentials" prompt in the Admin SDK panel, continue to create the necessary credentials for the driver to authenticate and obtain authorization to the G Suite domain.
- Select "Create Credentials."

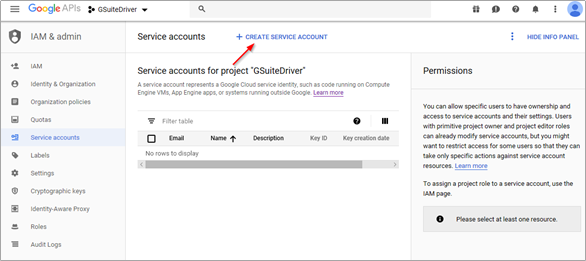
- The G Suite driver uses the “service account” credential type. Select “service account,” skipping the wizard.
- Click “Create Service Account.”
- Give the account a relevant name and description.

- Do NOT assign a role or permissions to the service account. Simply continue from the screen above.
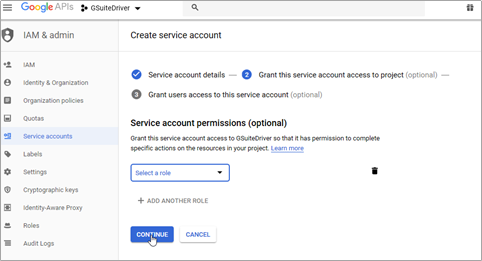
- There is no need to grant access to the service account. The driver uses a private key as the login credential, so it is necessary to create a key from this screen. Select "Create Key". This key is required for the driver to function.
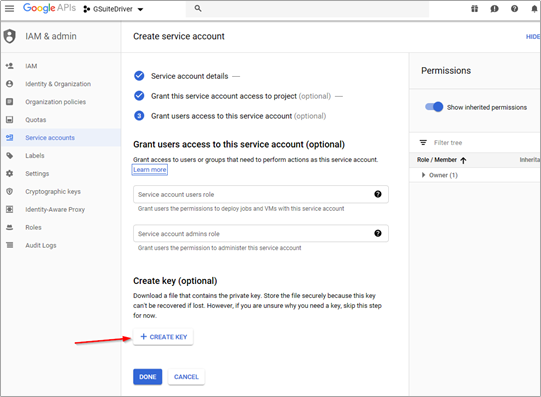
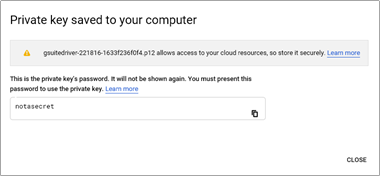
- Save the key in the P12 format. The key will download and be saved on your workstation. This is your ONLY copy of this key. The key cannot be redownloaded from the developer's console. If lost, a new key will need to be created for this service account. A new key can be recreated from the credential in the developer's console project, if needed. The P12 key file is the equivalent of the service account’s password and should be treated accordingly.

- The key will need to be copied to the hosting machine which is running the driver.
- Click done.
Locate the P12 file and upload it to your IDM server in a location accessible from the driver. /opt/novell/eDirectory/lib/dirxml/classes is a recommended location for Linux hosts. Generally, a good location is the same location as the gmailshim.jar file. If the driver is on a remote loader, then it needs to go with the gmailshim.jar file in the remote loader location.
NOTE: The location and filename of the key file is a necessary configuration parameter for the driver.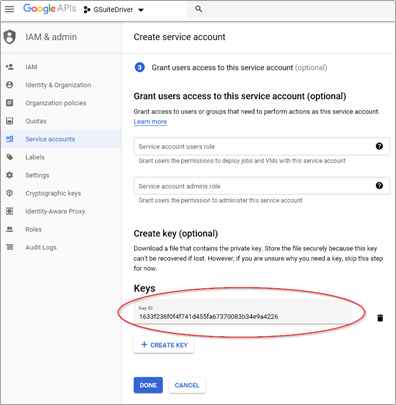
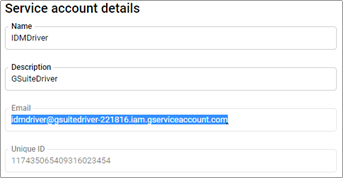
- IMPORTANT: On the service account details screen below, copy and paste the Email and Unique ID values into a text file for later use. The required data is highlighted below. These two values will be used to authorize the service account to access your domain via the various APIs used by the driver.
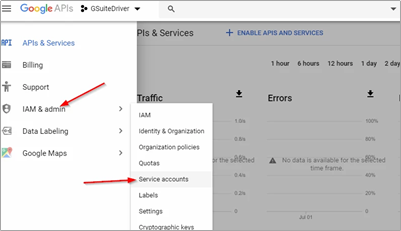
Managing Credentials and Keys
If you need to create or manage credentials after the fact, they can be accessed from the developer's console, in the project you created earlier. In the console, with your project selected, pull down the menu to IAM & admin and select service accounts as shown below.
From there, you can either create a new service account, manage your existing service account, or create new keys, as shown below.
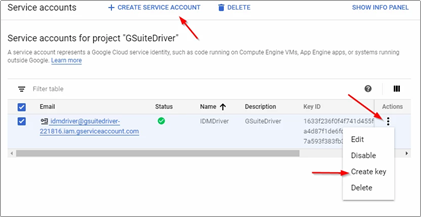
Please refer to Google's developer console help system accessible from the question mark icon at the top right of the page for more information.
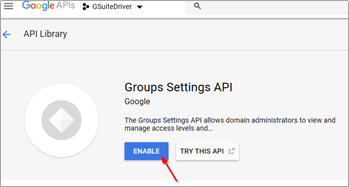
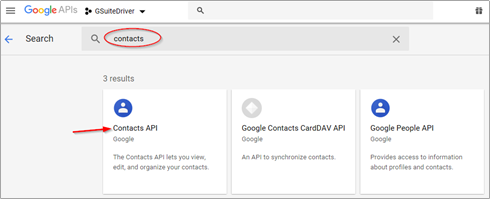
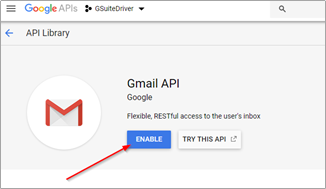
Enable Remaining APIs
The Admin SDK API is not sufficient alone for the connector to function. It is necessary to enable these additional APIs:
- Group Settings
- Contacts
- Gmail
Follow these steps:
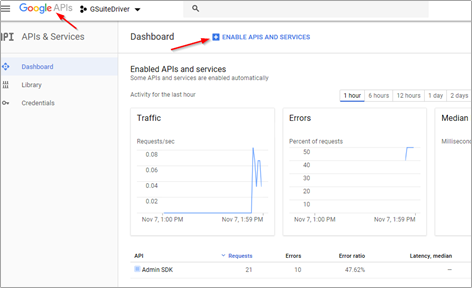
- From the developer console dashboard (click the GoogleAPIs banner to easily reach this point).
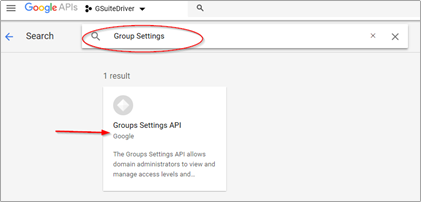
- Select Enable APIs. From the API Library, search for and enable Group Settings, Contacts, and GMailAPIs.
- Return to the Enable APIs screen and search for “Contacts.” Enable the Contacts API.
- Finally search for and enable the Gmail API.
Authorizing Service Account
The service account provides the driver with the ability to authenticate to the G Suite domain. It is necessary to grant that account permission to access your G Suite domain via the API service scope endpoints. For more information, please see the Directory API: Authorize Requests document available from Google.
NOTE: You will need the Unique ID of the service account which was created earlier. You will also need the API scope list provided with the driver. The scope list can be found in a text file called DirectoryScopes.txt. The scope list is a list of authorized scopes, which take the form of URLs, in a comma separated list, all in one line. The authorized scope list can also be found here and in Appendix E – Directory Scopes. Please use the most recent scope list as it may be updated in the future.
- From the G Suite Admin Console, select the Security icon.
- Scroll down and select “Advanced Settings.”
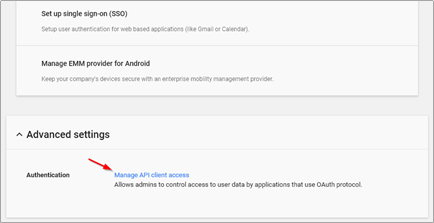
- Select “Manage API client access.” Copy and paste the Unique ID of the service account into the "Client Name" field.
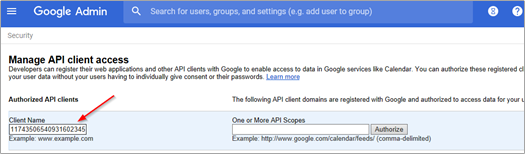
- Copy and paste the contents of the DirectoryScopes.txt file (included with the driver download or accessible here or in Appendix E – Directory Scopes) into the "One or More API Scopes" field. Please note that the content should be plain text, so copy from a text file not from a web page to avoid any metadata.
Click Authorize.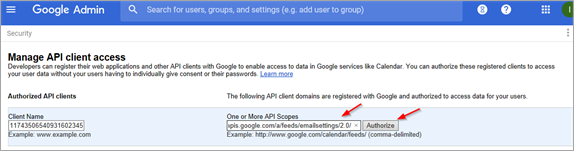
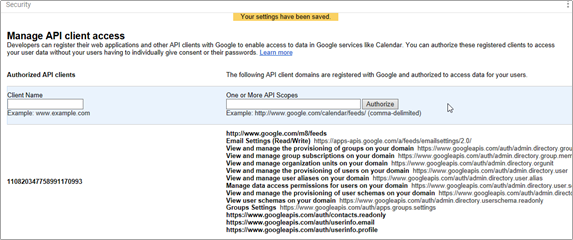
If this step was successful, the entry will appear in the authorized list similar to the image below:
If, for any reason, this does not work or you need to change the authorized scopes, delete the authorization entry and create it again with the correct information.
Configuring Driver Authentication
This section shows what information needs to be set in the IDM driver properties to use the service account. If you have not yet imported the driver configuration into Designer or iManager, then complete those steps first before attempting to set the service account information.
You will need the following information to configure the authentication settings:
Admin account email address and password for the G Suite domain
This is the one created first in this guide
Do not use your only admin account. Create one for the driver to use.
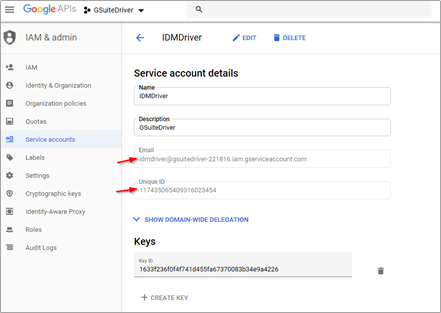
Service account Email Address
This should have been copied when the service account was created.
It can be found in the developer's console under service account details, as shown below:
Full path and file name of the P12 key file on the IDM server
This file was created as part of the credential process earlier in this guide
The file MUST be uploaded to the IDM server where the Google driver is running.
It is recommended that the file be placed in the same location as the ctgmailshim.jar file
On a Linux host, this location might be:
/opt/novell/eDirectory/lib/dirxml/classes/KEYFILENAME.p12
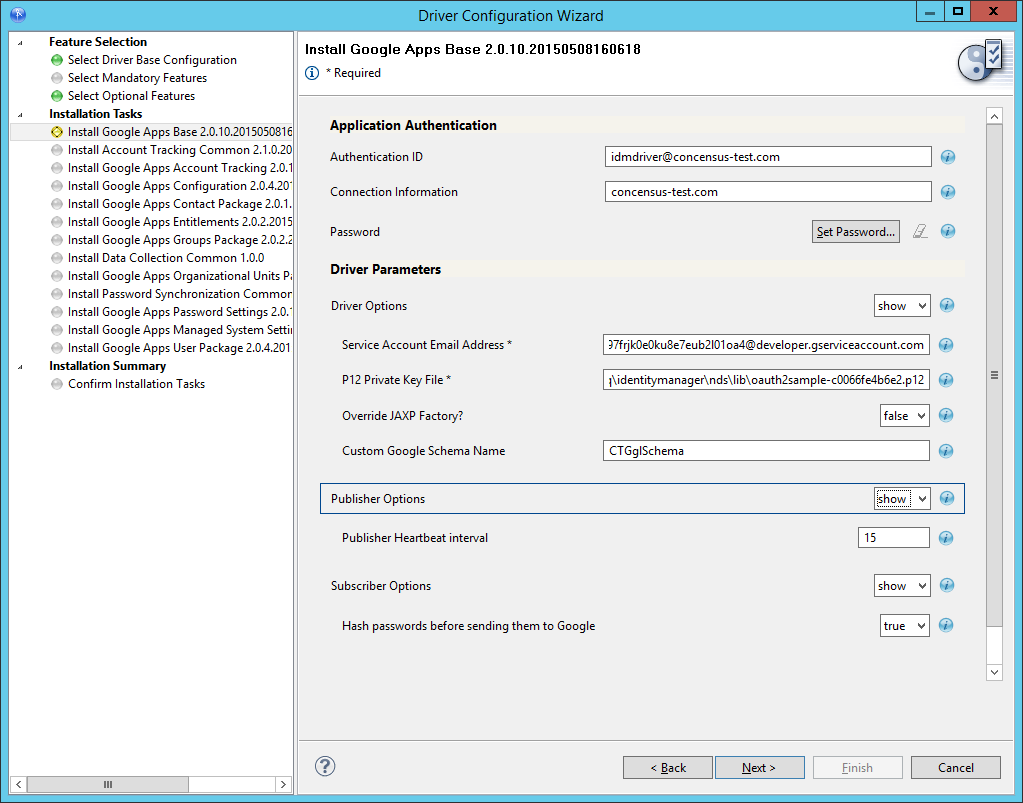
In IDM Designer or in iManager, edit the G Suite driver properties.
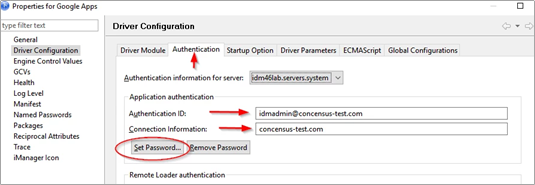
On the "Authentication" tab, set the following:
Authentication ID
The email address of the admin account
Connection Information
The domain name of this Google domain
Set Password
Set the password to the password of the admin account
The admin account is the actual identity used by the driver to effect changes in the domain. Once authenticated via the service account, the driver assumes the identity of the admin account and does the work via that proxy.
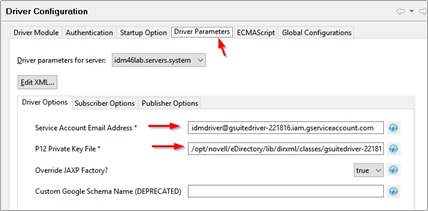
On the "Driver Parameters" tab, set the following:
Service Account Email Address
Set this to the service account email address from the service account created earlier.
P12 Private Key File
Set this to the precise path AND file name of the P12 file which was uploaded to the IDM server.
Use the hosting operating systems file and path correct syntax eg:
/path/filename for Linux
C:\path\filename for Windows
Finally, select “Ok” and update the driver in the Vault.
Driver File Installation
When installing the G Suite Driver on the target server for the first time, copy the zip file containing the G Suite Driver jar files to the target server running a compatible version of Identity Manager or Remote Loader.
In order to use the pre-configured import, you will need to extend the eDirectory schema using the following steps:
Windows:
Click Start > Settings > Control Panel > Novell eDirectory Services
Click install.dlm, then click Start
Click Install Additional Schema Files, then click Next
Log in as a user with administrative rights, then click OK
Specify the schema file path and name (<InstallDirectory>\Novell_Google_Schema.sch)
Click Finish
Linux:
/opt/novell/eDirectory/bin/ndssch -h <localhost:524> –t <MY treename> <admin_fdn> /opt/novell/eDirectory/lib/nds-schema/Novell_Google_Schema.sch
NOTE: The schema extension is the same as the Schema file included on the Micro Focus IDM install media.
It may be necessary to restart eDirectory once the driver binary and schema have been updated.
Windows:
Use services to restart your eDirectory Instance
Linux:
Consult eDirectory documentation
Driver License
The driver license file is sent to the technical contact listed on the software subscription license agreement. The technical contact will receive a zip file for each tree the connector is licensed for (typically a production and a test tree). The license will expire at the end of your contract term.
NOTE: The location for the license file will vary dependent on the version of IDM, the hosting operating system, and the options chosen during installation. Consult your IDM and eDirectory documentation for the correct path for your installation. The paths offered below are based on default selections and may not be correct.
To install the license, use the following steps:
Windows:
Unzip the file to a temporary location i.e. c:\temp
Copy the gmaillicense.jar file to the DirXML lib directory
IDM 3.6.1 – C:\novell\nds\lib
IDM 4.0 – C:\novell\identity manager\nds\lib
Later versions – C:\NetIQ\eDirectory\lib
Your location may vary
- Restart eDirectory
Linux
Unzip the file to a temporary location i.e. /root
Copy the gmaillicense.jar file to:
/var/opt/novell/eDirectory/lib/dirxml/classes/
Your location may vary
- Restart eDirectory (ndsd)
NOTE: When updating your license, you must remove the old jar file from the folder prior to installing the new one. Do not rename the old jar file. It must be removed such that it is no longer within the classpath of the IDM java virtual machine.
Driver Upgrades
If you are upgrading from a previous version of the driver, please follow the upgrade instructions indicating how to move from your deployed version to the new version. You will find the readme for the currently shipping version at the G Suite Driver Download page.
Replacing an Existing License File
Driver license files expire at the end of the contract term. They must be replaced each year as the driver will discontinue working (no events will be lost if the driver stops) at the end of the license term. The new license will be sent to the Technical Contact on the contract.
Once the new license has been obtained the following steps should be performed:
Windows:
Unzip the file to a temporary location i.e. c:\temp
Copy the gmaillicense.jar file to the DirXML lib directory and overwrite the existing jar file.
Default location (please verify in your installation) for IDM 4.x – c:\netiq\eDirectory\lib
Restart eDirectory on the server from the Services or Control Panel
Linux
Unzip the file to a temporary location i.e. /root
- Copy the gmaillicense.jar file to the /opt/novell/eDirectory/lib/dirxml/classes/ folder and overwrite the existing jar file.
Default location (please verify in your installation)
Restart eDirectory
Consult eDirectory documentation
The expiration date can be seen in the driver trace at level 3 or higher:

Creating a New Driver Instance
The G Suite (Google Apps) connector uses IDM packages for initial driver configuration. Please refer to the Micro Focus documentation for IDM Designer for understanding and using Designer. This guide assumes familiarity with Designer and that you have a Designer project of your IDM environment into which the G Suite driver will be installed.
The G Suite driver may be obtained either from Concensus Technologies or Micro Focus. Use of the Concensus packages is not required; the Micro Focus and Concensus packages are identical in all functional ways.
Using Micro Focus Packages
You may use the Micro Focus version of the G Suite packages. If you use the Micro Focus packages, there is one change which needs to be be made from the Micro Focus packages to work properly with the Concensus driver.
After creating the driver instance, or updating an existing instance, open the driver properties in Designer as shown below.
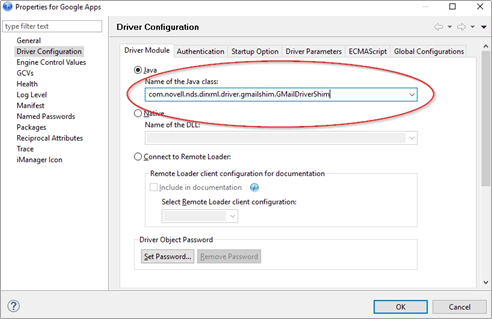
The Concensus driver and the Micro Focus driver use different Java class names. Change the highlighted class name to reflect the Concensus driver.
Vendor | Java Class Name |
|---|---|
Micro Focus | com.novell.nds.dirxml.driver.gmailshim.GMailDriverShim |
Concensus | com.concensustechnologies.dirxml.driver.ctgmailshim.GMailDriverShim |
Please note that the Java class name is case sensitive and needs to be exactly as shown in the above table.
Once the class name is changed, save and deploy the change. The driver will now use the Concensus shim instead of the Micro Focus shim.
Using Concensus Packages
To use the Concensus packages within your designer, it is necessary to add the Concensus package repository to your Designer's online update sources. Note that the following screen shots may not match your version of Designer or future versions. Consult the Designer documentation for details.
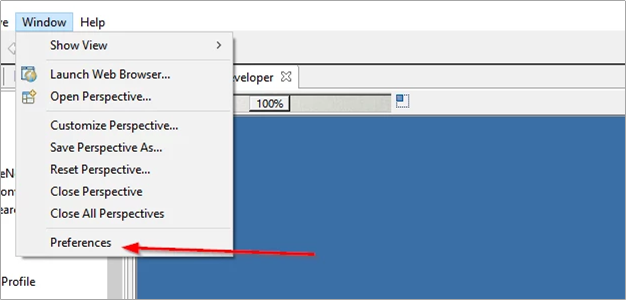
- From the "Window" menu, select "Preferences."
- From the preferences panel, select Micro Focus, Package Manager, and Online Updates.
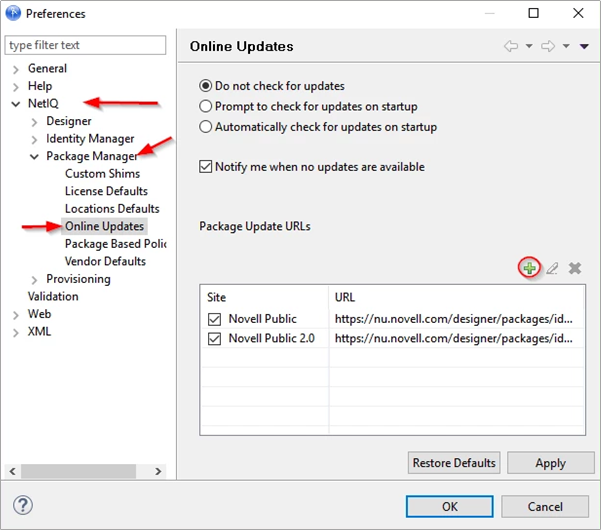
- Press the green plus symbol to add a new source. The URL is https://www.concensus.com/designer.

- After saving the changes, pull down the Help menu and check for package updates. Install the latest packages from Concensus to update your Designer.
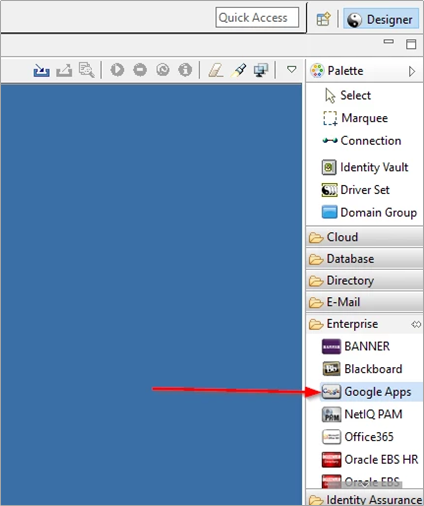
- Once the packages are updated and Designer is restarted, create a new driver instance by dragging the "Google Apps" icon from the Designer palette on to your project.
- When the driver configuration window opens, select the CT Google Apps Base package to use the Concensus packages.
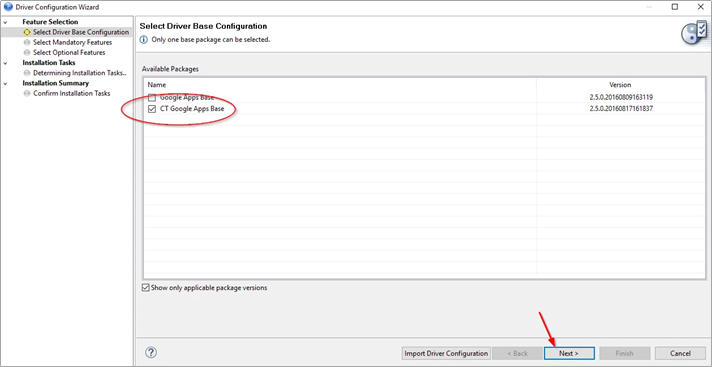
- Click Next and process through the driver configuration wizard. This will create a new driver instance into your project. Proceed with configuration of the driver and deploy into the Identity Vault.
Driver Customization
The IDM driver for G Suite can be customized using iManager or Designer. The default package configuration should be considered an example for an implementation. With an understanding of Identity Manager policy, it is possible, and often necessary, to configure the driver to do just about anything the Google APIs will allow you to do. For examples please review the other Identity Manager driver configuration files and Micro Focus Cool Solutions.
This section documents the items in the default configuration.
Driver Properties
The Driver Properties page (right click on the driver in Designer and choose Properties from the menu) contains all of the items that the driver needs to startup and connect to Google.
Driver Configuration
Driver Module Tab
This tab sets the Java class name or allows configuring for remote loader.
Authentication Tab
Application ID: The admin account whose rights are used by the driver to do work in the G Suite domain.
Connection Information: The primary domain name of the G Suite domain.
Set Password: As the driver uses the OAuth2 service account for authentication, this password is unnecessary.
If you are configuring the remote loader, set up that authentication information here.
Startup Option
Auto start: The driver will start when the eDirectory server starts.
Manual: The driver will start only from user interaction in iManager or Designer.
Disabled: The driver will not start, and no events will be cached for the driver.
Driver Parameters
Driver Options
Service Account Email Address: Email address associated with the Service Account credential created in Google Developers Console
P12 Private Key File: Path and filename of credential file associated with Service Account credential created in Google Developers Console
Subscriber Options
Hash passwords before sending them to Google: Set this value to true to cause the driver to hash passwords being set on G Suite users.
Publisher Options
Publisher Heartbeat Interval: If you have policies which need to fire periodically on the publisher channel, set the heartbeat interval value here. The driver will send a heartbeat message to the Identity Manager engine each time the interval expires. This feature is not used in the G Suite driver.
GCVs
Account Tracking Tab
Account Tracking is documented by Micro Focus Documentation
Managed System Information Tab
Managed System Information is documented by Micro Focus Documentation
User Settings Tab
Entitlement settings for User objects
RBPMS Settings
Groups Settings Tab
- This tab is currently not used by the driver config.
Google Config Tab
Google Apps Primary Domain Name: This is the domain name of the primary G Suite domain to which the driver is connecting.
Google Apps Secondary Domain Names: This is a list of secondary Google domain names the driver can service.
Password Settings Tab
Google Apps Password Settings configures how passwords are generated for new users being created in G Suite.
You can select using a random password, specifying how many characters and numbers are required.
You can select using a value from an existing attribute.
Password Synchronization configures policy configurations around how passwords are synchronized from the ID Vault to G Suite for a given user.
OU Settings Tab
User placement settings: This variable controls placement policies to not generate placement, use Mirrored placement, or Entitlement based placement.
Advanced RBPM Settings
The last tab in the list is named using the driver name, and is intended to be a bucket for administrators to place their own GCV definitions.
Trace
Trace Level: For normal production use this value should be set to 0. For driver testing and debug information set this to trace level 3. Trace level 5 is used to dump more information about the driver operations between G Suite and the Driver Shim. Trace level 6 provides debug messaging and is not recommended for routine use. Trace level 6 is the highest level at which any G Suite driver debug messages are written.
Trace file: If you are tracing you should set the path and name of the file you want to trace to. For example /var/log/googleappsdriver.log. If you set this option, please be sure to set the Trace file size limit as it defaults to Unlimited.
Trace file encoding: Recommended not to change from default settings
Trace file size limit: Typically set to no more than 1024 MB.
Trace name: Typically set to GoogleApps. This is not a required entry.
Driver Filter
The driver supports Contacts, Users, Groups and Organizational Units classes. For Users and Contacts the following table lists the default list of attributes. These classes support many more attributes that can be found by refreshing the application schema and mapping them to an eDirectory attribute in the schema mapping rule.
Class | Attribute | Notes |
OrganizationUnit | Description | |
| OU | This is the naming value of the attribute |
| ||
Group | Member | |
| Owner | |
| CN | Required |
| DirXML-GAGroupEMailAddress | This attribute is required in order to determine which email domain the group belongs to. The value should be in the form of an email address i.e. info@yourcompany.com. |
| ||
User | DirXML-EntitlementRef | Required if using entitlements |
| nspmDistributionPassword | Required if synchronizing user passwords. Note that it is required to set a password for a new user. Even if you are using SAML for authentication you will need to set a password on the account to have it provision to G Suite. |
| Given Name | Required |
| Surname | Required |
| Login Disabled | |
| assistant | See manager attribute |
| manager | Assistant and Manager are DN attributes in eDirectory. In Google, these map to text fields. It is recommended that the developer decide what should be synchronized to Google (i.e. Given Name Last Name) and write a transformation for displaying that information in the Google Contacts application. |
| Telephone Number | |
| Mobile | |
| Company | |
| L | |
| OU | Department |
| Title | |
| preferredName | preferredName is mapped by default to the Alias attribute in G Suite. This should be in the form of an email address: i.e. name@yourcompany.com. |
| ||
DirXML-GAContact | Surname | Required |
| Facsimile Telephone Number | |
| Given Name | Required |
| Mobile | |
| OU | |
| L | |
| Title | |
| Pager | |
| Telephone Number | |
| Company | |
| Internet Email Address | Required |
Group | EmailAddress | Required naming attribute |
Name | Group descriptive name | |
Description | Description of the group | |
Members | List of members | |
Owners | List of owners. In Google, owners are just members with an owner flag set. | |
AllowExternalMembers | Allows external members to view and join the group. Possible values are TRUE or FALSE. | |
AllowGoogleCommunication | Allows Google to contact group administrators. Possible values are TRUE or FALSE. | |
AllowWebPosting | Allows posting to the group web forum. Possible values are TRUE or FALSE. | |
ArchiveOnly | Allows the group to be only archived. Possible values are TRUE or FALSE. | |
IsArchived | Allows the contents of the group to be archived. Possible values are TRUE or FALSE. | |
MaxMessageBytes | Maximum size of a message. Default is 1 Mbyte. | |
MessageModerationLevel |
| |
SpamModerationLevel |
| |
ReplyTo |
| |
CustomReplyTo | Custom REPLY_TO message | |
SendMessageDenyNotification | Allows member to be notified if his message is denied by the owner. Possible values are TRUE or FALSE. | |
DefaultMessageDenyNotificationText | Notification message text sent when a message is denied. | |
ShowInGroupDirectory | Allows groups to be listed in the Groups directory. Possible values are TRUE or FALSE. | |
MembersCanPostAsTheGroup | Allows members to post using the group email address. Possible values are TRUE or FALSE. | |
PrimaryLanguage | Group Primary Language. See Google Language Tags. | |
MessageDisplayFont | Default message display font:
| |
IncludeInGlobalAddressList | Enables the group to be included in the Global Address List. Possible values are TRUE or FALSE. | |
WhoCanJoin | Permission to join the group
| |
WhoCanViewMembership |
| |
WhoCanViewGroup |
| |
WhoCanInvite |
| |
WhoCanPostMessage |
| |
WhoCanLeaveGroup |
| |
WhoCanContactOwner |
| |
Gmail Settings Attributes
Several attributes are exposed for the Google Schema that update a user’s default email settings within a Google Domain. These attributes are not mapped to an eDirectory attribute but can be set on modify events.
NOTE: Due to limitations in the Gmail API and Directory API interactions, it is not possible to set these attributes during user creation. It is recommended that a delay of at least five seconds or more be used between the creation of a new user and any attempted setting of a Gmail Setting attribute.
These attributes are:
GmailSettingsDelegates
GmailSettingsEnableIMAP
GmailSettingsEnablePop
GmailSettingsForwarding
GmailSettingsLabel
GmailSettingsLanguage
GmailSettingsSendAs
GmailSettingsSignature
GmailSettingsDelegates
Use this attribute to add, remove, or list the assigned delegates to a user’s Gmail account. The attribute takes one of two forms: a string value which consists of the email address of the designated delegate or a distinguished name syntax with an association reference for the designated delegate for this user. The connector will take either form.
GmailSettingsEnableIMAP
Use this attribute to enable or disable the IMAP feature of a user’s account. The attribute takes two values; true or false.
This attribute does not support remove-value or remove-all-values as a user’s IMAP settings cannot be removed. Change the state of this setting with an add-value command.
GmailSettingsEnablePOP
Use this attribute to manage a user’s POP settings. This attribute takes a structured value with the following components:
EnableFor
Whether to enable POP for all mail, or mail from now on.
Enumerated
Required
Values:
ALL_MAIL
MAIL_FROM_NOW_ON
Action
What Google Mail should do with its copy of the email after it is retrieved using POP
Enumerated
Required
Values:
KEEP
ARCHIVE
DELETE
Enable
Whether to enable/disable POP access
Boolean
This attribute does not support remove-all-values and remove-value commands as POP settings cannot be removed from users. Send any changes as an add-value command.
GmailSettingsForwarding
Use this attribute to set and update a user’s auto-forwarding rule. The attribute takes a structured value with the following components:
Enable
Whether to enable forwarding of incoming mail
Boolean
ForwardAddress
The email address to which the email will be forwarded
This must be verified, which means it must satisfy one of these tests:
It belongs to the same domain
It belongs to a subdomain of the same domain
It belongs to a domain alias configured as part of the same G Suite account
Action
What Google Mail should do with its copy of the email after forwarding it on
Enumerated
Values
KEEP
Keep it in the inbox
ARCHIVE
Archive it
DELETE
Delete it
MARK_READ
Mark it as read
This attribute only supports add-value changes. Use an add-value command to update or disable auto-forward.
GmailSettingsLabel
This attribute can be used to list, add to, and remove from a user’s configured set of labels within Gmail. Please note that the API only allows access to the user custom labels. The pre-defined system default labels cannot be manipulated with the API. The attribute accepts string syntax values representing the label to be created or removed. It supports add-value, remove-value, and remove-all-values commands.
GmailSettingsLanguage
This attribute can be used to change or display the language setting for a user’s Gmail account. Please note that the values accepted and displayed by this API are strictly constrained by the API service to be in RFC 3066 language tag format.
See https://www.w3.org/International/articles/language-tags/
The attribute is string syntax containing the language tag desired. It only supports add-value commands.
GmailSettingsSendAs
This attribute can be used to display, set, and remove SendAs aliases. A SendAs alias is a configuration on a user’s account that allows them to send mail as another name and email address. Note that the collection of SendAs alias on any user account includes a system entry, the primary SendAs, which will be displayed when queried, but cannot be removed. The attribute is structured with the following components:
Name
The display name for the send as alias
SendAs
The email address used for the send as alias
ReplyTo
The reply-to address used for the send as alias
isDefault
Whether or not this alias is the default SendAs configuration for this user
Takes the value of either true or false
The attribute supports add-value, remove-value, and remove-all-values.
GmailSettingsSignature
This attribute can be used to display or change a user’s signature. The attribute takes a string value which is the signature for the user and applies it to their account.
Gmail Settings Attribute Syntax and Examples
Application Attribute Name | Syntax | Example |
|---|---|---|
GmailSettingsDelegates | DN/String | This can be formatted as a distinguished name with an association-ref or as a plain string in the form of an email address of the delegate. <modify-attr attr-name="GmailSettingsDelegates"> <add-value> <value association-ref=user@mydomain.com" type="dn">/data/users/my-user</value> </add-value> </modify-attr> == OR == <modify-attr attr-name="GmailSettingsDelegates"> <add-value> <value type="string">user@mydomain.com</value> </add-value> </modify-attr> |
GmailSettingsEnableIMAP | Boolean | <modify-attr attr-name="GmailSettingsEnableIMAP"> <add-value> <value type="string">true</value> </add-value> </modify-attr> |
GmailSettingsEnablePop | Structured | <modify-attr attr-name="GmailSettingsEnablePOP"> <add-value> <value type="structured"> <component name="EnableFor">ALL_MAIL</component> <component name="Action">KEEP</component> <component name="Enable">true</component> </value> </add-value> </modify-attr> |
GmailSettingsForwarding | Structured | <modify-attr attr-name="GmailSettingsForwarding"> <add-value> <value type=”structured”> <component name="ForwardAddress">user@domain.com</component> <component name="Action">KEEP</component> <component name="Enable">true</component> </value> </add-value> </modify-attr> |
GmailSettingsLabel | String | <modify-attr attr-name="GmailSettingsLabel"> <add-value> <value type=”string”>MyProject</value> </add-value> </modify-attr> |
GmailSettingsLanguage | String | <modify-attr attr-name="GmailSettingsLanguage"> <add-value> <value type=”string”>Eng</value> </add-value> </modify-attr> |
GmailSettingsSendAs | Structured | <modify-attr attr-name="GmailSettingsSendAs"> <add-value> <value type=”structured”> <component name="Name">My Name</component> <component name=”SendAs”>name@idmtest.org</component> <component name=”ReplyTo”>name@idmtest.org</component> <component name=”IsDefault”>true</component> </value> </add-value> </modify-attr> |
GmailSettingsSignature | String | <modify-attr attr-name="GmailSettingsSignature"> <add-value> <value type=”string”>Signature Data</value> </add-value> </modify-attr> |
Role Assignments
The G Suite connector is able to create and delete role assignments for users into Google admin roles, both custom and default. The connector exposes an attribute on UserEntry objects called roleAssignment which can be used to list, create, or delete role assignments for that user within the environment.
Understanding Roles and Role Assignments
G Suite domains allow for granting granular rights to certain administrative functions to users within the domain. This is done via a security role assignment.
NOTE: Google frequently updates the user interfaces of their web consoles. Your screens may differ from the ones shown in this guide.
To view your domain roles, select the Admin Roles tool from the admin console at https://admin.google.com
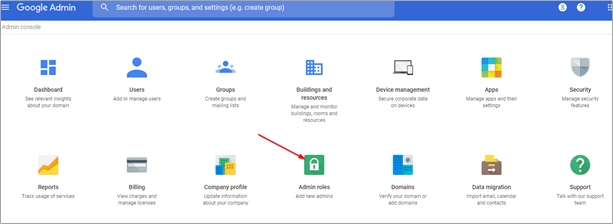
The default roles are visible in this panel. It is also possible to add custom roles to this list with various privileges.

These roles can be assigned to users through a role assignment.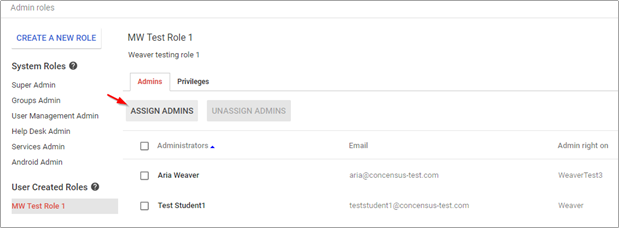
For more information on administrator roles and role management, please refer to Google's documentation.
The developer documentation for role assignments may also provide additional clarity and assistance.
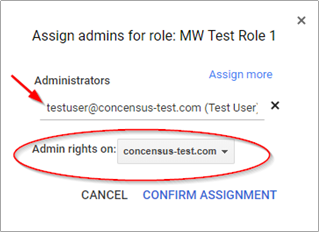
A role assignment consists of the following elements:
The user to whom the role is assigned
The role which is being assigned
The scope of the assignment
The entire domain
An organizational unit
When assigning a role to a user for multiple organizational units, multiple role assignments are used, one per organizational unit assignment.
IDM and Role Assignments
The G Suite IDM connector allows for the creation and deletion of role assignments for users via a structured attribute called roleAssignment.
The roleAssignment attribute is an optional structured attribute on user objects. Added values are interpreted by the connector as a role assignment creation and removed values are interpreted as a deletion of a role assignment. There are several elements of a roleAssignment value:
roleId
Unique internal ID for the role
roleName
The role’s name
roleDescription
The role’s description
scopeType
The scope of the assignment.
Must be either:
CUSTOMER
The entire domain
ORG_UNIT
A specified org unit
Must specify either orgUnitId or orgUnitPath
orgUnitId
The unique internal ID for the orgUnit
orgUnitPath
The path of the orgUnit.
These elements are not all required for add or remove value elements, however, it is necessary to ensure that enough data is present in a value element to perform the task.
When adding a value for roleAssignment, the following requirements must be met:
A role must be identified
A scope must be specified
If the scope is ORG_UNIT, then an organizational unit must be specified.
When removing a value for roleAssignment, the connector must search the list of that user’s role assignments, identify the correct assignment, and delete it. A role assignment is matched by:
Using a provided roleAssignmentId value
If this value is known, then it is sufficient for a remove value event.
roleAssignmentId values can be found by querying roleAssignment on a user.
If the roleAssignmentId is not known or provided, an attempt will be made to find one using:
roleId, roleName, or roleDescription to identify the role
scopeType
orgUnitId or orgUnitPath if the scope is ORG_UNIT
To add or remove a value for roleAssignment, the connector needs to know two or three things: the role being assigned, the scope of the assignment, and (depending on the scope) the organizational unit which is the target of the assignment.
Identifying a role can be done in one of three ways:
Direct reference with the internal role unique ID value, roleId
An exact match with the role name, roleName
An exact match with the role description, roleDescription
Role ID values can be found by issuing a query into the connector for object class name “Role” and viewing the returned instance documents in the driver trace logs. Role ID values are also returned on any query for roleAssignments on user objects. Note that role ID values are unique per instance or domain and are not the same for each domain within the Google environment.
As of this writing, the default system roles have the following names and descriptions:
Admin UI Display Name | Role Name | Role Description |
|---|---|---|
Super Admin | _SEED_ADMIN_ROLE | G Suite Administrator Seed Role |
Groups Admin | _GROUPS_ADMIN_ROLE | Groups Administrator |
User Management Admin | _USER_MANAGEMENT_ADMIN_ROLE | User Management Administrator |
Help Desk Admin | _HELP_DESK_ADMIN_ROLE | Help Desk Administrator |
Services Admin | _SERVICE_ADMIN_ROLE | Services Administrator |
There may be other default system roles or changes to this list at any time.
Please see: https://support.google.com/a/answer/2405986?hl=en
For custom roles, the role name and role description are defined at role creation and are the same for the connector and API as what was entered during creation.
For the above example custom role, the values to use for roleName and roleDescription are highlighted above.
A simple way to determine role ID, role Name, or role Description for any role would be to assign it to a user managed by the connector then querying that user for the attribute roleAssignment. The connector will populate all these elements for each assigned role.
In the following example, roleAssignment was mapped to siteLocation for testing. This is the result of a query on a test user in iManager:

And here’s the trace log:
<instance class-name="UserEntry" src-dn="/teststudent1@concensus-test.com">
  <association>teststudent1@concensus-test.com</association>
  <attr attr-name="RoleAssignments">
    <value type="structured">
      <component name="orgUnitPath">/Weaver</component>
      <component name="roleAssignmentId">1498736891002969</component>
      <component name="scopeType">ORG_UNIT</component>
      <component name="roleId">1498736891002894</component>
      <component name="roleName">MW Test Role 1</component>
      <component name="orgUnitId">03gre1hq2n7bt2m</component>
      <component name="roleDescription">Weaver testing role 1</component>
    </value>
    <value type="structured">
      <component name="orgUnitPath"/>
      <component name="roleAssignmentId">1498736891002970</component>
      <component name="scopeType">CUSTOMER</component>
      <component name="roleId">1498736891002893</component>
      <component name="roleName">_PLAY_FOR_WORK_ADMIN_ROLE</component>
      <component name="orgUnitId"/>
      <component name="roleDescription">Play For Work Administrator</component>
    </value>
    <value type="structured">
      <component name="orgUnitPath"/>
      <component name="roleAssignmentId">1498736891002971</component>
      <component name="scopeType">CUSTOMER</component>
      <component name="roleId">1498736891002886</component>
      <component name="roleName">_SEED_ADMIN_ROLE</component>
      <component name="orgUnitId"/>
      <component name="roleDescription">Google Apps Administrator Seed Role</component>
    </value>
  </attr>
</instance>
From these examples, you can see how the role identifiers are present in the roleAssignment query.
To specify an organizational unit, either the orgUnitId or orgUnitPath must be specified. The orgUnitId is the internal identifier for the organizational unit within Google. This can be determined by querying the OrgUnit and reading the attribute named OrgUnitId.
Example OrgUnitId:
<instance class-name="Organizational Unit" src-dn="/AK/NL">
  <association>/AK/NL</association>
  <attr attr-name="OrgUnitId">
    <value>id:03gre1hq4d6ldwa</value>
  </attr>
  <attr attr-name="OU">
    <value>NL</value>
  </attr>
  <attr attr-name="Description">
    <value/>
  </attr>
  <attr attr-name="BlockPolicy">
    <value>false</value>
  </attr>
</instance>
Alternately, the orgUnitPath can be specified. For the above example, the OrgUnitPath is the association value or source DN: /AK/NL.
If the connector cannot find a role, org unit, or role assignment to add/remove role assignments, then no operation is performed, and an error is returned.
Note that when matching on roleName or roleDescription, the first match is used, in the event multiple roles match.
Examples
Add Value
<modify-attr attr-name="roleAssignment">
   <add-value>
     <value type="structured">
       <component name="roleDescription">Weaver testing role 1</component>
       <component name="scopeType">ORG_UNIT</component>
       <component name="orgUnitPath">/Weaver</component>
     </value>
   </add-value>
 </modify-attr>
Remove Value
  <modify-attr attr-name="roleAssignment">
    <remove-value>
      <value type="structured">
        <component name="roleDescription">User Management Administrator</component>
        <component name="scopeType">CUSTOMER</component>
        <component name="orgUnitPath"/>
      </value>
    </remove-value>
  </modify-attr>
</modify>
Location Attribute
The user attribute Location exposes and processes a structured value representing a set of location values which are part of the user information available in the Google user object. Google exposes the following Location data elements: (Taken from Google API documentation)
Data Element | Description |
|---|---|
area | Textual location. This is most useful for display purposes to concisely describe the location. For example, "Mountain View, CA" or "Near Seattle." |
buildingId | Building identifier |
deskCode | Most specific textual code of individual desk location |
floorName | Floor name/number |
floorSection | Floor section. More specific location within the floor. For example, if a floor is divided into sections "A," "B," and "C," this field would identify one of those values. |
These data elements are collected into a group identified with a “type.” There are three acceptable values for type:
desk
default
custom
If custom is chosen, then an additional element customType is needed.
The connector supports one instance of each type or custom/customType combination. Any added values of type “desk,” for example, will replace any existing “desk” location sets. Any removed values for type “desk” will remove any “desk” location set values. The pair of type “custom” and the value of customType will uniquely identify one element.
Location is supported via a structured attribute with these components:
type
Must be desk, default, or custom
If set to “custom”, the component customType becomes mandatory.
customType
Mandatory if type is custom
Ignored if type is not custom
area
Optional, string
buildingId
Optional, string
The value MUST resolve to a building resource which exists in the domain*
deskCode
Optional, string
floorName
Optional, string
floorSection
Optional, string
* NOTE: Building ID values will be rejected by the API stack if they do not refer to a building resource within the Google domain. This is done via the Google Admin interface. Please see: https://support.google.com/a/answer/1033925?hl=en&ref_topic=1034362
Examples
Add Value
<modify-attr attr-name="Location">
  <add-value>
    <value type="structured">
      <component name="type">default</component>
      <component name="customType"/>
      <component name="area">MyArea</component>
      <component name="buildingId"/>
      <component name="deskCode">Desk1121</component>
      <component name="floorName">1st Floor</component>
      <component name="floorSection"/>
    </value>
  </add-value>
</modify-attr>
Remove Value
<modify-attr attr-name="Location">
  <remove-value>
    <value type="structured">
      <component name="type">default</component>
    </value>
  </remove-value>
</modify-attr>
On remove value elements, only type and, if needed, customType, are examined. All other components are ignored.
Other Attributes
Several attributes are exposed for the Google Schema that the driver can use to make settings in G Suite. The following table summarizes these attributes and provides an example of the settings.
Attribute | Example DOM and Notes |
|---|---|
CN User Object. This attribute is mapped to Google’s UserName. | In G Suite the UserName is the user’s primary email address name unless you use the GMailSettingsSendAs attribute to change it. The default driver config uses the source name of the user object (naming value of the user) and then adds the primary G Suite email domain name (i.e. user@mycompany.com). In a multi-domain environment, you must set the user’s CN value to the domain in which you wish to create the user in the form of the email address (user@domainname.org). |
Permission This attribute is set on Group objects during creation. This is a GCV setting that can be overwritten in the Create Rule. | <add-attr attr-name=”Permission”> <value>Owner<value> </add-attr> Valid values are: Owner, Member, Domain, Anyone |
Assistant & Manager These are not special attributes but do not have the same behavior as other drivers. | Assistant and Manager will only synchronize a DN (\\tree\org\user\myname) value to G Suite unless a transformation is written (typically in the output transformation) that will query back for the information you want to send to G Suite. This is information that will show up on the Google Contacts. For instance, if you would like the Manager or Assistants email address you would have to write a policy that would trigger on the Assistant/Manager attribute and then query back using the DN value for the Internet Email Address and finally reformat the attribute. |
DirXMLGAGroupEMailAddress This attribute is required on the Group object for sync to G Suite. | <add-attr attr-name=”DirXMLGAGroupEMailAddress”> <value>GroupA@mycompany.com<value> </add-attr> In a multi-email domain environment (where there is a primary email domain and secondary/subdomain) it is possible through the API to have groups in the secondary/subdomain domain. For example if your G Suite Primary Email domain is mycompany.com and your secondary domain is mycompany.org you could create the group’s email address in the secondary domain by setting this value to groupa@mycompany.org. The default driver pre-config will set this value to the CN value of the object and the primary domain name. Note that the Google Admin interface will not allow this creation within the UI but will allow you to see the group and manage it once it is created. |
preferredName By default, this attribute is mapped to G Suite’s Alias attribute. It is used to add a nickname to the user’s mail account. | <add-attr attr-name=”preferredName”> <value>First.Last@mycompany.com<value> <value>first@mycompany.com<value> </add-attr> The value should always be in the form of name@domain name. |
Facsimile Telephone Number Due to the way eDirectory stores this attribute it cannot be sent to Google without a transformation. | There is a policy that changes the format of this attribute so that G Suite can consume it. The policy will take the first value found and send that value while removing the structured values. |
AgreedToTerms AgreedToTerms is a flag indicating that you have agreed to Google’s terms and conditions the first time you log into GA. This is a query-only attribute. You may not set this value. | The Google Provisioning API does not allow this value to be set. It can be queried to determine if the user has accepted the Google Terms on first login. |
IsAdmin This is a flag that can be set on a user object to make the user a Domain Admin. | This attribute will return true if the user is a domain admin. The user can be made domain admin by setting it to true. Set it to false to remove that authority. |
ExternalId ExternalIds reference identifiers in external systems. An external ID contains an ID value and an ID Type. Valid types are:
| ExternalId is sent to the driver as a structured type. If the value of "type" is "custom" then a third component with name="customtype" must be provided to specify the custom type. <modify-attr attr-name="ExternalId"> <add-value> <value timestamp="1467727743#2" type="structured"> <component name="value">bob@dog.com</component> <component name="type">account</component> </value> </add-value> </modify-attr> |
Use G Suite Custom Schema
The G Suite Directory API provides the ability to extend the schema of a UserEntry object through the use of Google Custom Schema. Customers can create multiple custom schemas, each of which can define multiple custom attributes. These fields can be used to hold attribute data. Adding Custom Schema effectively extends the application schema managed by the driver. When the driver is asked to refresh application schema from Designer or iManager, the driver queries all of the Custom Schema objects, and adds all of the attributes to the application schema. Once the driver has returned the new schema attributes, the attributes are available to be included in the filter, schema mapped, and used in the Policy Builder. Google Custom Schema attribute definitions carry metadata to indicate whether or not the attribute is multi-valued, as well as the datatype of the field. Google supports the following datatypes:
BOOL
DATE
DOUBLE
EMAIL
INT64
PHONE
STRING
Appendix A - Multi-E-Mail Domain Support
While the connector is capable of managing multiple domains within one connector instance, in many cases, it is recommended that a one domain per driver instance model be used. This is a best practice recommendation. The connector does not support a one to many model between IDV users and Google domain users. As a result, a single IDV user instance can only be in one domain at a time, if all domains are managed by a single driver instance. Configuring a driver instance per domain (each child domain is set as the primary domain for the driver serving that domain) gives considerable flexibility for provisioning users and groups in multiple domains from a single IDV source object.
The G Suite email application – Gmail – is included with all versions of Google Apps. This application can be turned off by an administrator for the entire domain or a subset of users (via an organization). There are three types of mail domains within Google Apps:
Primary Domain – This domain is tied to the name of the G Suite Domain name: i.e. https://www.google.com/a/mycompany.com
Domain Alias – A domain Alias is an alternate domain name for the primary domain only. If you create a domain alias named myothercompany.com a user named name@mycompany.com will be able to receive an email via name@myothercompany.com.
Secondary or Sub Domain – A secondary domain is a separate email domain within G Suite. An example of a secondary domain would be name@staff.mycompany.com. In the Google admin interface it would be possible to have two accounts called "name" with one being in the primary domain and one in the secondary domain. It is not possible to create a Domain Alias for a secondary domain.
Planning out your email strategy within G Suite should be completed and verified prior to synchronizing accounts with the driver.
The Google Driver can:
Create and modify settings on a user in the Primary or Secondary Domain
Use the GmailSettingsSendAs to set the users From Name and Email Address if there is a domain alias. Note that it is not possible to setup a SendAs with an account in a Secondary Domain.
- Switch users between parent and child domain via a rename operation
- Rename the user from username@domain1.org to username@domain2.org
- If the domains are within the same G Suite service, the user account should switch to the other domain.
In order to create a user in a specific e-mail domain all you have to do is set the UserName (Google Attribute Name mapped to CN by default) to the domain name of your choice i.e. user@domain.com. The driver import comes with disabled policies for adding a secondary domain. These policies can be copied if there is more than one policy.
To enable these policies, you must first decide which users will go to which domain. This can be via entitlements, group membership, attribute values or containment within a container. For example, the following policy (used in the create rule) will create a user in the students.com email domain if the attribute employeeType is set to the value of student:
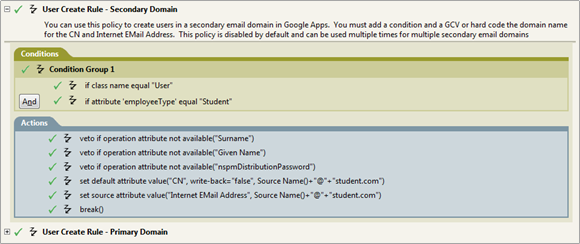
Note that you will need to modify your matching rule in a similar fashion.
Groups also fall into the same category as users. A policy would need to be written in the matching and create rule to facilitate adding a secondary domain for groups. The attribute that facilitates this is the DirXML-GAGroupEMailAddress. As with users all you have to do is set the attribute to determine which email domain the group will belong to with the email address of the group.
Appendix B - Google Error Codes
Exception | Cause | Status Level |
Exception thrown when an error status code is detected in an HTTP response to a Google API. | Specific causes and responses are enumerated below. | |
GoogleJsonResponseException with HTTP Response 408 - Client Timeout 500 - Server Error 503 - Unavailable | These response codes are generated in response to transient errors on the server. | Retry |
GoogleJsonResponseException with HTTP Response 404 - Not Found | This code indicates the requested resource doesn't exist. | Success - If the driver was processing a query, a Not Found is a valid response. Error - If the driver was retrieving an object based on an association. |
GoogleJsonResponseException with HTTP Response 400 - Bad Request 405 - Bad Method 406 - Not Acceptable 409 - Conflict 410 - Gone 411 - Length Required 412 - Precondition Failed 413 - Entity Too Large 414 - Request Too Long 415 - Unsupported Type | These errors are caused by problems in the data or structure of the transmitted message. The driver can't repair and re-transmit but is not in a fatal state. | Error |
GoogleJsonResponseException with HTTP Response 401 - Unauthorized 407 - Proxy Authentication Required | The client is unauthorized | Fatal |
GoogleJsonResponseException with HTTP Response 403 - Forbidden | The client is forbidden to make the specific request. Generally, this is a fatal condition the driver can't correct. For example, this error will occur when the driver issues a request for an OAuth2 scope that hasn't been authorized on the admin delegation. If the Reason on the exception is RateLimitExceeded, the driver will issue a retry AFTER attempting to use Google's exponential back-off algorithm on 5 consecutive requests. RateLimitExceeded vs QuotaExceeded RateLimitExceeded is a transient condition where the driver issues too many requests too quickly. A user's quota for a given service is exceeded when the driver issues too many requests in a 24-hour period to that service. That condition can't be resolved by back-off. Contact Google to request a higher quota. Read about quotas and resolving this issue here or in Appendix D – Google API Quotas. | Fatal, unless the Reason code is "RateLimitExceeded". |
Interrupted I/O operations | Retry | |
An error occurred in Google while processing a request | Error | |
This is a connection exception received from Google after the driver has successfully authenticated. | Retry | |
The Google Entry ID requested is invalid | Error | |
This exception indicates that a query failed to retrieve a valid object | If the exception is a result of a query the status level is Success, since a query that doesn't resolve to an object is not an error. If the exception is a result of requesting a Google object based on an Association value, the Status Level will be Error. | |
This exception indicates an attempt to update an object based on an expired object ID. | Error | |
This exception indicates the driver has requested a service it is not allowed to access. | Error | |
com.google.gdata.util.ServiceException with an error description of "Internal Server Error" | The Google APIs encountered an undefined server error when processing a request. | Retry |
Indicates a malformed URL was received | Error | |
com.google.api.client.auth.oauth2.TokenResponseException with error 401 Unauthorized | Indicates that the service account is not authorized to access the service endpoint the driver attempted to use | Fatal |
com.google.api.client.googleapis.json.GoogleJsonResponseException with error detail of: Access Not Configured. Gmail API has not been used in project | Indicates that the Gmail API has not been enabled in the service account's Developer's console project. | Error |
Appendix C - Common Driver Issues
Issue | Example and Notes |
User Placement. Do not use a leading "\" to place users or Organization Units. | To place a user in the root container, the dest-dn should only contain the Username. If you are placing a user in the google Sales\Marketing container your dest-dn should look like: <add class-name="User" dest-dn="Sales\Marketing\ ddare"/> Organization Units use the same format for dest-dn. |
Group Placement: Do not use a placement rule on groups as Google does not support placing groups in organizations. | Groups are not kept in a hierarchical structure. Placement is not relevant to group objects. |
Unique naming: It is important that Nicknames, Group names and usernames be unique in the G Suite domain. | When developing a matching rule be sure to check for nicknames and usernames to ensure proper matching. Further, naming must be unique across all Google Organization units. It is not legal to have Sales\Marketing\myname and Engineering\myname since myname needs to be unique across the domain. |
Driver Unable to Start |
|
Driver Exceeds Quota on requests to specific services. | Google has specific default quotas defined for the various services the driver uses. The quotas limit the total number of requests allowed in a given 24 hour period. Once these quotas are exceeded the driver will receive an HTTP 403: Forbidden error. Read about quotas and how to resolve this issue here or in Appendix D – Google API Quotas. |
Token Response Exception when using Gmail Settings Attributes | The trace will show something like this: This error is due to not authorizing the new Gmail scopes within the Security section of your G Suite domain. Please see the OAuth Guide and reset the authorized scopes for the service account. |
GoogleJsonResponseException error 403 forbidden when accessing Gmail Settings attributes | The trace will show something like this: The Gmail API has not been enabled for your G Suite domain. Enable it in your service account's developers console project. |
Appendix D - Google API Quotas
With the transition from the old Provisioning API to the Directory API via the Admin SDK, Google has introduced and exposed quotas on the various interfaces used by the Google IDM Driver. Some people are seeing quota issues with their driver. This document details how to view your quotas, current usage levels, and how to request more quota from Google, should you need it.
Should you exceed your quota, your Google driver will report this case to the trace log file and shutdown.
Managing Quotas
Your API quotas and current usage can be viewed at any time from your developer’s console: https://console.developers.google.com
Please note that Google can and does change their policies and web interfaces at any time without warning. The information provided here may no longer be correct or current, though we will attempt to keep it up to date.
TIP: Log in with the account used to create the project in the first place.
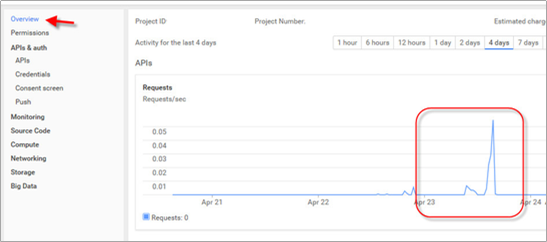
Select the project which created the credential used by the Google Driver. The overview will give you a snapshot of your usage overall.
From the APIs & Auth section, select APIs, then select Enabled APIs.
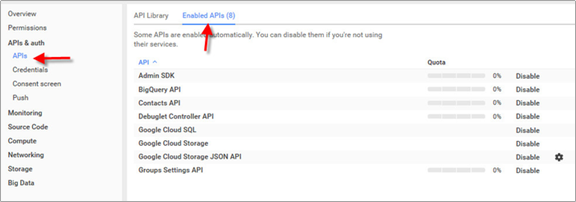
Select the Admin SDK. This API provides all services for the driver with the exception of Group Settings and Domain Shared Contacts. Selecting Usage will allow you to see a usage summary over time.
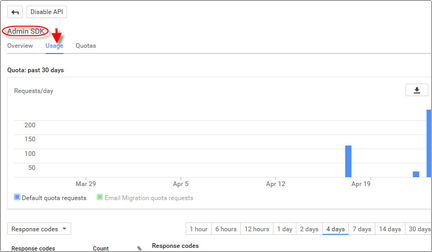
Select "Quotas" to see your current quotas and current remaining quota.
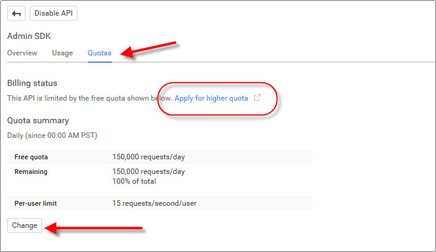
If you have exceeded your quota for requests per day, click the highlighted link to create a request to Google for more daily quota.
You can also go to this URL to directly access the Quota request form for the Admin SDK: https://support.google.com/code/contact/admin_sdk_quota
Clicking the "Change" button allows you to change your per-user limit of 15 requests per user per second, though it is unlikely that the driver will ever exceed this threshold.
For more information on the Admin SDK and quota limits, please see this Google documentation: https://developers.google.com/admin-sdk/directory/v1/limits
Appendix E - Directory Scopes
Below is the list of all authorized scopes required by the driver. It is highly recommended that you refer to the DirectoryScopes.txt file bundled with the driver and any driver patches as this list can and will change as new features are added or old endpoints are deprecated. When authorizing scopes, the values should be plain text (use a text file editor, do not copy and paste from a web, pdf, or rich document as that may result in failures due to extra information kept in the clipboard), all on one line, and comma separated. The DirectoryScopes.txt file is properly formatted and should be used for this purpose. See Configuring API and Service Account above for more information.
https://www.googleapis.com/auth/admin.directory.group,
https://www.googleapis.com/auth/admin.directory.group.member,
https://www.googleapis.com/auth/admin.directory.orgunit,
https://www.googleapis.com/auth/admin.directory.user,
https://www.googleapis.com/auth/admin.directory.user.alias,
https://www.googleapis.com/auth/admin.directory.user.security,
https://www.googleapis.com/auth/admin.directory.userschema,
https://www.googleapis.com/auth/userinfo.profile,
https://www.googleapis.com/auth/userinfo.email,
http://www.google.com/m8/feeds,
https://www.googleapis.com/auth/contacts.readonly,
https://www.googleapis.com/auth/apps.groups.settings,
https://www.googleapis.com/auth/admin.directory.rolemanagement,
https://www.googleapis.com/auth/gmail.settings.basic,
https://www.googleapis.com/auth/gmail.settings.sharing,
https://www.googleapis.com/auth/gmail.labels,
https://apps-apis.google.com/a/feeds/emailsettings/2.0/