Administration Guide 1.0.3
About this Guide
What this Guide Contains
The Athena Administration Guide provides information about:
- Configuration for Athena
- Exposing users and groups
- Troubleshooting Athena
This guide is intended for administrators who are already familiar with eDirectory and Active Directory directories and using LDAP queries to access directory data.
Related Documentation
Getting Started
Complete the installation and configuration instructions specified in Installation Guide 1.0.3
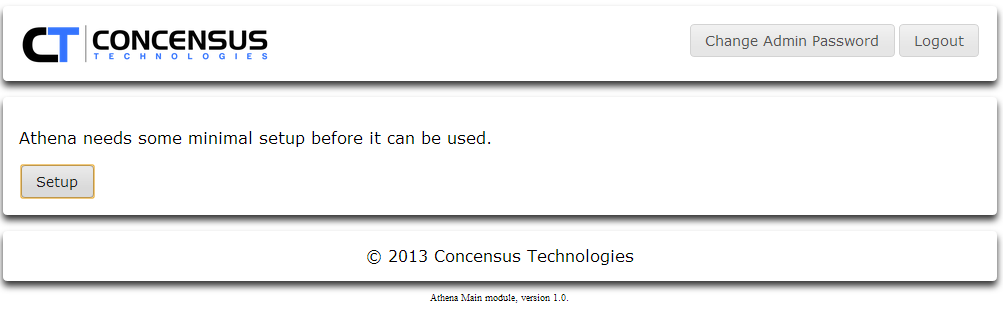
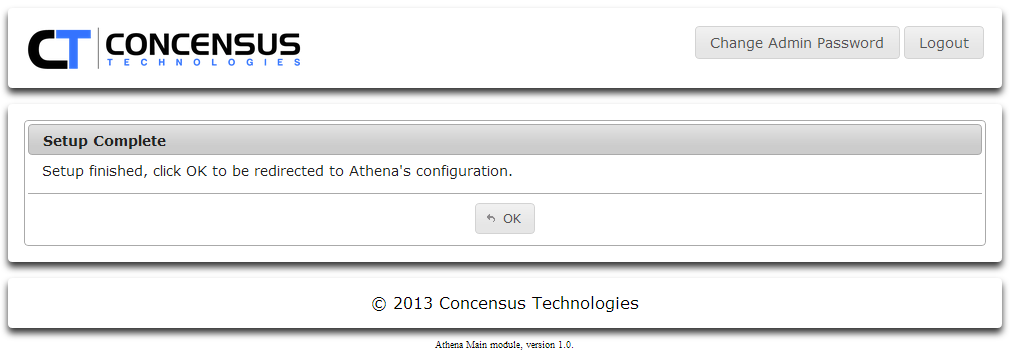
- To access Athena Setup:
- http://<Athena server IP or DNS>/main/setup
- Login name: admin
- Default password: admin
Initial Configuration
Connection Settings
- Select Directory Vendor:
- AD for Microsoft Active Directory
- eDir for Novell eDirectory
- Other will default to eDir specific behavior
- Specify the Scheme for the LDAP connection
- LDAP - Unsecured LDAP access. The Default port for this is 389.
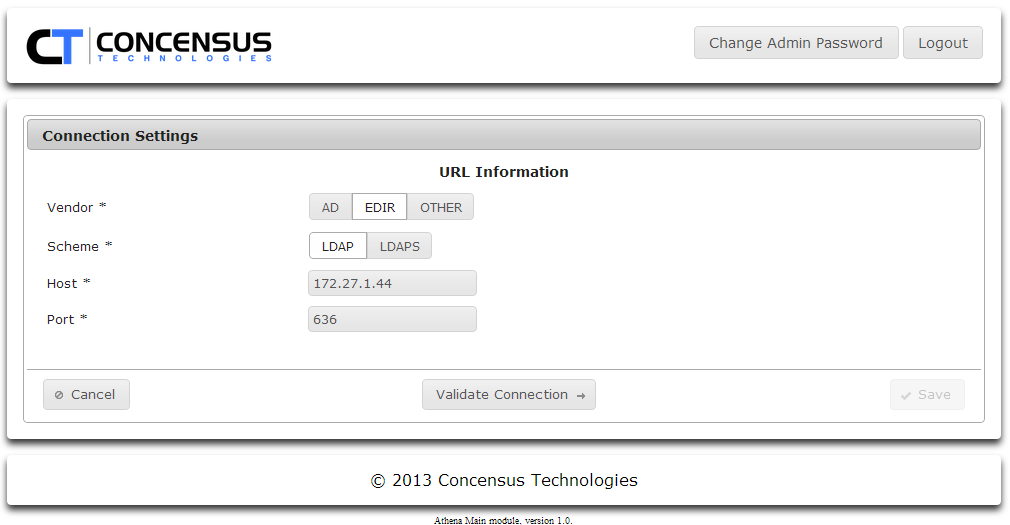
- LDAPS - Secured LDAP access. The Default port for this is 636.
- If you select LDAPS, Athena will display the certificate info is has stored. You may either click Get Server Certificate to retrieve the certificate from the server specified by Host and Port or you can click Choose to upload a certificate.
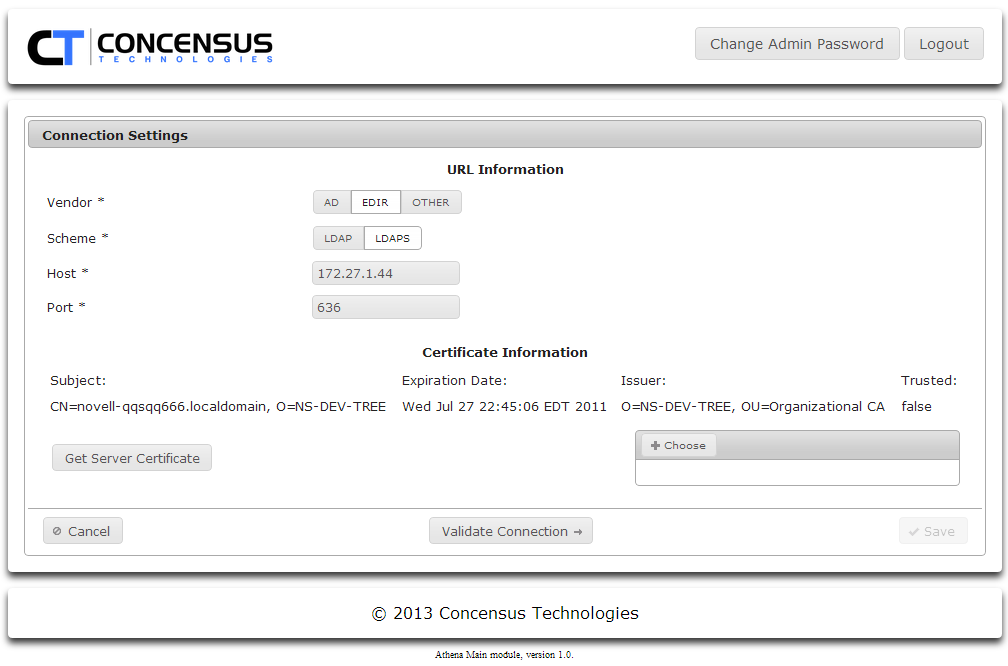
- If you select LDAPS, Athena will display the certificate info is has stored. You may either click Get Server Certificate to retrieve the certificate from the server specified by Host and Port or you can click Choose to upload a certificate.
- LDAP - Unsecured LDAP access. The Default port for this is 389.
- Host
This is the Host IP Address or Server Name of the target LDAP server. - Port
This is the port Athena will use to access the LDAP server. Consult your LDAP administrator to determine which port the LDAP server uses. - Once you have set the fields, click Validate Connection.
Set the Service Account Settings
- Enter the username for the Principal account you want to use
- If you have set your directory type to eDir, this is a DN.
If you have selected AD it can be either a DN or a User Principal Name
NOTE
The Service Account specified by Principal MUST have administrative rights to the directory.
- Enter the credentials (password) for the Principal user
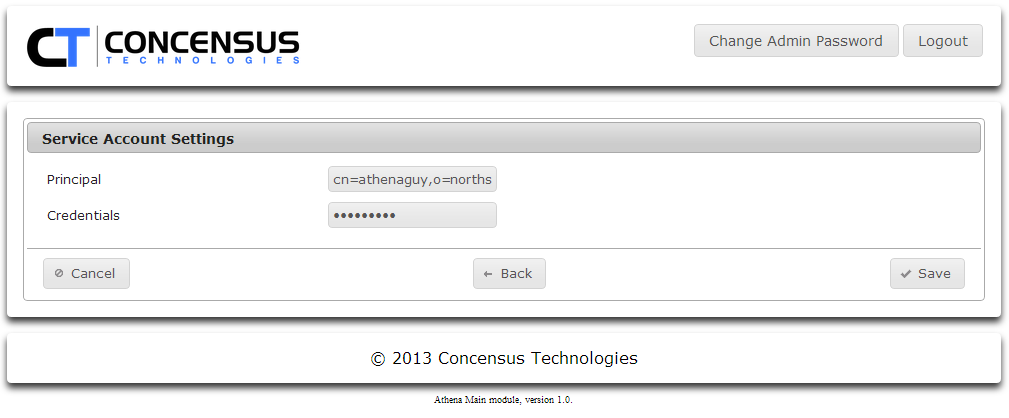
- Click Save
- Enter the username for the Principal account you want to use
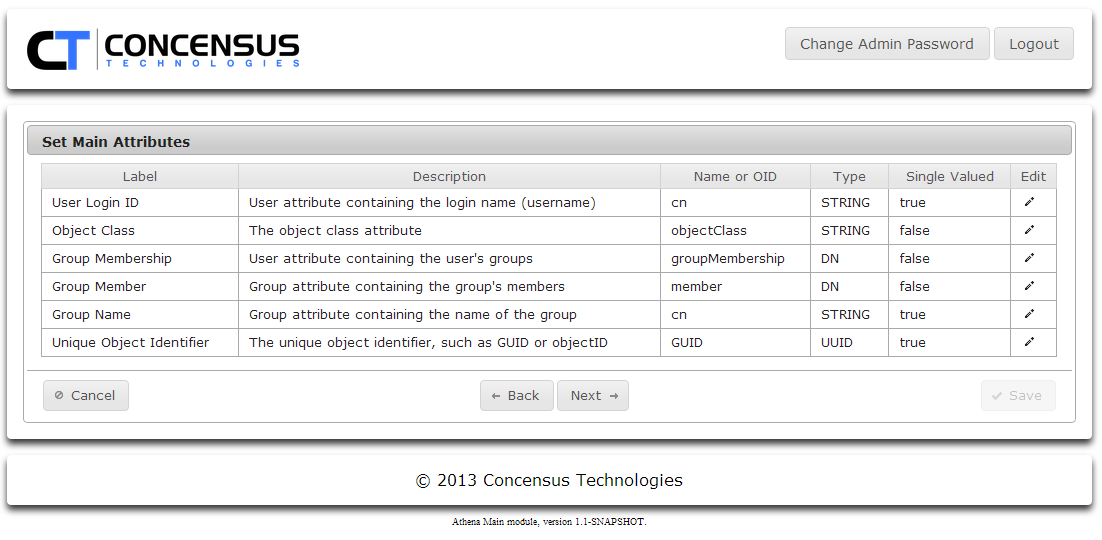
Review Main Attributes. You may change the default mappings for any of the default Main attributes.
NOTE
The attribute you map to User Login ID must contain a unique name. If the values of cn in your directory tree are only unique on a per-container basis, and your search contexts search multiple containers it is possible that Athena will encounter multiple search results when trying to resolve the specified user name during the login process. Ambiguous naming on login will cause Athena to throw an error that it can't resolve the user. Please ensure the naming values in the attribute you map to User Login ID are unique.
- To edit an attribute see Managing Required Attributes to learn how to manage the required attributes.
- Click Next .
- Specify the search contexts for Users.

- Click on the arrow next to the folder icon to expand the directory tree view.
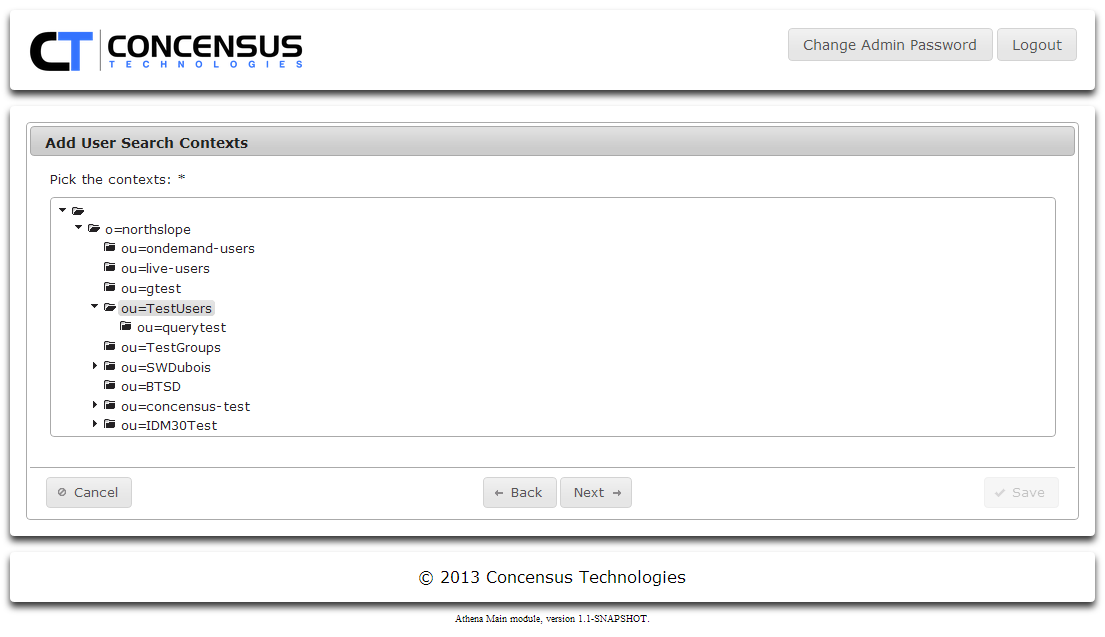
- Browse the tree and Ctrl-click on each folder to be included in the search contexts.
- Click Next
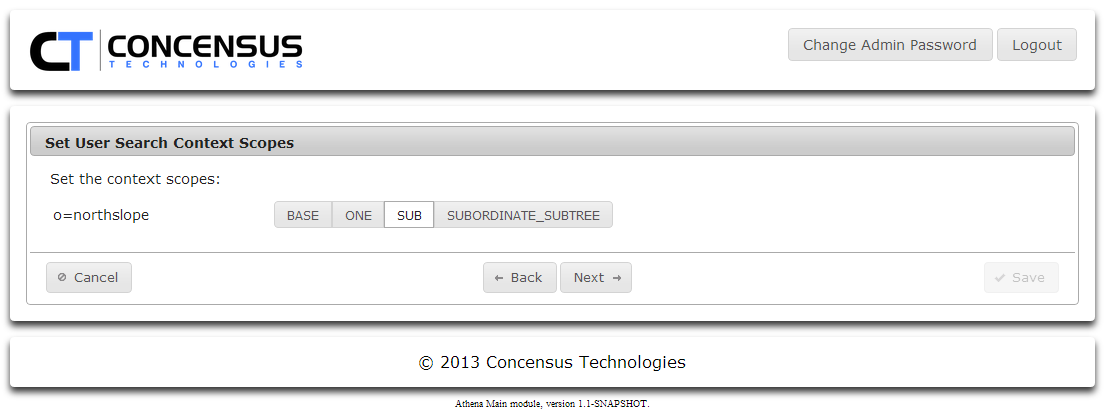
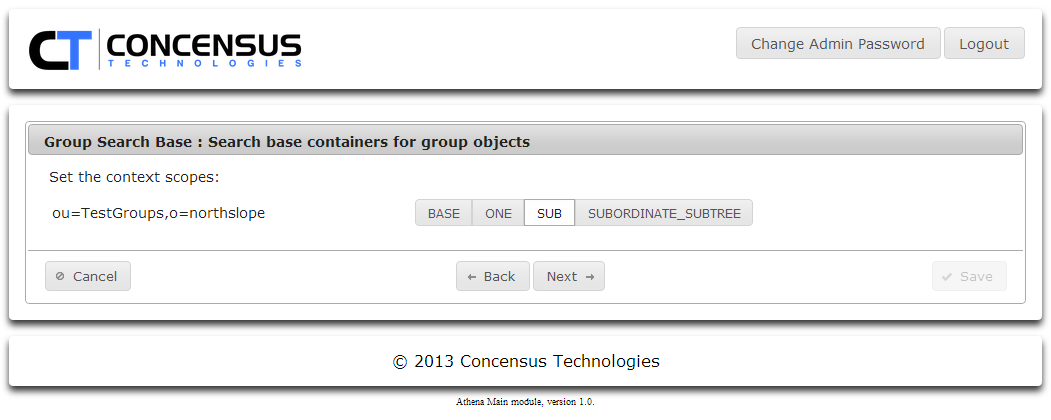
- Select a search scope for the context.
- Click Next
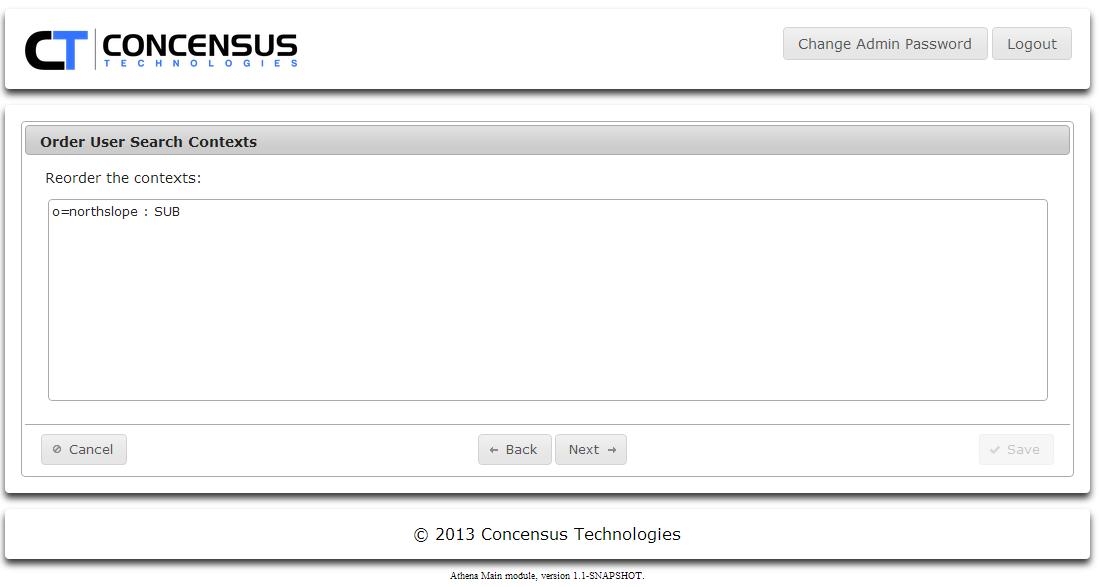
- If you have defined multiple search contexts, you may change the order in which they are searched.
- Add Group Search contexts, set the scope and search order.
- Click Next
- Click OK
Athena General Configuration
This option is used to configure security roles and attributes which apply across the Athena Framework and modules
To access Athena Configuration:
- From your web browser type: http://<Athena server IP or DNS>/main/configuration
- Login name: admin
Default password: admin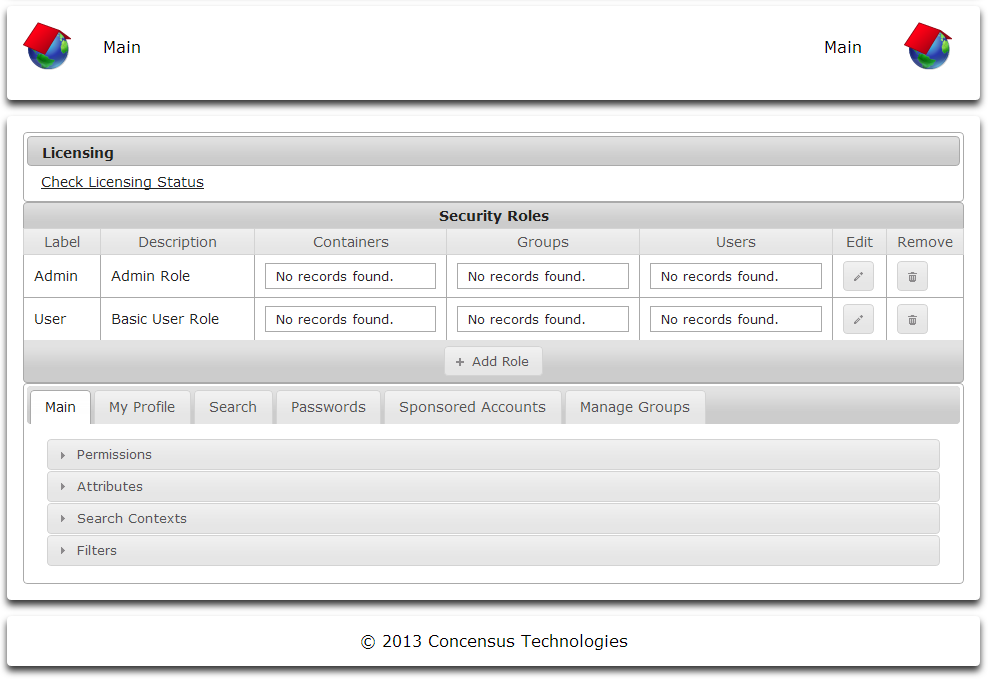
Licensing Athena
- Click Check Licensing Status
- If you have not uploaded a license, or if your license is not valid Athena will display the following screen.
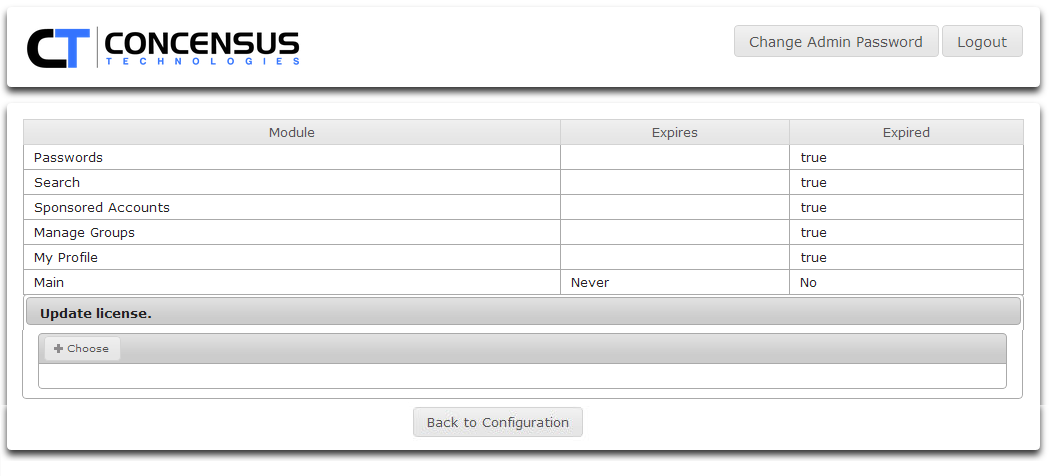
If the license if valid Athena will display a screen similar to the one below.
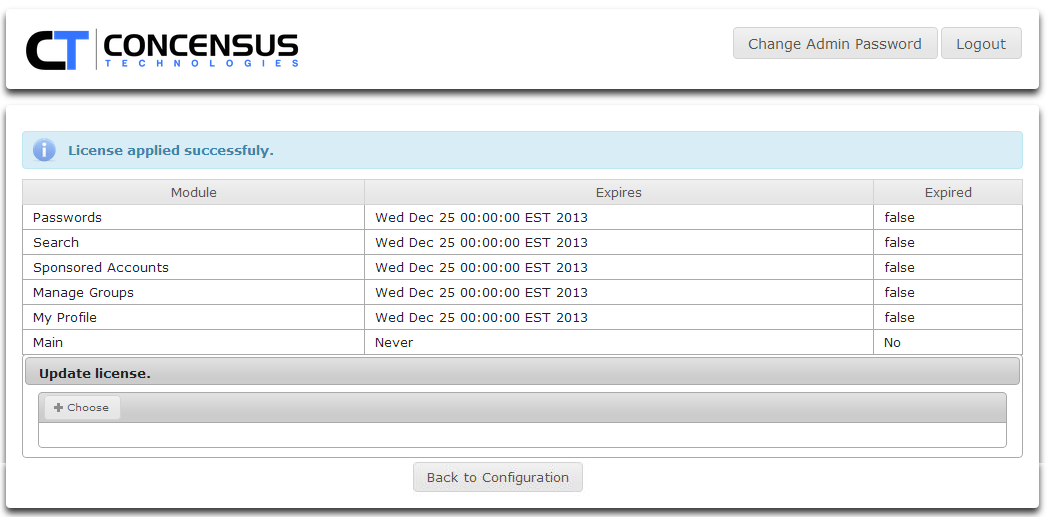
- Click OK to return to Athena Configuration
- If you have not uploaded a license, or if your license is not valid Athena will display the following screen.
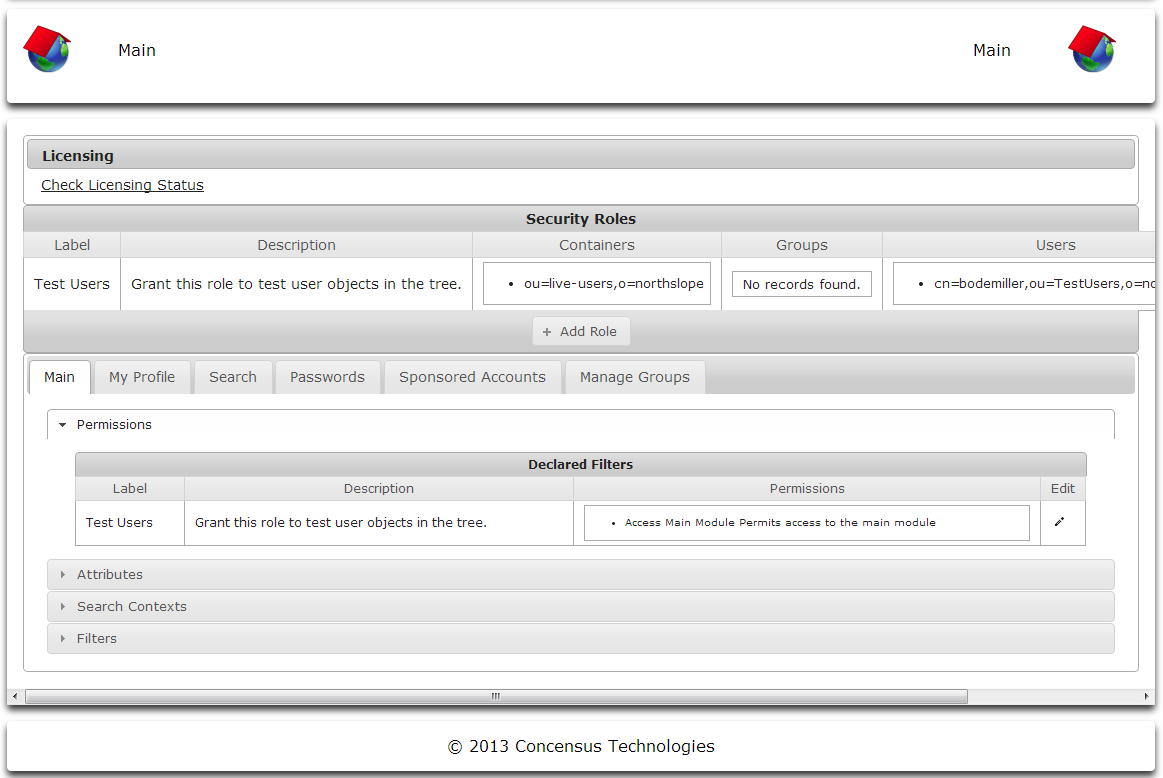
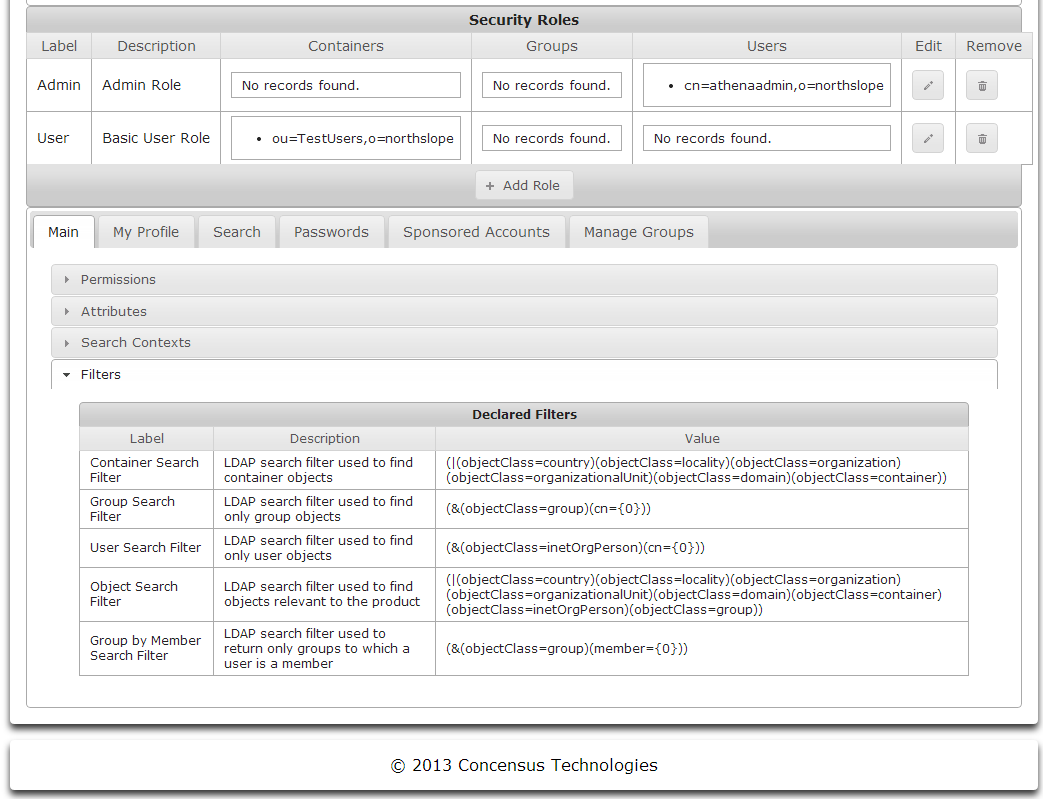
Security Roles
About Roles
Athena Security Roles are required for creating roles, assigning users to a role and user access. All users accessing Athena must belong to a role. No security roles exist after the initial deployment of Athena and the roles must be created and populated using the admin user created during the deployment phase. Additional roles will be needed to add users and control directory access.
The Security Roles section of the screen serves two functional purposes. First, you may define security roles by clicking the Add Roles button. A role consists of a Name, a Description, and a set of users to which the role applies. You may specify a set of directory contexts, groups and even specific users to which a role applies. The set of users will be populated by the union of all users found within the directory contexts, groups and specific user objects selected. Once roles have been defined, you can associate them with each of the modules configured for Athena and apply permissions based on the roles. This is the second function of the Security Roles section of the screen.
Managing Default Roles
Athena is pre-configured with two default Security Roles.
- Admin Role
- Basic User Role
These Security Roles have default permissions for each of the modules associated with them. Once a set of users, groups and directory containers have been assigned to these Security Roles, Athena is ready for use. See Managing Roles to learn how to assign users, groups or directory containers to each of these roles.
Creating Roles
To create a new role:
- Using a web browser use the url: http://<Athena server IP or DNS>/main/configuration
Login using the admin account created in the deployment section
- Now you can add roles.
- Click Add Role
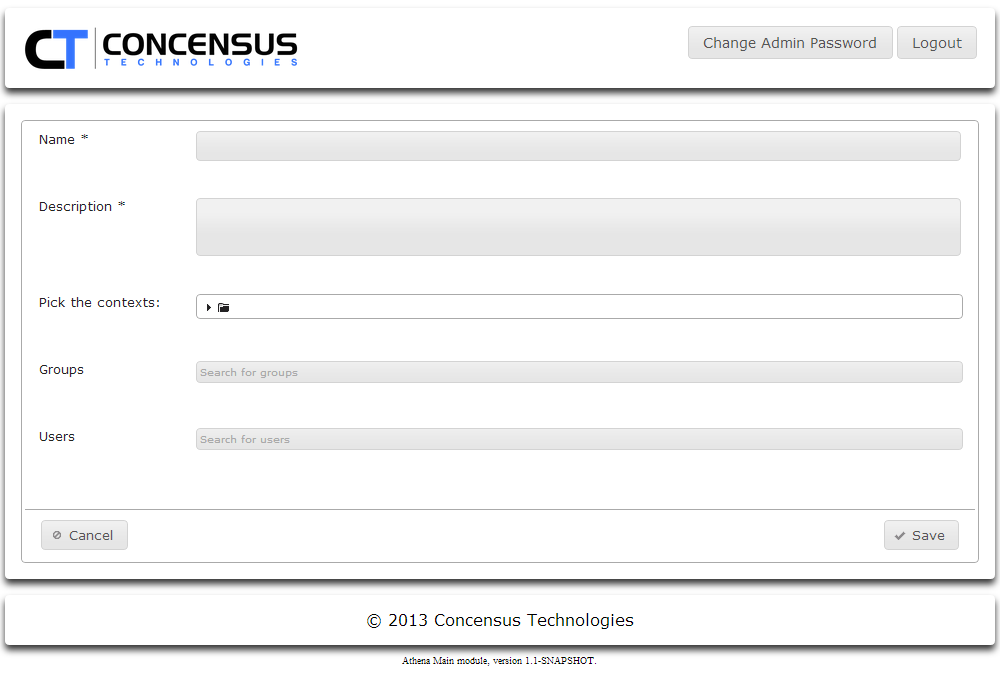
- Enter the Role Name
- Enter the Role Description
- Assign users to the Role. Users can be assigned using any combination of the following:
- Using the Pick the contexts tree control, browse to and select any number of directory contexts. Control-click each context you wish to select.
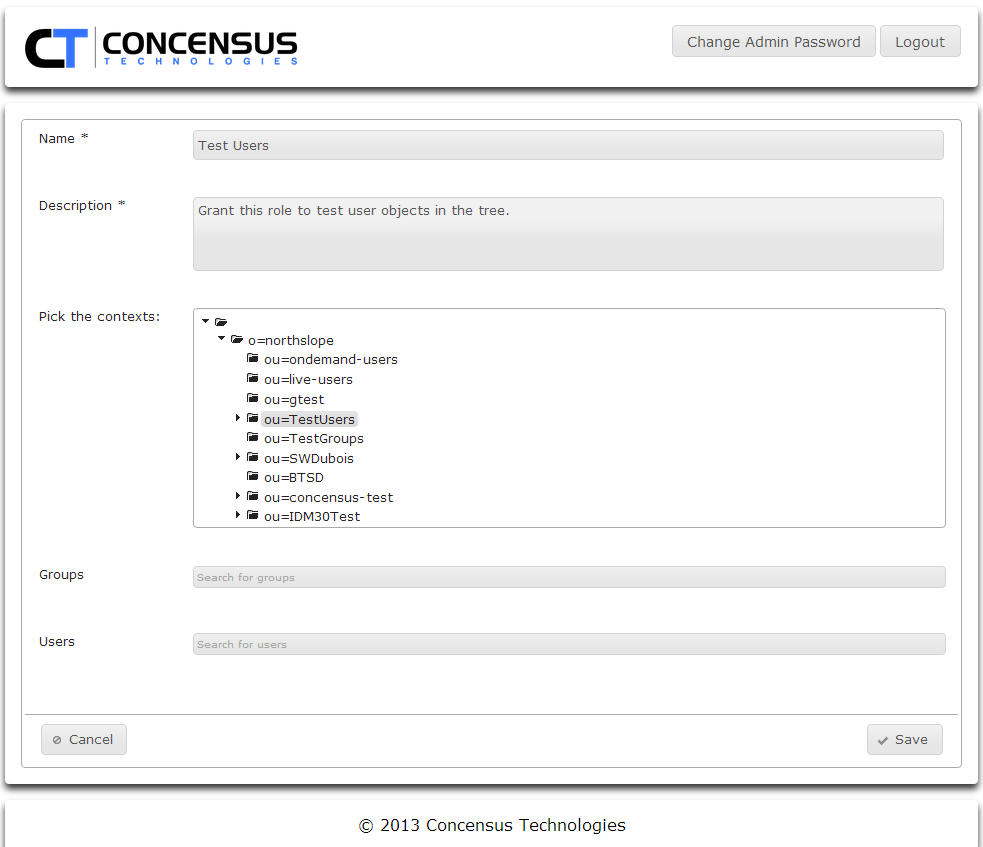
- Search for groups to include
- Search for users to include
- As you enter a user or group to search for, Athena will search the search contexts defined in Module Configurations | Main | Search Contexts section of this document. When a match is found Athena will display the information for the user.

- Click on the displayed object information to add it to the list of users or groups to which the new role will apply.
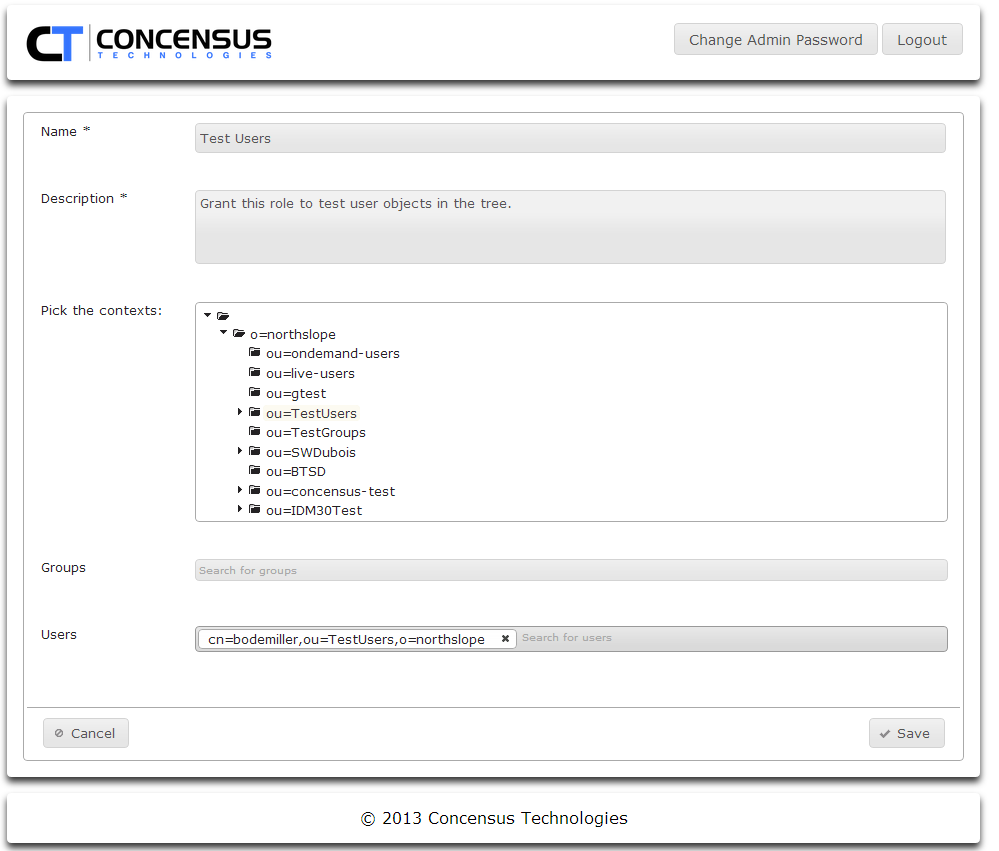
- When you have finished configuring contexts, groups and users for the role, click Save
- As you enter a user or group to search for, Athena will search the search contexts defined in Module Configurations | Main | Search Contexts section of this document. When a match is found Athena will display the information for the user.
- Using the Pick the contexts tree control, browse to and select any number of directory contexts. Control-click each context you wish to select.
- Click Add Role
Managing Roles
To modify the set of users to which a roles applies
- Using a web browser use the url: http://<Athena server IP or DNS>/main/configuration
- Login using a user that has Athena Admin rights
- In the Security Roles section
- Select a Role
- Click the Edit pencil in the Edit column
- Edit this list of directory contexts by adding or removing contexts as desired.
- Edit the list of groups as desired.
- Delete groups by clicking the X next to the group DN.
- Add groups by typing the name of a desired group found in the defined search contexts.
- Edit the list of users as desired
- Delete users by clicking the X next to the user's DN
- Add users by typing the name of the desired user found in the defined search contexts.
Configuring Modules for the Athena Framework
About Module Configuration
The Athena framework provides a scheme to enable modules to manage the sets of Permissions, Attributes, Search Contexts and Filters they use. Modules can inherit from the sets defined for the Main module, or can require specific sets to be configured.
Managing Permissions
Permissions are assigned to a defined role and will be enforced for all members of that role. This allows for each role to have different Search permissions for ease of administration. Permissions control access to specific modules, groups, users and their attributes within Athena.
Each module requires some base permissions
- Administrative roles require Access and Configure
- User roles at minimum require Access
The Access permission is named slightly differently from module to module. For instance, for the My Profile module, the Access permission is named Access user profile module.
To manage permissions for a module
- Select the tab for the desired module.
- Click on the arrow to the left of the Permissions section to expand the module's permissions.
- Click the Edit pencil icon on the right of the security role for which you wish to edit the permissions list.
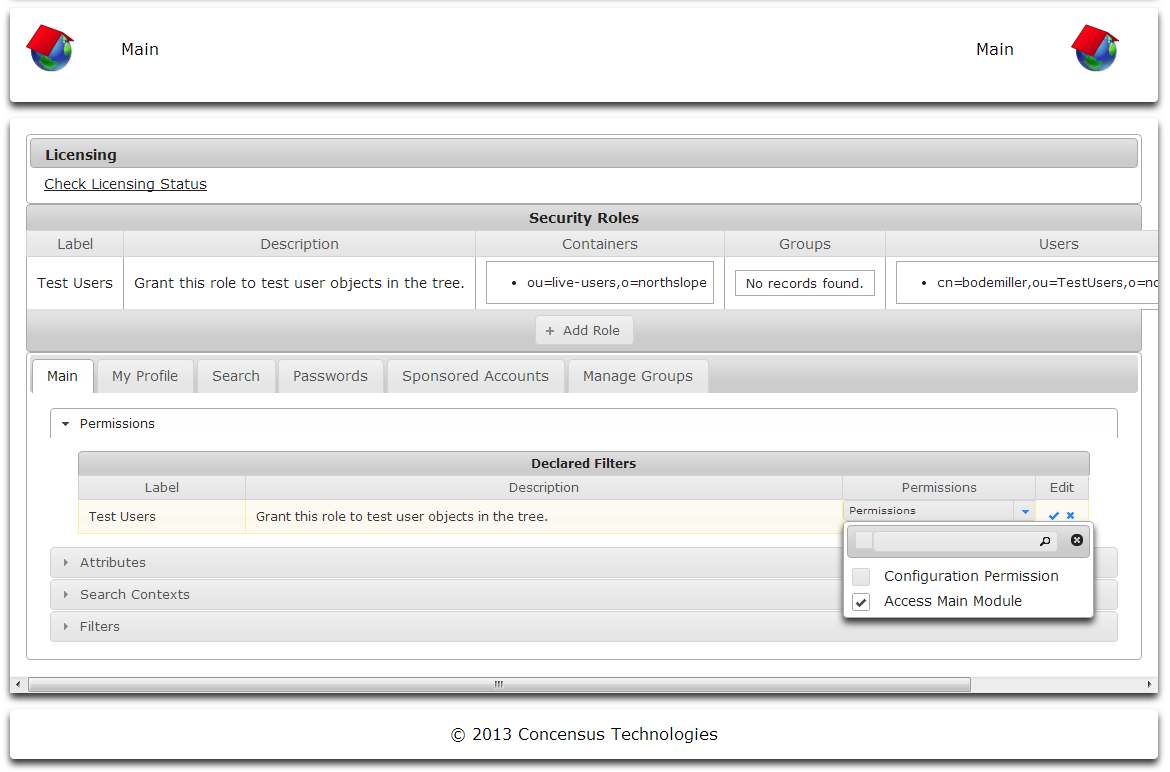
- Select the permissions to enable for the selected Security Role. In some instances, the list of permissions can be very long. You can narrow the set of permissions displayed by typing search terms next to the magnifying glass icon. As you type the list of permissions will be narrowed.
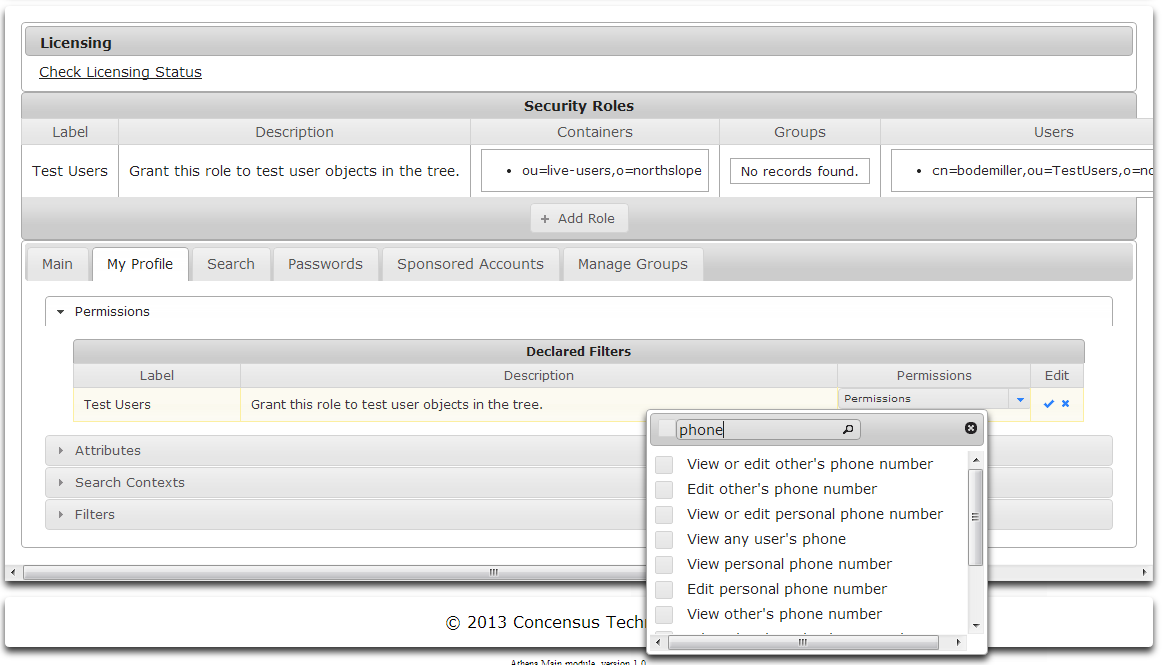
- When you are finished specifying permissions for the selected security role:
- Click the checkmark icon to save your changes
or - Click the X to cancel your changes.
- Click the checkmark icon to save your changes
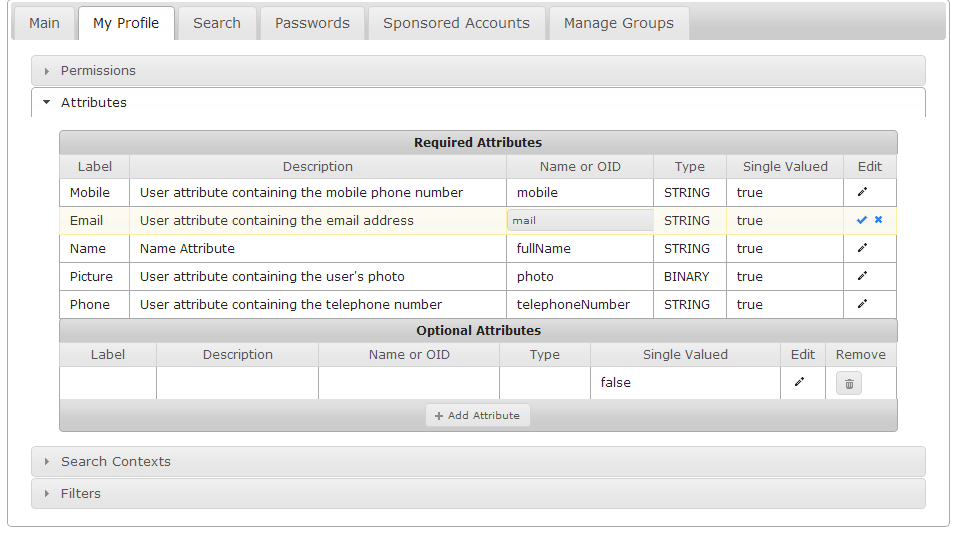
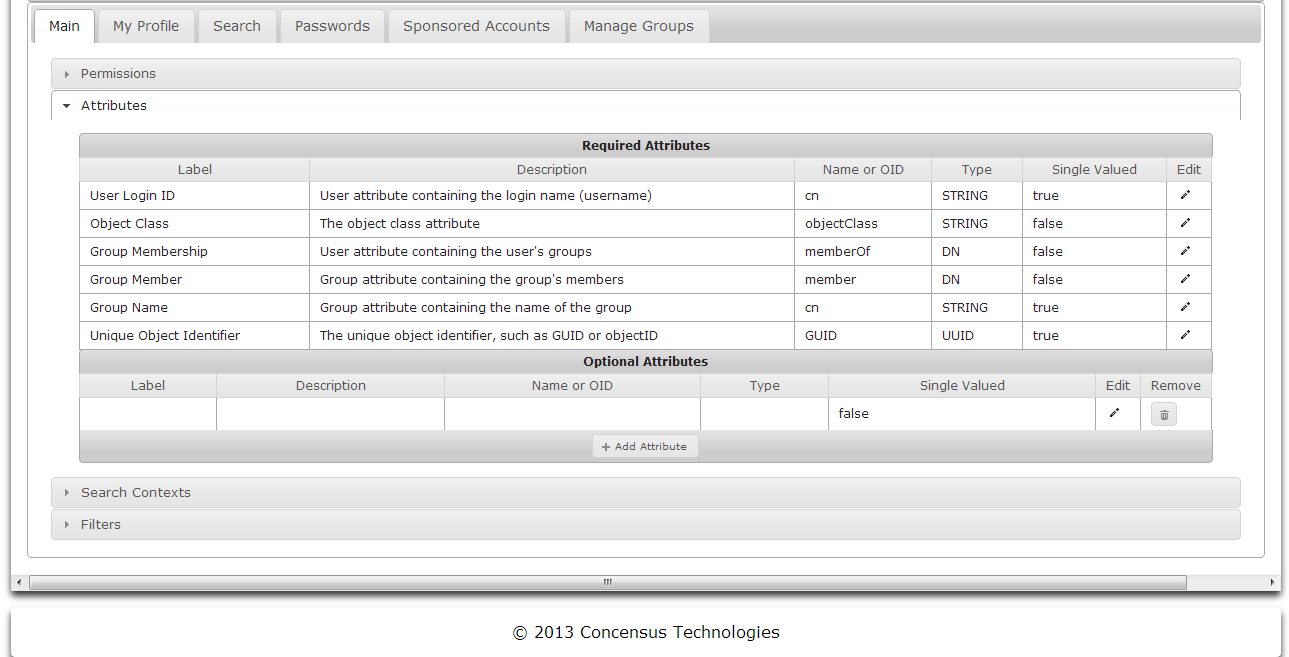
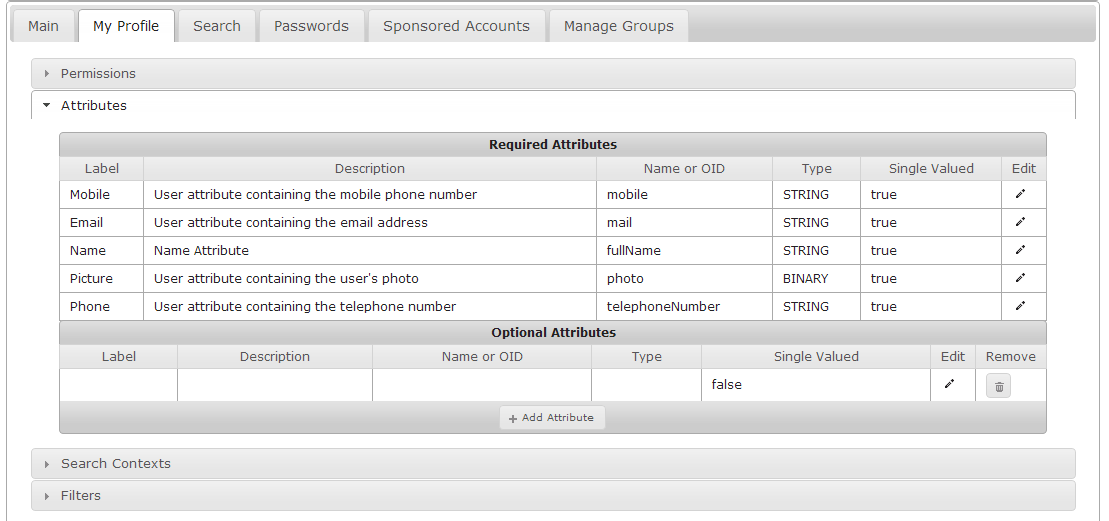
Managing Attributes
Modules can view and interact with a set of attributes for users and groups. The set of attributes can be managed using the Attributes section. The Required Attributes section lists attributes which a module requires. Note that the attribute names shown in Required Attributes are namespace specific to the target directory. It is possible to edit the attributes's Name or OID value to map it to a different attribute in the target directory if necessary.
Additional attributes can be added for each module.
Viewing Attributes
- With the desired module tab selected, expand the Attributes section
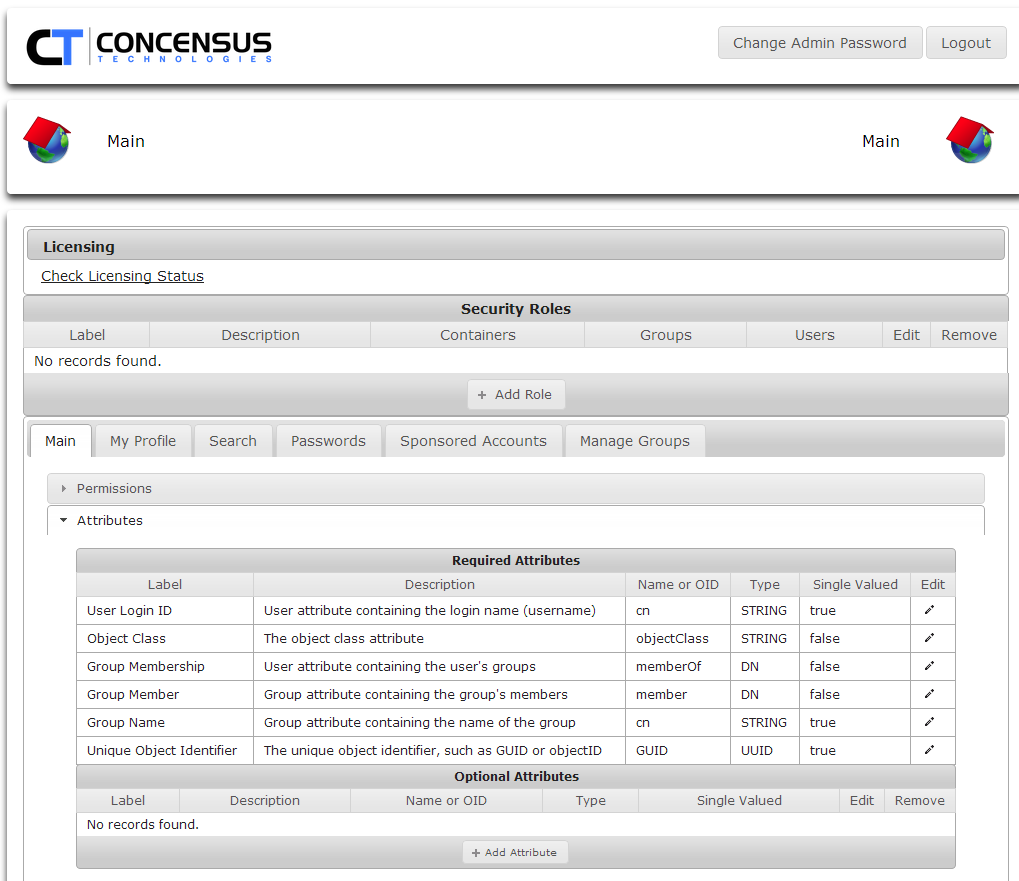
Managing Required Attributes
- To edit the Name or OID value for an attribute in Required Attributes click on the Edit pencil icon to the right of the desired attribute
- Edit the Name or OID field.
- Click the checkmark to save your changes
or - click the X to cancel your change.
Adding Optional Attributes
- To add an optional attribute, click on Add Attribute. A new empty row appears in the Optional Attributes section.
Editing Optional Attributes
- Click on the Edit pencil icon to the right side of the attribute to edit.
- The attribute being edited will be shown in a grey background.
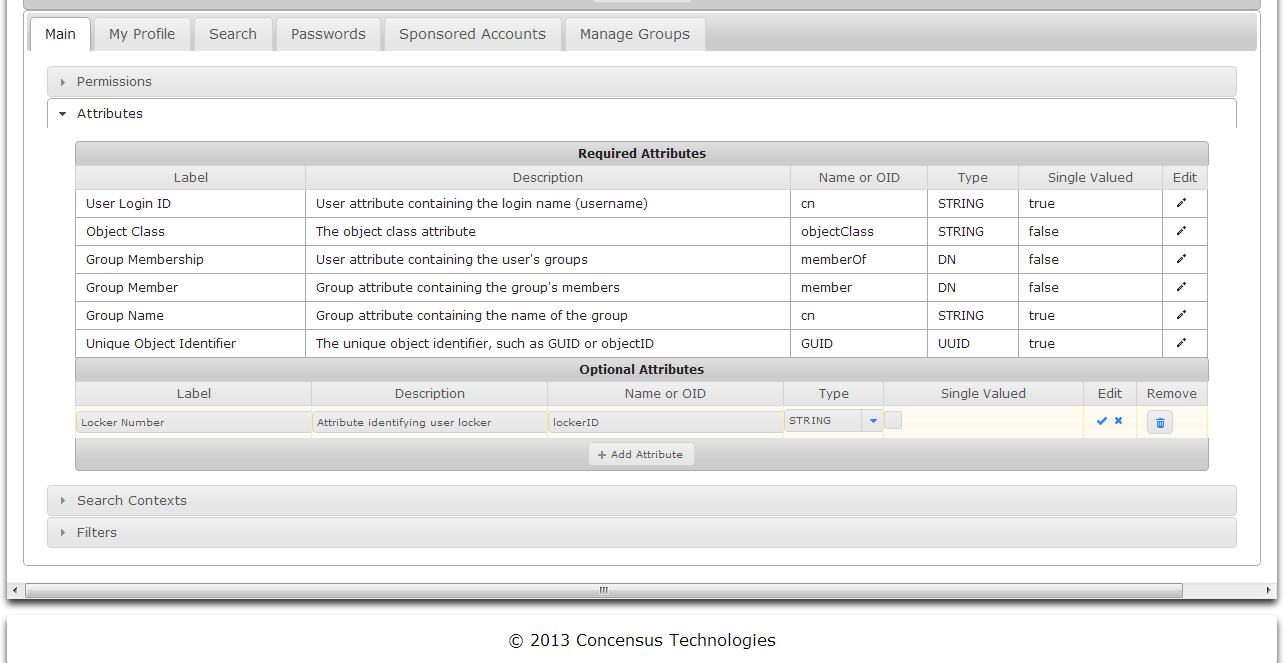
- Edit the fields
- Label
- Description
- Name or OID
- Type
- Click the checkmark to save your changes
or - Click the X to cancel your changes.
Deleting Optional Attributes
- Click on the Remove trash can icon to the right side of the attribute to delete.
Managing Search Contexts
Search contexts are defined in the Main module for user and group objects and will be used by the other modules. Setting the search context defines where in the directory objects searches will begin.
- Expand the Search Contexts section
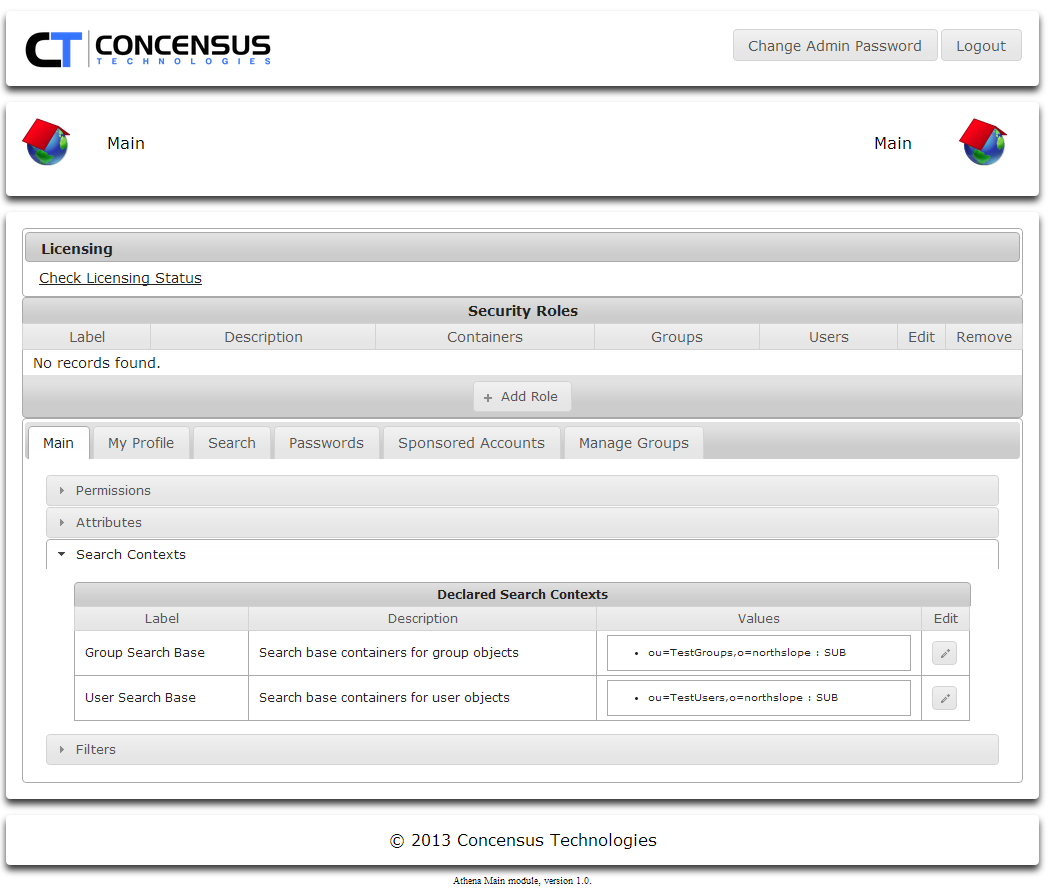
- Click the Edit pencil button to edit the Group Search Base
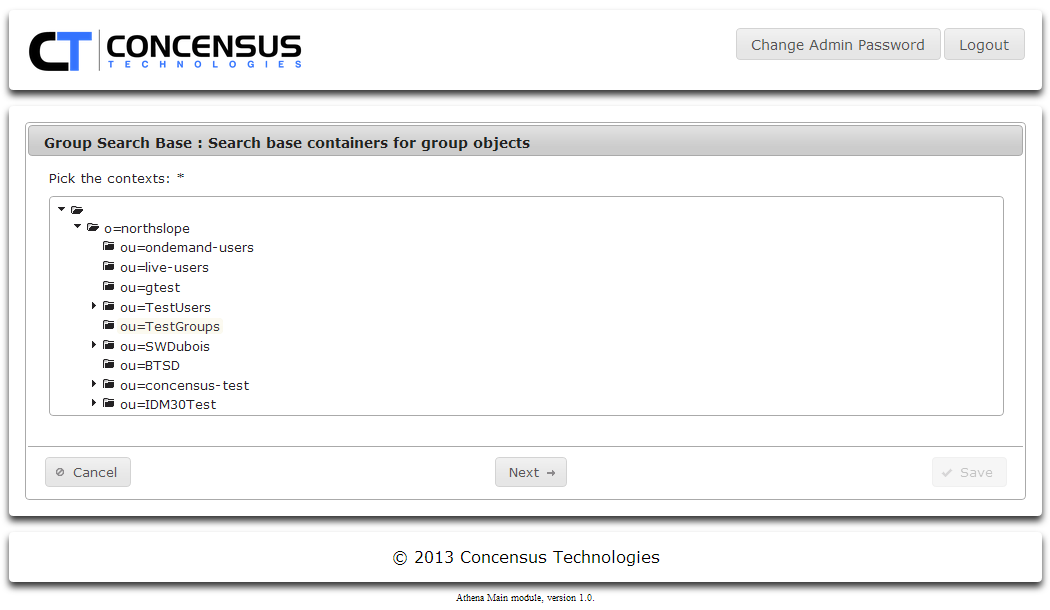
- Select the directory context you wish to use for Groups and click Next
- Select a scope for the context. Click Next
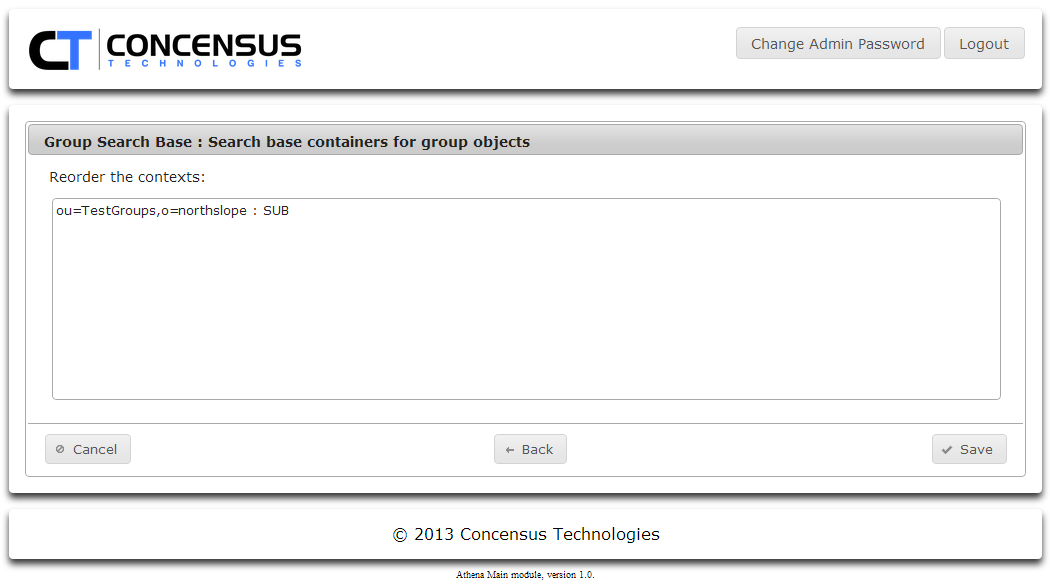
- You can specify multiple search contexts. If necessary, reorder the contexts. Click Save
- Repeat steps 1 through 5 as many times as necessary to set the desired groups search contexts.
- Click on the Edit pencil for Users and then repeat steps 2 through 5 as many times as necessary to set the desired user search contexts.
Managing Filters
Athena uses LDAP to access the target directory. Filters are used to make LDAP queries more specific, thus limiting the amount of data returned for a query based on a Search request. The use of filters improve performance and scalability. Filters are defined in LDAP syntax. To learn more about LDAP filters see http://tools.ietf.org/html/rfc4515.
To manage filters
- Click the arrow to the left of Filters to expand the list of defined filters
- Click the text in the cell in the Value column that you wish to edit.
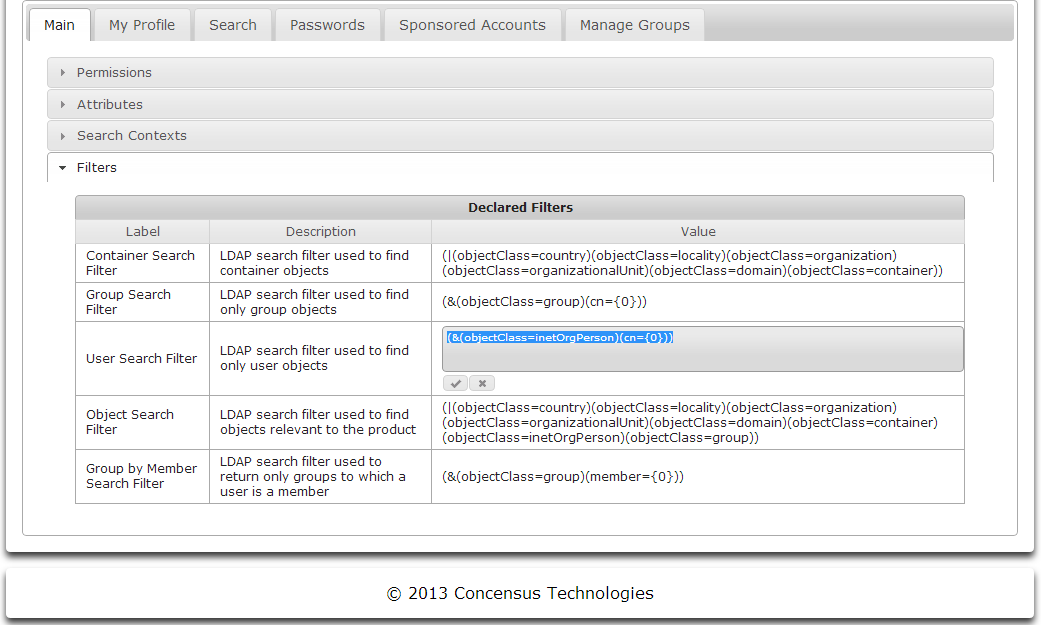
- An In-place editor will open, allowing you to edit the filter text
- Add the LDAP filter
- For example for User class:
- (&(objectClass=organizationalPerson)(|(userPrincipalName={0}*)(displayName={0}*)(mail={0}*)))
- For Group class:
- (&(objectClass=group)(|(name={0}*)(cn={0}*)))
- Click the check mark to save the filter, or the X on the far right to cancel the changes.
Module Specific Configuration
Main
Permissions
To Manage the permissions for the Main module, see Managing Permissions
| Permission | Description |
|---|---|
| Configuration Permission | When checked, this permission allows users with the associated role to configure the module. |
| Access Main Module | When checked, this permission allows users with the associated role to use the module. |
The Main module requires some base permissions
- Administrative roles require Access Main Module and Configure Permission
- User roles at minimum require Access Main Module
Attributes
The Main module comes pre-configured with a set of attributes needed for the module to operate. You may wish to map one of those attributes to a different schema element. See Managing Attributes for an explaination of how to edit required attributes.
No other attributes are needed by Main. Adding attributes will have no affect on the functionality or user experience of the module.
Search Contexts
Search contexts are defined in the Main module for user and group objects and will be used by the other modules. Setting the search context defines where in the directory objects searches will begin. See Managing Search Contexts to learn how to manage Search Contexts.
Filters
The Main module uses five defined filters.
- Container Search Filter
- Group Search Filter
- User Search Filter
- Object Search Filter
- Group by Member Search Filter
These filters tell the LDAP server how to search for these specific objects types. See Managing Filters to learn how to manage these filters.
My Profile
About My Profile
The My Profile module allows a user to view their attribute values for their object or other users' objects in the target directory.
Configuring My Profile
Permissions
See Managing Permissions to learn how to configure the permissions for My Profile.
| Permission | Permission |
|---|---|
| Access user profile module | Allows user to access the My Profile module |
| Configuration Permission | Allows user to configure the My Profile module |
| Edit all profile attributes on subordinate | Allows user to edit all the attributes of a subordinate user |
| Edit any personal profile attribute | Allows user to edit any of their personal profile attributes |
| Edit any profile attribute on any user | Allows user to edit any profile attribute on any user |
| Edit any profile attribute on others | Allows user to edit any profile attribute on other users |
| Edit any subordinate's phone number | Allows user to edit any subordinate's phone number |
| Edit any user's email | Allows user to edit any user's email address |
| Edit any user's mobile | Allows user to edit any user's mobile number |
| Edit any user's name | Allows user to edit any user's name |
| Edit any user's optional attributes | Allows user to edit any user's optional attributes |
| Edit any user's phone | Allows user to edit any user's phone number |
| Edit any users's photo | Allows user to edit any users photo |
| Edit other's email address | Allows user to edit other's email address |
| Edit other's mobile number | Allows user to edit other's mobile number |
| Edit other's name | Allows user to edit other's name |
| Edit other's optional attributes | Allows user to edit other's optional attributes |
| Edit other's phone number | Allows user to edit other's phone number |
| Edit other's photo | Allows user to edit other's photo |
| Edit personal email | Allows user to edit personal email address |
| Edit personal name | Allows user to edit personal name |
| Edit personal optional attributes | Allows user to edit personal optional attributes |
| Edit personal phone number | Allows user to edit personal phone number |
| Edit personal photo | Allows user to edit personal phtoto |
| Edit subordinate's mobile number | Allows user to edit subordinate's mobile number |
| Edit subordinate's name | Allows user to edit subordinate's name |
| Edit subordinate's optional attributes | Allows user to edit subordinate's optional attributes |
| Edit subordinate's photo | Allows user to edit subordinate's photo |
| No limits | Allows user to view and edit their own attributes as well as those for subordinates and others |
| View all profile attributes on subordinate | Allows user to view all profile attributes on subordinate |
| View any personal profile attribute | Allows user to view any personal profile attribute |
| View any profile attribute on any user | Allows user to view any profile attribute on any user |
| View any profile attribute on others | Allows user to view any profile attribute on others |
| View any user's email | Allows user to view any user's email address |
| View any user's mobile | Allows user to view any user's mobile number |
| View any user's name | Allows user to view any user's name |
| View any user's optional attributes | Allows user to view any user's optional attributes |
| View any user's phone | Allows user to view any user's phone number |
| View any user's photo | Allows user to view any user's photo |
| View or edit all profile attributes on others | Allows user to view or edit all profile attributes on others |
| View or edit all profile attributes on subordinate | Allows user to view or edit all profile attributes on subordinates |
| View or edit any personal profile attribute | Allows user to view or edit any personal profile attributes |
| View or edit other's email address | Allows user to view or edit other's email address |
| View or edit other's mobile number | Allows user to view or edit other's mobile phone number |
View or edit other's name | Allows user to view or edit other's name |
View or edit other's optional attributes | Allows user to view or edit other's optional attributes |
View or edit other's phone number | Allows user to view or edit other's phone number |
View or edit other's photo | Allows user to view or edit other's photo |
View or edit personal email | Allows user to view or edit personal email |
View or edit personal mobile phone number | Allows user to view or edit personal mobile phone number |
View or edit personal name | Allows user to view or edit personal name |
View or edit personal phone number | Allows user to view or edit phone number |
View or edit personal photo | Allows user to view or edit personal photo |
View or edit subordinate's email address | Allows user to view or edit subordinate's email address |
View or edit Subordinate's mobile number | Allows user to view or edit subordinate's mobile number |
View or edit subordinate's name | Allows user to view or edit subordinate's name |
View or edit subordinate's optional attributes | Allows user to view or edit subordinate's optional attributes |
View or edit subordinate's phone number | Allows user to view or edit subordinate's phone number |
View or edit subordinate's photo | Allows user to view or edit subordinate's photo |
View other's email address | Allows user to view other's email address |
View other's mobile number | Allows user to view other's mobile number |
View other's name | Allows user to view other's name |
View other's optional attributes | Allows user to view other's optional attributes |
View other's phone number | Allows user to view other's phone number |
View other's photo | Allows user to view other's photo |
View personal email | Allows user to view personal email address |
View personal mobile phone number | Allows user to view personal mobile phone number |
View personal name | Allows user to view personal name |
View personal optional attributes | Allows user to view personal optional attributes |
View personal phone number | Allows user to view personal phone number |
View subordinate's email address | Allows user to view subordinate's email address |
View subordinate's mobile number | Allows user to view subordinate's mobile phone number |
View subordinate's name | Allows user to view subordinate's name |
| View subordinate's optional attributes | Allows user to view subordinate's optional attributes |
| View subordinate's phone number | Allows user to view subordinate's phone number |
| View subordinate's photo | Allows user to view subordinate's photo. |
Attributes
The My Profile module comes pre-configured with a set of attributes needed for the module to operate. You may wish to map one of those attributes to a different schema element. See Managing Attributes for an explaination of how to edit the list of required attributes as well as add optional attributes.
Search Contexts
My Profile inherits the search contexts defined for Main.
Filters
My Profile inherits the filters defined for Main.
Search
About Search
The Search module allows a user to search for a users or groups in the directory. Once the search is completed the user can select individual search results. User objects will be opened in the My Profile module. Groups will be opened in a view from the Manage Groups module.
Configuring Search
Permissions
To Manage the permissions for the Search module, see Managing Permissions
| Permission | Description |
|---|---|
| Configuration Permission | When checked, this permission allows users with the associated role to configure the module. |
| Access Main Module | When checked, this permission allows users with the associated role to use the module. |
The Search module requires some base permissions
- Administrative roles require Access Search Module and Configure Permission
- User roles at minimum require Access Search Module
Because the results returned by the Search module are viewed in the My Profile module, no other permissions are needed for Search.
Attributes
Because the results returned by the Search module are viewed in the My Profile module, no attributes are needed for Search.
Search Contexts
Search contexts are defined in the Main module for user and group class objects. Those search contexts are used by the Search module. See Managing Search Contexts to learn about setting search contexts.
Filters
The Search module uses two defined filters.
- Group Search Filter
- User Search Filter
These filters tell the LDAP server how to search for these specific objects types. See Managing Filters to learn how to manage these filters.
Password Self-Service
About Password Self-Service
The Password Self-Service allows a user to change their own password, as well as subordinate users and other users' passwords based on their permissions. A user can also set and manage password challenge questions.
Configuring Password Self-Service
Permissions
To Manage the permissions for the Password Self Service module, see Managing Permissions
| Permission | Description |
|---|---|
| Access Password Module | Allows users with the associated role to use the module. |
| Configure Password Module | Allows users with the associated role to configure the module. |
| Change any user's password | Allows user to change any user's password |
| Change other user's password | Allows user to change other user's password |
| Change own password | Allows user to change their own password |
| Change subordinate user's password | Allows user to change a subordinate user's password |
The Search module requires some base permissions
- Administrative roles require Access Password Self-service Module and Configure Permission
- User roles at minimum require Access Password Self-service Module
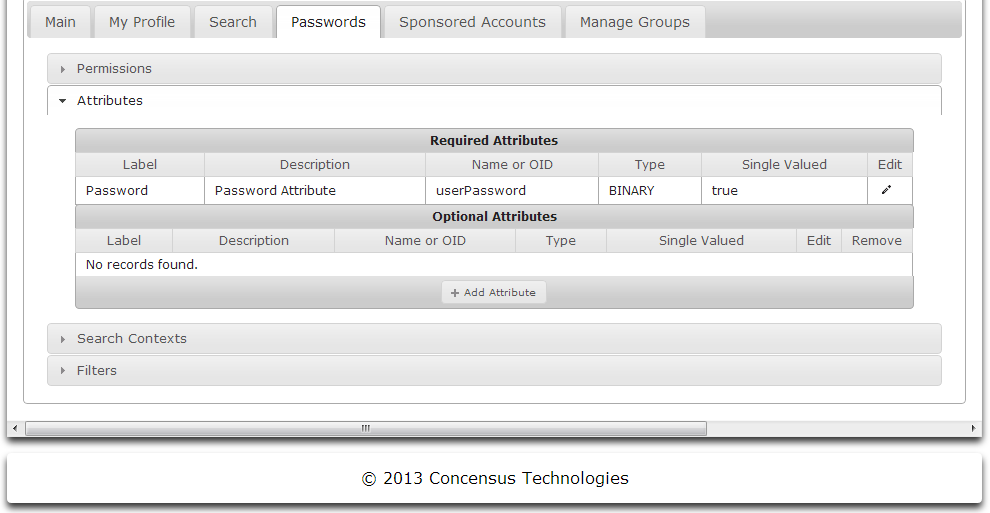
Attributes
The Password Self Service module comes pre-configured with a set of attributes needed for the module to operate. You may wish to map one of those attributes to a different schema element. See Managing Attributes for an explanation of how to edit the list of required attributes as well as add optional attributes.
Search Contexts
My Profile inherits the search contexts defined for Main.
Filters
My Profile inherits the filters defined for Main.
Account Sponsorship
Account Sponsorship moves creating accounts from the directory to a simple browser interface that uses account templates created by the Athena administrator that can be assigned to users.
About Account Sponsorship
Account Sponsorship does the following
- Use templates to create accounts
- Administrator can define create account templates to match account requirements
- Assign users to create account templates that match the required account
- Simplify management of account creation
Configuring Account Sponsorship
Permissions
To Manage the permissions for the Account Sponsorship module, see Managing Permissions
| Permission | Description |
|---|---|
| Configuration Permission | When checked, this permission allows users with the associated role to configure the module. |
| Access Accounts Module | When checked, this permission allows users with the associated role to use the module. |
The Account Sponsorship module requires some base permissions
- Administrative roles require Access Accounts Module and Configure Permission
- User roles at minimum require Access Accounts Module
Because the results returned by the Search module are viewed in the My Profile module, no other permissions are needed for Search.
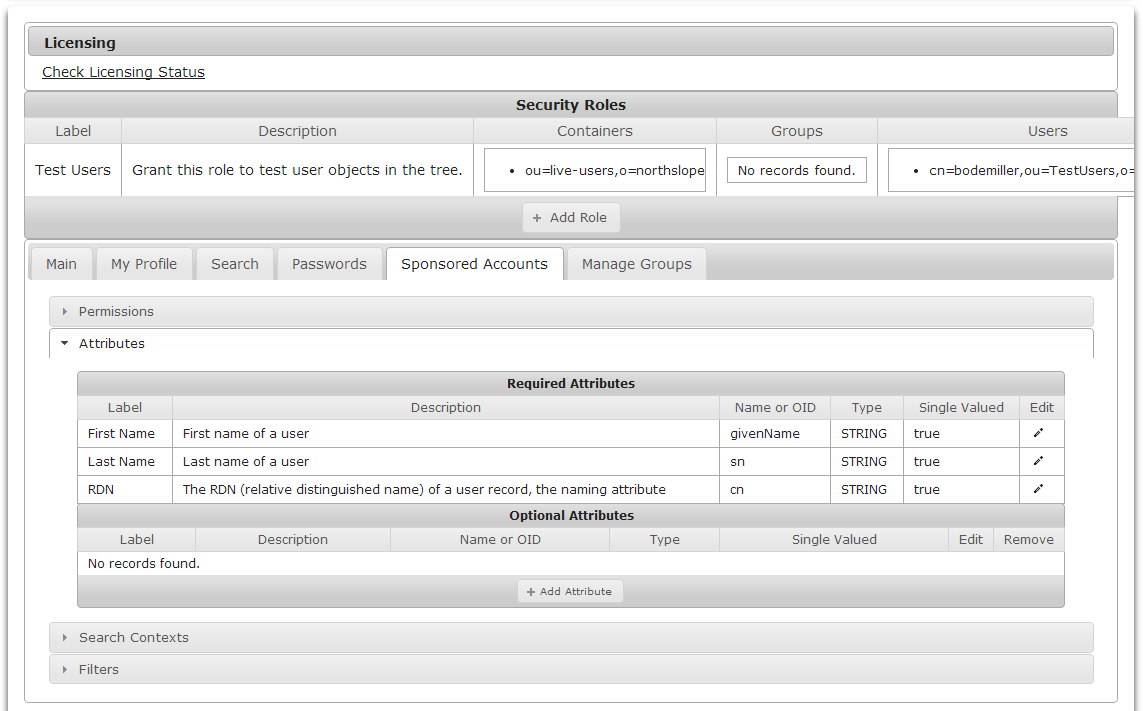
Attributes
The Account Sponsorship module comes pre-configured with a set of attributes needed for the module to operate. You may wish to map one of those attributes to a different schema element. See Managing Attributes for an explaination of how to edit the list of required attributes as well as add optional attributes..
Search Contexts
Search contexts are defined in the Main module for user and group class objects. Those search contexts are used by the Search module. See Managing Search Contexts to learn about setting search contexts.
Filters
The Search module uses two defined filters.
- Group Search Filter
- User Search Filter
These filters tell the LDAP server how to search for these specific objects types. See Managing Filters to learn how to manage these filters.
Manage Groups
Permissions
To Manage the permissions for the Main module, see Managing Permissions
| Permission | Description |
|---|---|
| Access Groups Module | When checked, this permission allows users with the associated role to use the module. |
| Configuration Permission | When checked, this permission allows users with the associated role to configure the module. |
| Allow Group Creation | Allows user to create groups |
| Allow Owners to Add Members | Allows user to add members to groups of which they are owners |
| Allow Owners to Edit Description | Allows user to edit the description of groups of which they are owners |
| Allow Owners to Add/Remove Owners | Allows user to add or remove owners to groups of which they are owners |
| Allow Owners to Remove Members | Allows user to remove members to groups of which they are owners |
| Allow Owners to Rename Groups | Allows user to rename groups of which they are owners |
The Main module requires some base permissions
- Administrative roles require Access Groups Module and Configuration Permission
- User roles at minimum require Access Groups Module
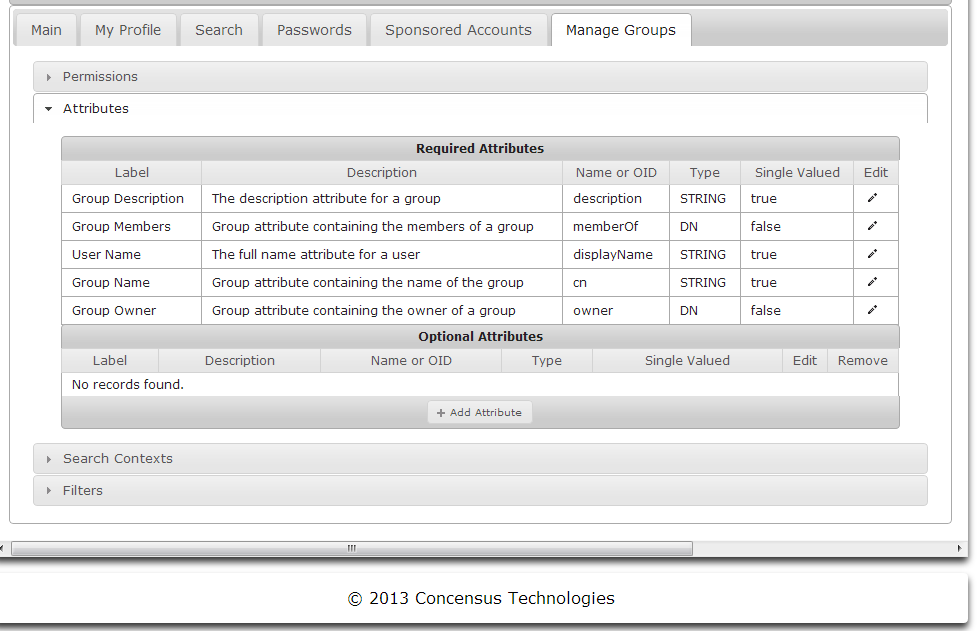
Attributes
The Manage Groups module comes pre-configured with a set of attributes needed for the module to operate. You may wish to map one of those attributes to a different schema element. See Managing Attributes for an explaination of how to edit the list of required attributes as well as add optional attributes.
Search Contexts
Search contexts are defined in the Main module for user and group objects and will be used by the other modules. Setting the search context defines where in the directory objects searches will begin. See Managing Search Contexts to learn how to manage Search Contexts.
Filters
The Main module uses five defined filters.
- Group Owned by User Filter
- Owned Groups with Selected Member Filter
- Group by Member Filter
These filters tell the LDAP server how to search for these specific objects types. See Managing Filters to learn how to manage these filters.
Administering Modules
About Module Administration
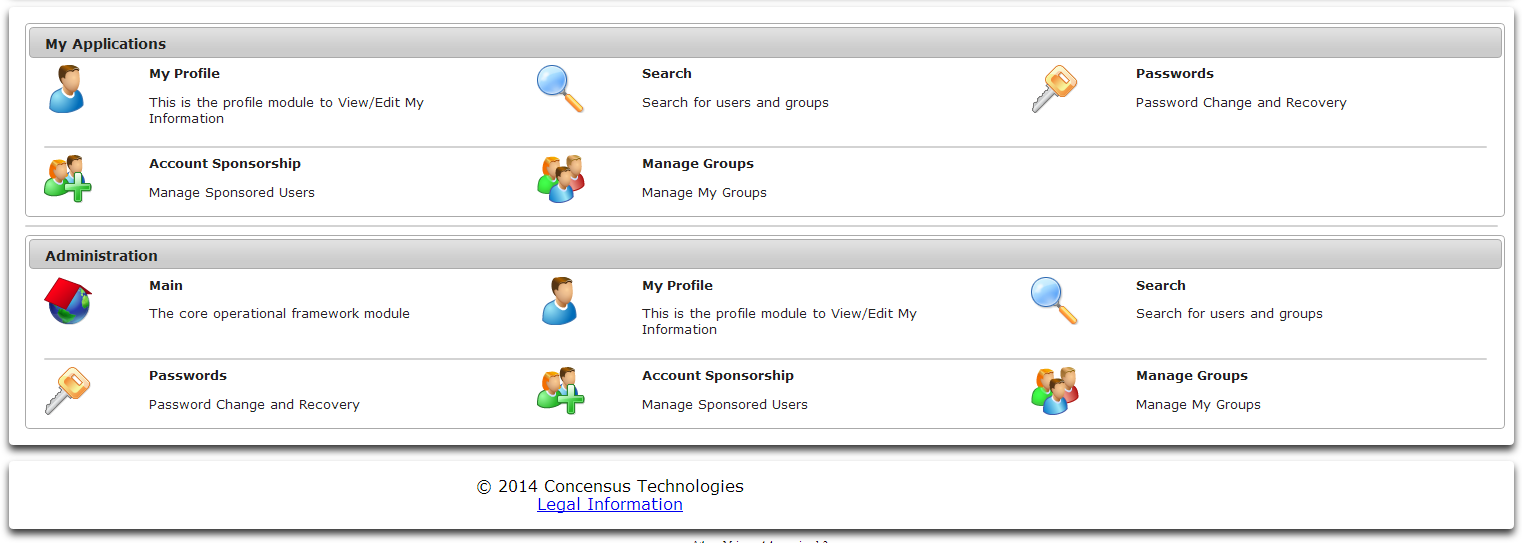
Each module loaded in the Athena framework may need module specific administration. If the currently authenticated user has administrative rights the administrative tools will be displayed in the main view. The user can click on any of the module administration tools to administer the options for that module.
Main
Selecting the Main administration module will invoke the interface described in Main.
My Profile
Use the My Profile module administration tool to select which credentials Athena should use when interacting with a user's profile data, as well as to set options regarding a user's profile picture.
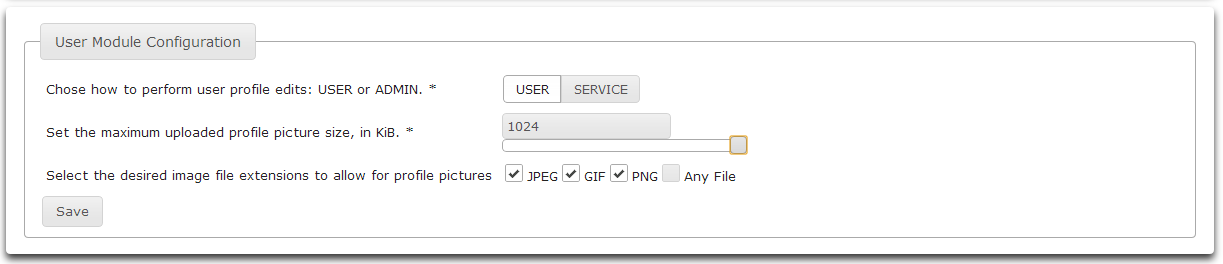
- Select User to perform user edits using the credentials of the currently authenticated user. Select Service to perform user edits as the Athena service account.
- Drag the slider to set the maximum uploaded profile picture size. The maximum picture size is 1024 KBytes.
- Click the checkboxes to enable various file extensions to allow for profile pictures.
- Click Save to save the changes.
- Click Main to return to the main screen.
Search
Use the Search module administration tool to select which credentials Athena should use when performing searches and to determine search size limits.

- Select User to perform edits using the credentials of the currently authenticated user. Select Service to perform user edits as the Athena service account.
- To search without limiting the result set size, leave the Limit the search result set size checkbox unchecked.
- To limit the search result set size, check the Limit the search result set size checkbox.

- Once the Limit the search result set size checkbox is checked, a control to set the limit size will be displayed.
- Click Save to save your changes.
- Click Main to return to the main screen.
Passwords
Use the Passwords module administration tool to configure the password policy for password complexity.
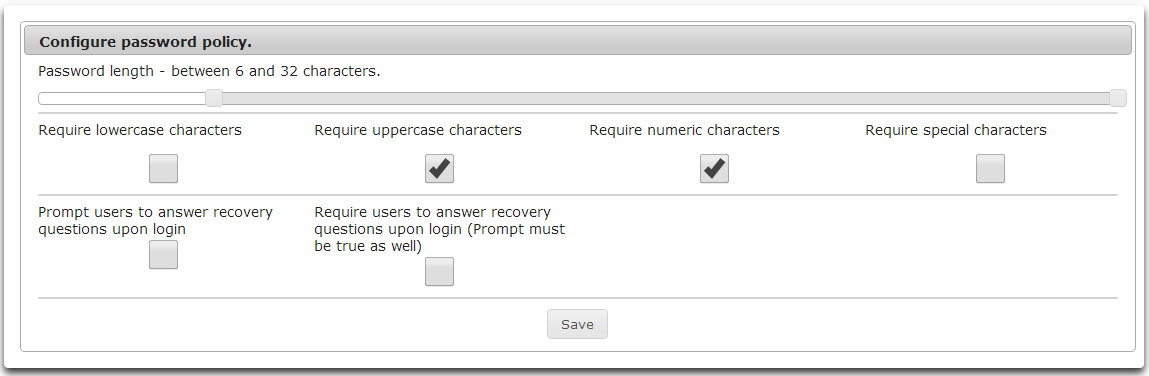
- Drag the slider to set the minimum password length.
- Check the checkboxes for desired password requirements.
- Require lowercase characters.
- Require uppercase characters.
- Require numeric characters.
- Require special characters.
- Prompt users to answer recovery questions on login.
- Require users to answer recovery questions on login.
- Click Save to save changes.
- Click Home to return to the main screen.
Account Sponsorship
Use the Account Sponsorship module administrative tool to set an acceptable use policy, define sponsorship templates, and view sponsored account information.
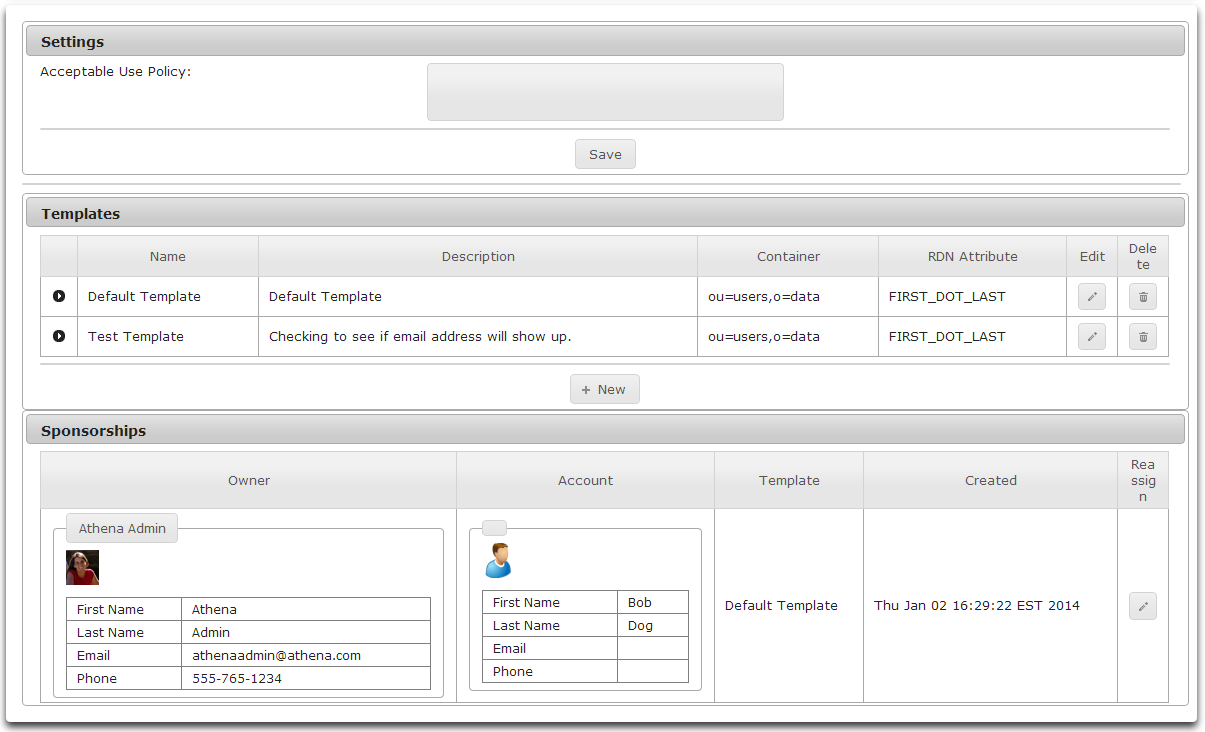
Defining an Acceptable Use Policy
- To set a default Acceptable Use Policy, simply type the policy in the Acceptable Use Policy edit control.
- Click Save below the edit control to save the policy.
Creating Account Templates
- To create a new Account Template, click New.
- The Account Template Wizard will be displayed.
- Enter the template Name and Description
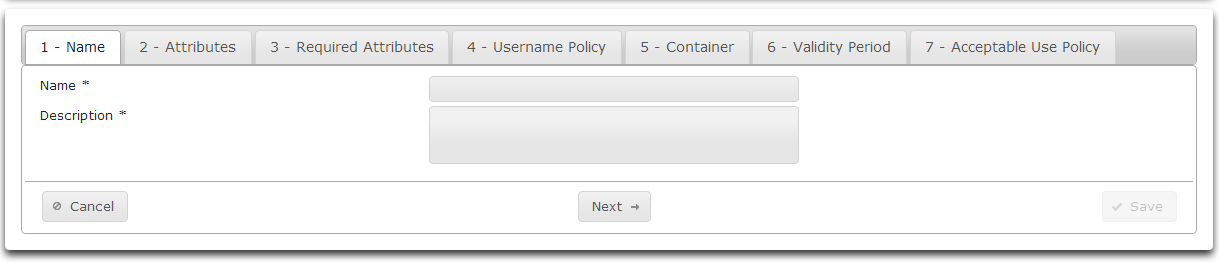
- Click Next
- On the Attributes tab, select optional attributes to be available in the template.
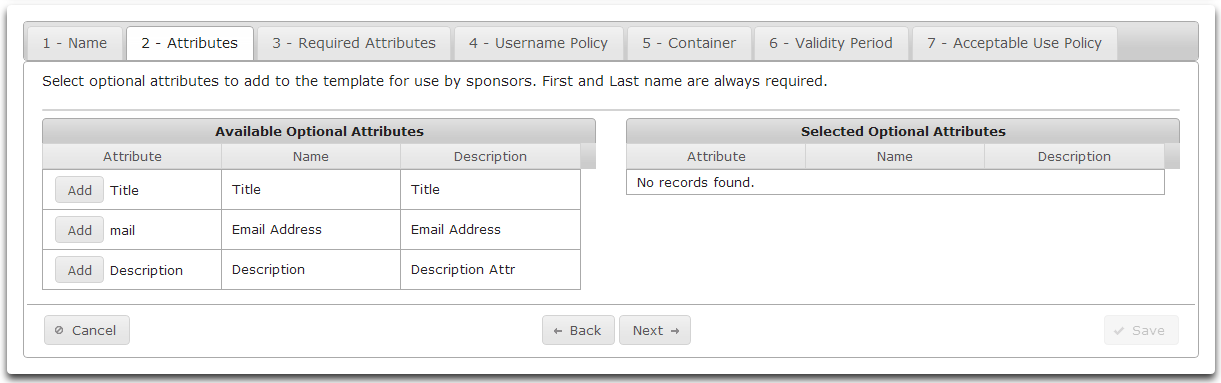
- Clicking Add will move an available attribute to the list of Selected Optional Attributes.
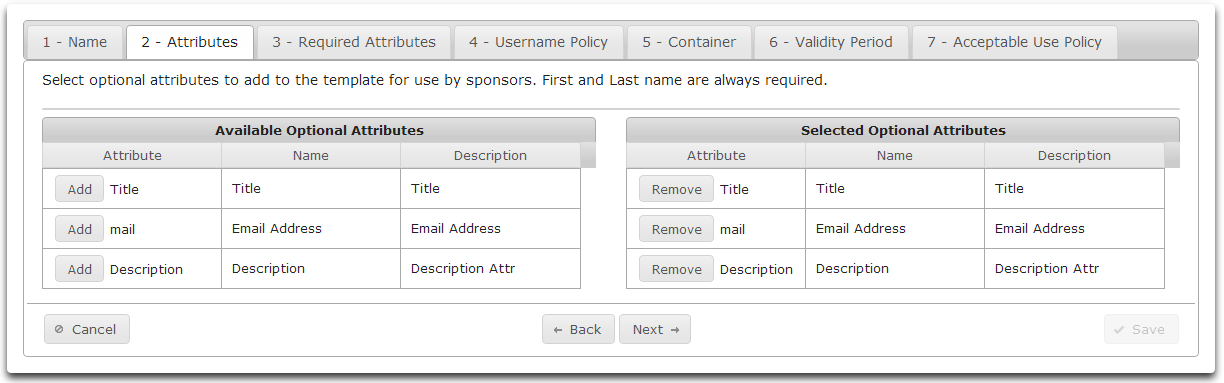
Click Next
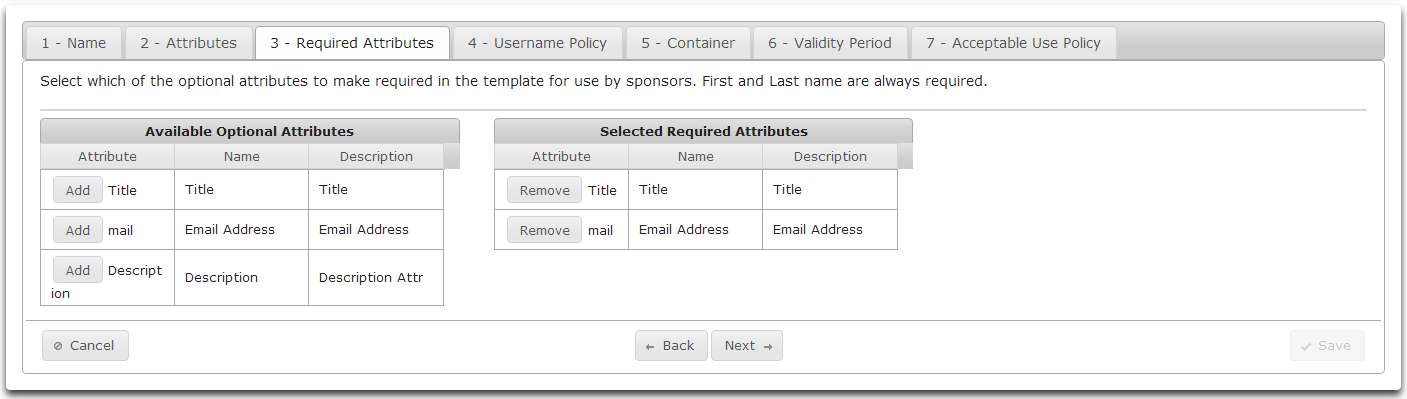
On the Required Attributes tab you can select which optional attributes to make required.
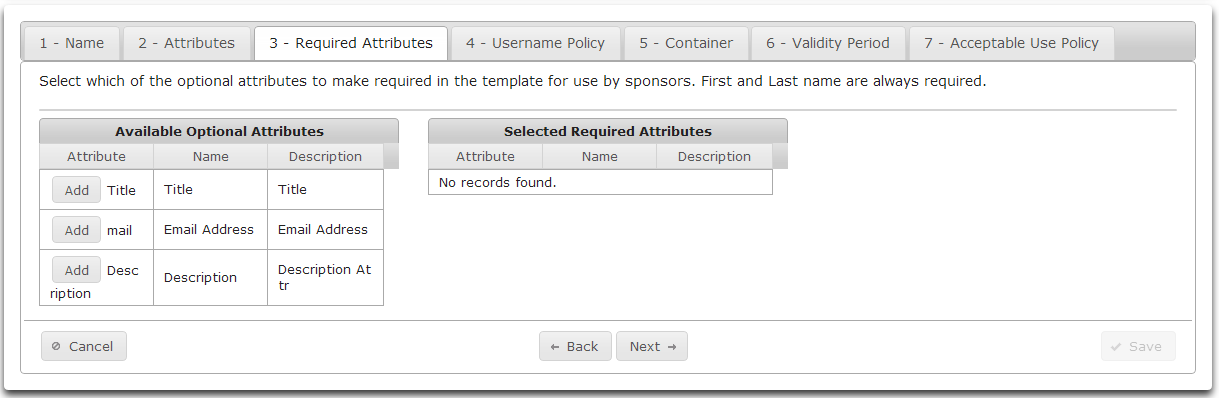
Click Add to move an Available Optional Attribute to the list of Required Optional Attributes.
Available Optional Attributes may be populated when creating a new sponsored account.
Required Optional Attributes must be populated when creating a new sponsored account.
- Click Next
- On the Username Policy tab select a naming method for new users.
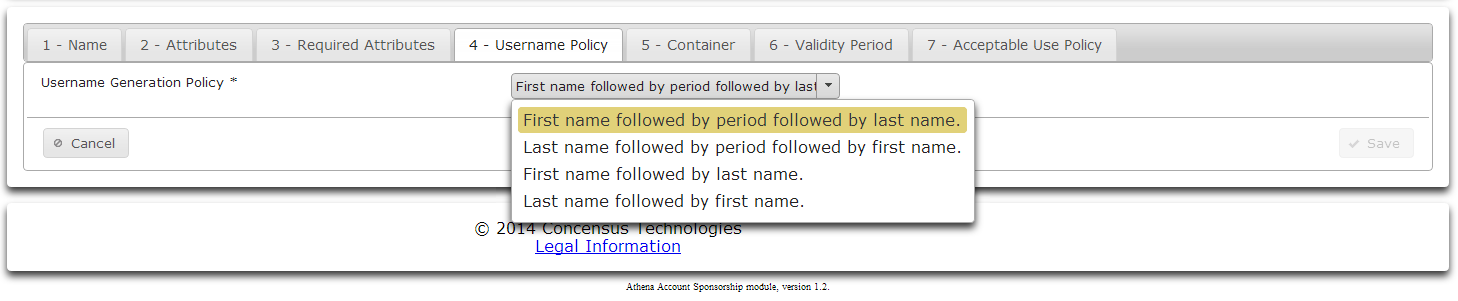
- Select a naming method from the dropdown list.
- Click Next
- On the Container tab browse to a container to hold sponsored accounts.
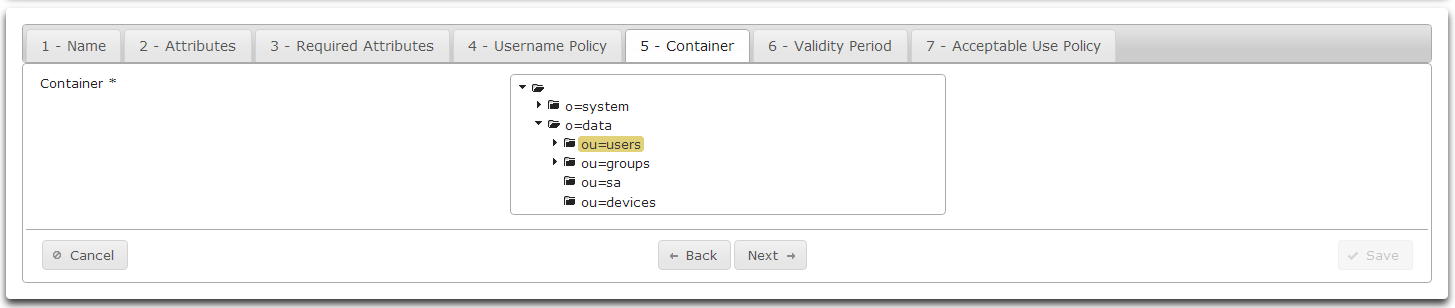
- Click on the desired container.
- Click Next
- On the Validity Period tab specify the number of days until the Sponsored Account expires.

- Drag the slider to specify the number of days desired.
- Click Next
- On the Acceptable Use Policy tab enter the Acceptable Use Policy for this template.

- Click Save
Viewing Account Template Details
- All defined Account Templates are listed in the Templates section.
- To view the details of a template, click on the arrow symbol on the far left of the desired row.
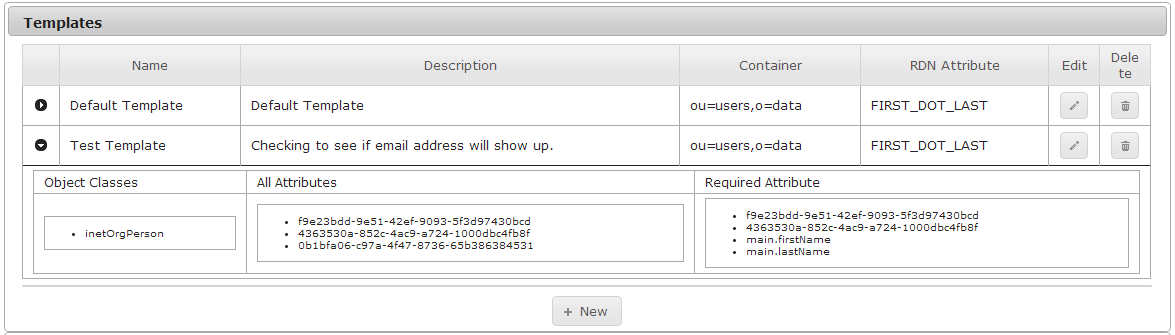
- Hide the template details by clicking on the arrow icon again.
Editing an Account Template
- To edit an Account Template, click on the pencil icon on the far right side of the row containing the desired Account Template. This launches the Account Sponsorship Template Wizard.
Deleting an Account Template
- To delete an Account Template, click on the garbage can icon on the far right side of the row containing the Account Template to delete.
- Athena will display the details of the Account Sponsorship Template to delete.
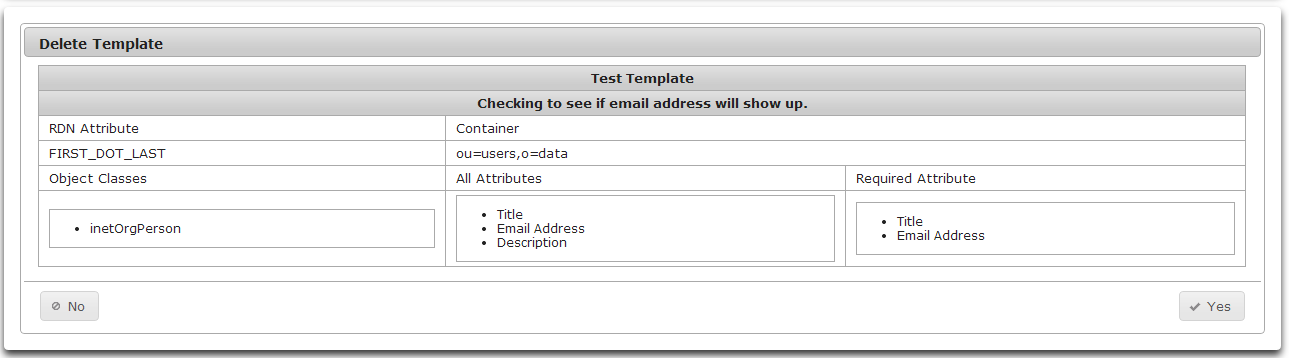
- Click Yes to delete the template or No to keep the template.
Manage Groups
Use the Manage Groups module administrative tool to enable group creation, group name uniqueness, and where Athena will create groups.
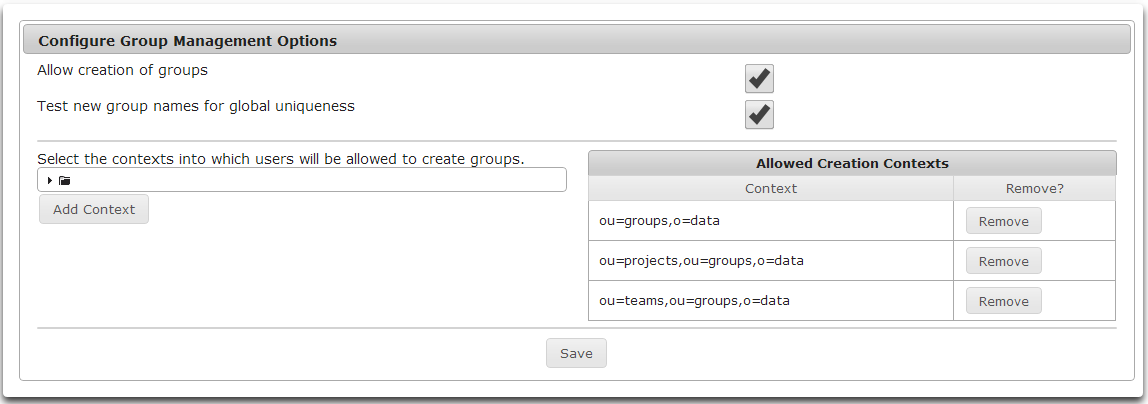
- To allow Group Management to create groups, check the Allow creation of groups checkbox.
- To have Athena test to make sure group names are unique across all containers, check the Test new group names for global uniqueness checkbox.
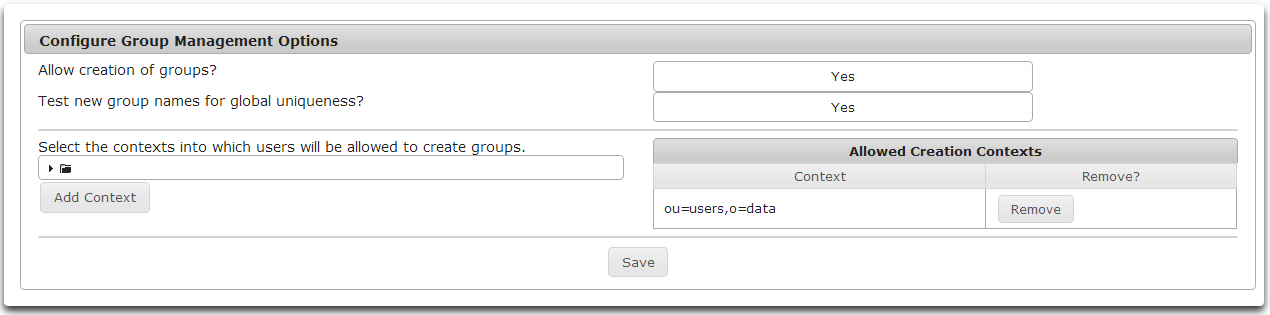
- Add contexts where groups can be created by browsing the tree control.
- Select the desired container.
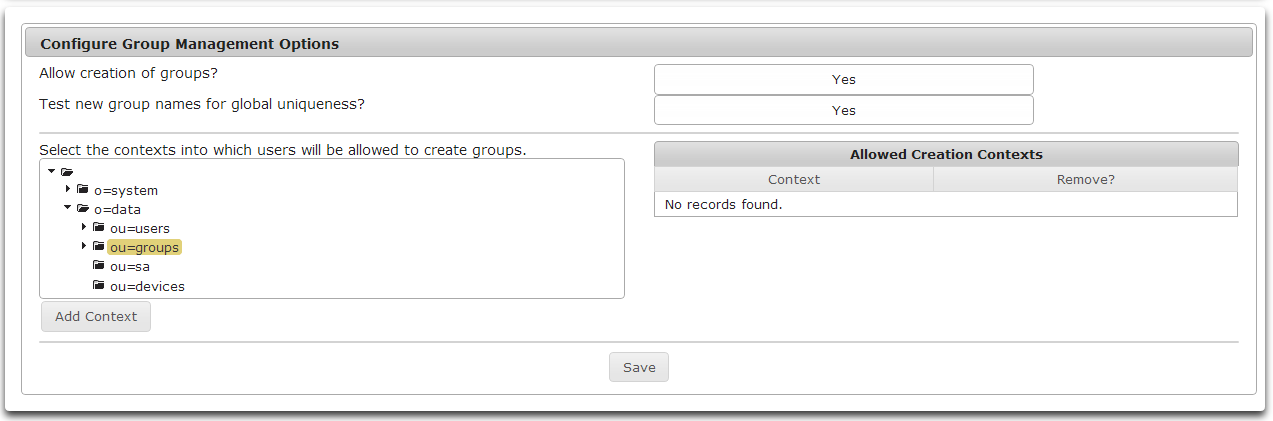
- Click Add Context to add the selected context to the list of Allowed Creation Contexts.
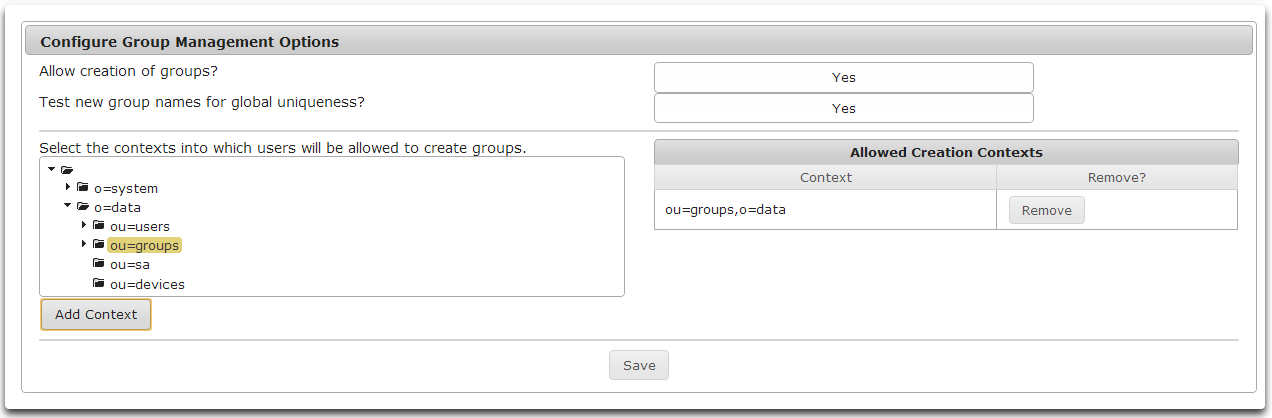
- To remove a context from the list of Allowed Creation Contexts click the Remove button to the right of the desired context.
- To save any changes made to Group Management Options, click Save.
Troubleshooting
About Troubleshooting
Troubleshooting Logs
Common Issues
Nullpointer Error
Appendix A
Appendix B
Appendix C
View subordinate's name