SIF Rollover Process 2013 v1.0
Download: SIF Repair Tool
Introduction
In order to prepare a new school year it is necessary to perform a “Roll over” of school information for all students in the Student Information System. This involves advancing students in the Student Information System to new grades, possibly changing school information as part of the roll-over. In an environment where the SIS is connected to an Identity Vault this process needs to be done in a way that properly cleans up all the identity information, school information and section/course information in the vault as well as guaranteeing proper synchronization of the newly ‘rolled over’ identity information to other systems connected to the Identity Vault.
Warnings
When performing the rollover process your Zone Integration Server, Identity Management Server and your directories will be processing a very large number of events. The following warnings are compiled from our experience over the last several years.
If your Identity Management System is connected to eDirectory it is very important that you do not start the Rollover process unless your directory is healthy and all servers are on and available during the entire process. An eDirectory health check is recommended for all customers. Failure to do so will cause many errors in your eDirectory environment.
If your Identity Management System is connected to Active Directory you must also ensure all of your Domain Controllers are up and available during the entire process.
If you are using Novell Storage Manager or File System Factory in your environment and you are using shared storage you will need to remove the shared storage policies prior to synchronizing the new school year. Once that process has been completed you may re-associate the shared storage policies and perform a backfill to create the shared storage. Failure to do this in the correct order will overload the FSF/NSM Engine and likely require a support call from the manufacturer.
If you are connected via IDM driver to an email system it is important to know that the course groups will be removed during this process. Also some districts will delete users out of their Directory at the end of the year. This may delete your users out of your mail system.
Before the Rollover Process Begins
Before beginning the rollover procedure within your Student Information System (SIS), the following steps should be completed.
- Log into the iManager that is installed on your IDM Server. The URL for this is usually https://{IP or DNS of IDM Server}:8443/nps .You should see something like the following.

- Click on the link for “Identity Manager Overview”. If you don’t see this screen you should still be able to find the “Identity Manager Overview” on the “Roles and Tasks” screen under the “Identity Manager” role.
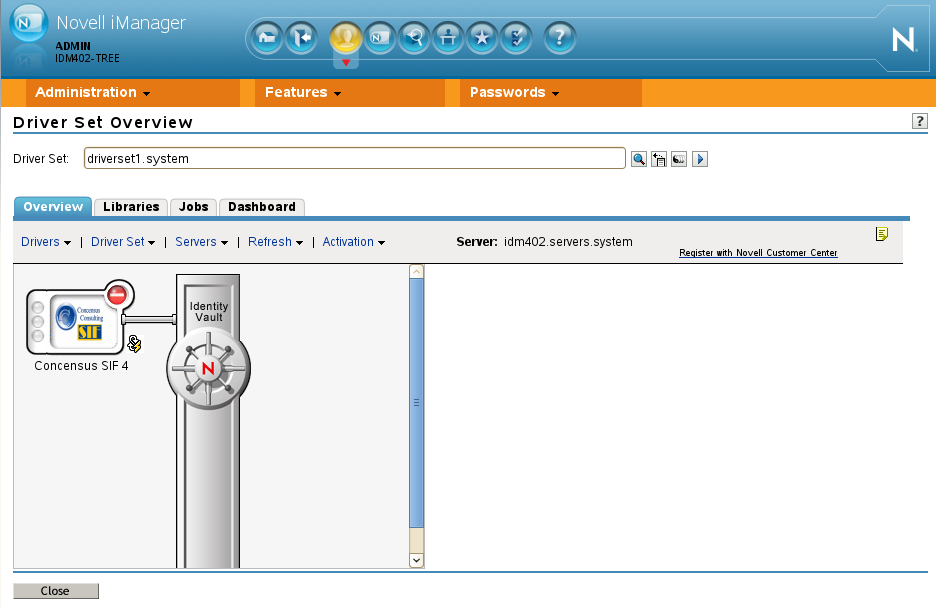
- The screen that comes up will allow you to search for IDM driver sets in your Identity Vault. To do this click the “Driver Sets” tab and it will show you a list of all driver sets configured in your Identity Vault. Select the driver set containing the SIF driver.
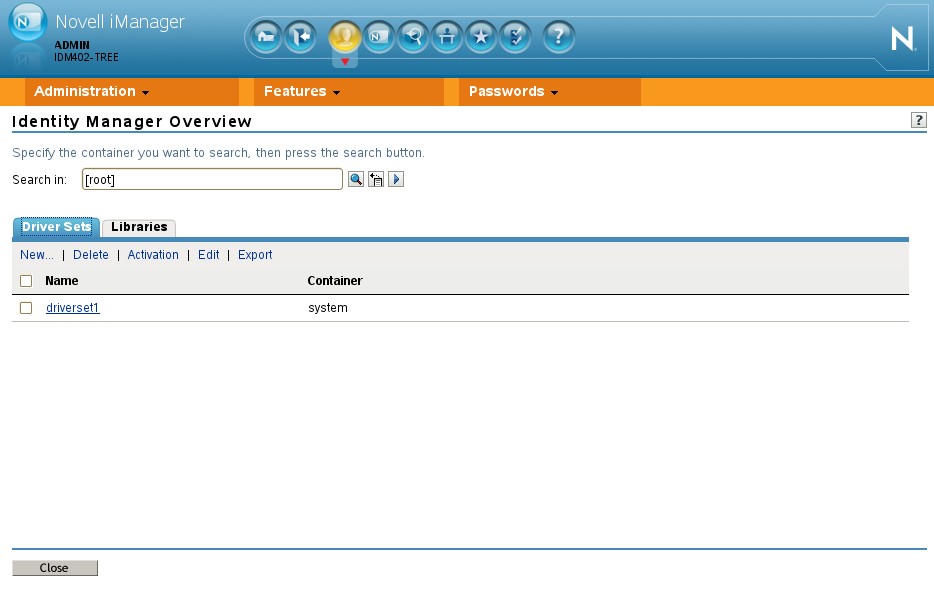
- The Driver Set Overview screen will look similar to the screen shown below. The number and type of Identity Manager drivers you see on your Overview may vary. For the purposes of the Rollover process, we are primarily concerned with the Concensus SIF driver.

- Perform the following operations on the SIF driver:
Stop the SIF driver
This is done by left clicking the green circle in the top-right corner of the driver icon and selecting Stop from the menu. When the driver has stopped it will appear as the red circle shown in the screen-shot above.
- Unregister the SIF driver with the ZIS.
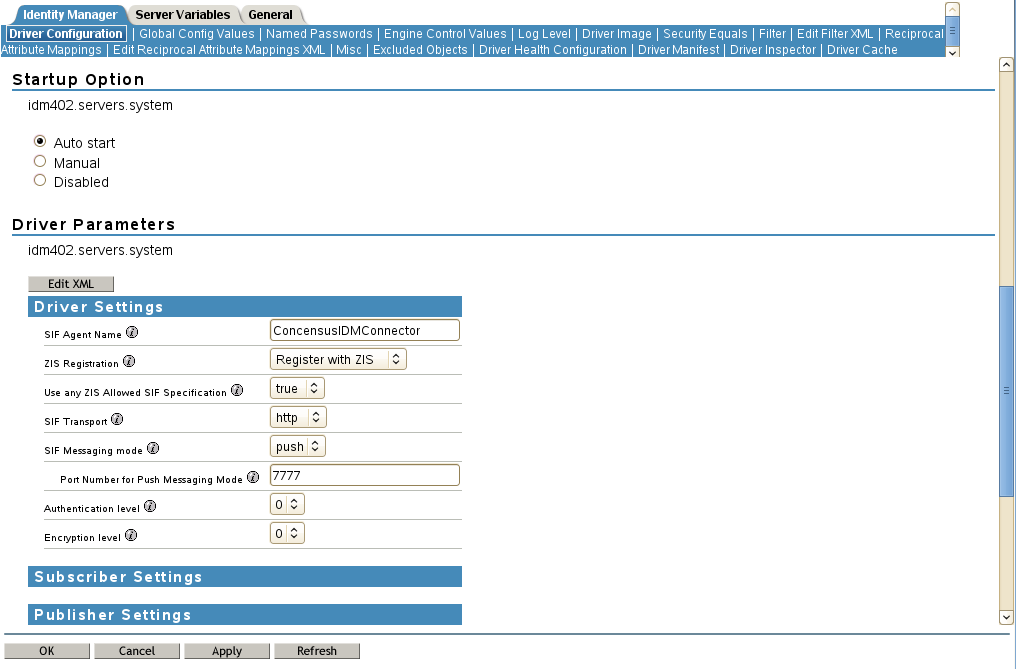
- This is done by left-clicking the driver icon and selecting Edit Properties. On the Driver Configuration tab scroll down to locate the Driver Parameters section. Change the ZIS Registration option to Unregister From ZIS and click OK on the driver properties screen.
- Now click the red circle and select Start Driver .
- The driver will start, unregister itself from the ZIS and then shut down.
- This is done by left-clicking the driver icon and selecting Edit Properties. On the Driver Configuration tab scroll down to locate the Driver Parameters section. Change the ZIS Registration option to Unregister From ZIS and click OK on the driver properties screen.
- Left-click the driver icon to go into the Edit Properties screen of the driver and locate the Startup Option section and change the driver to Disabled. Disabling the SIF driver prevents the IDM engine from caching events for the SIF driver during the rollover process.
- At this point, the system will no longer react to changes in the Student Information System (SIS).
Perform the Rollover
The student record updates may now begin in the SIS without impacting the Identity Management system.
Prepare the identity Management System for the New School Year
The Student information data from the previous year along with any Section Groups need to be cleaned up. Because the rollover process causes such a large number of data changes on student objects, Concensus has created the SIF Repair Tool (SRT) for cleaning up data from the previous year. However, prior to running SRT a decision needs to be made regarding existing Section Groups. SRT will delete the Section Groups from the previous year. When you delete the Section Groups, it is better to delete these groups while your Identity Connectors are running to allow the deletes to propagate to the connected systems. The SRT has a separate operation for deleting the section groups out and should be completed first with the connected drivers running.
Concensus SIF Repair Tool (SRT): Part 1
Starting SRT
To start the SRT you first need to download the SRT (See top of document)
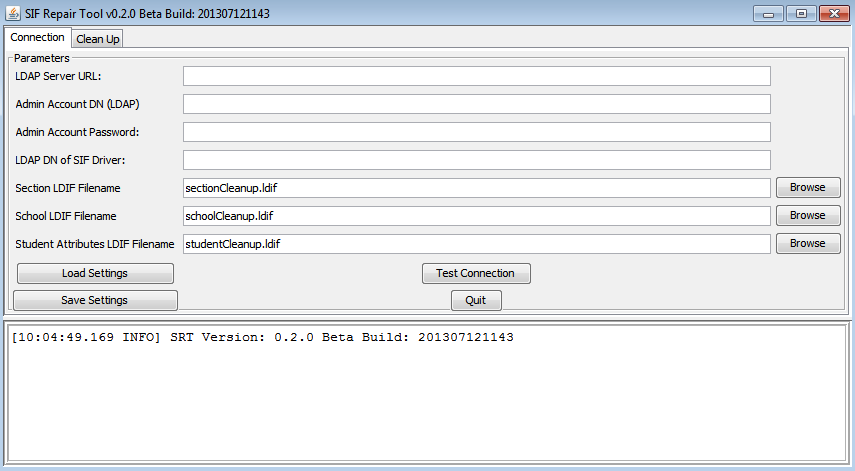
The SRT is a Java jar file. To start it you can double click the jar file. SRT should start if your Java environment is installed correctly. Alternatively you can open a command prompt to execute the SRT. From the prompt, type java –version. If this successfully returns a Java version then Java is installed in your path and you may continue to the next step. Otherwise, Java is either not installed on the machine or is not in your path. For help on this problem go to www.java.com. If Java is correct, go to the folder where the SIF Repair Tool jar file is located and run the following command: java –jar SIF_Repair_Tool.jar
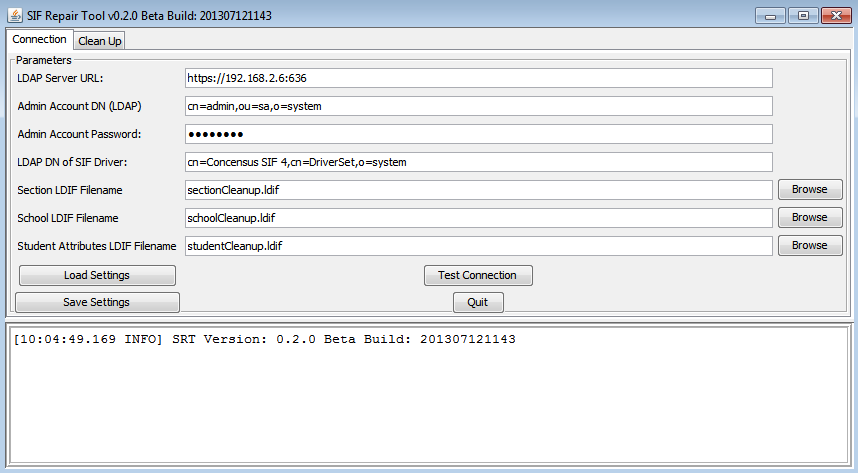
If SRT starts correctly the SRT application should display as shown below.
Connecting SRT to the Identity Vault
The first step is to set up the connection to the Identity Vault. After entering the settings you can save the configuration settings for future use. SRT does not store password information. For the LDAP Server URL it does not require any special setup to use a secure connection. The application is designed to accept the server certificate. It is recommended you use ldaps://{IP address or DNS of Server}:636. The Admin DN and SIF Driver DN are both in LDAP form as shown in the example below. The settings should look similar to the example shown below.
Select the desired file names and locations for each of the three LDIF output files generated by the SRT. These files represent the ouput of each of the three core processes present on the Clean Up tab.
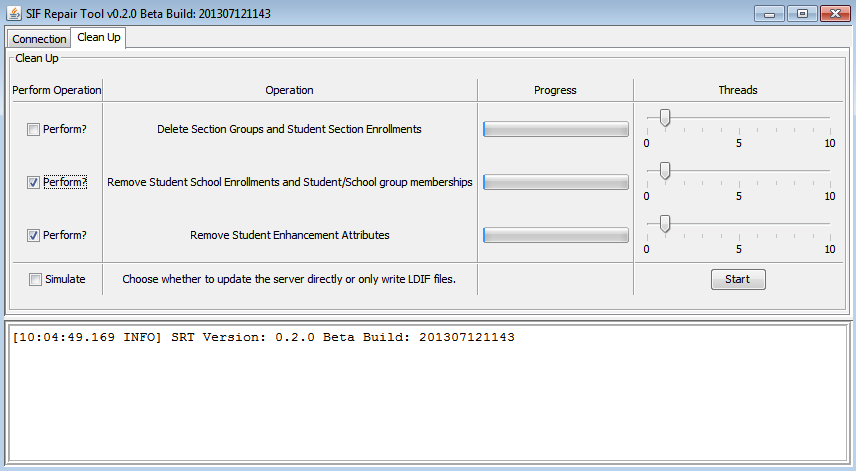
Initial Clean-up Step
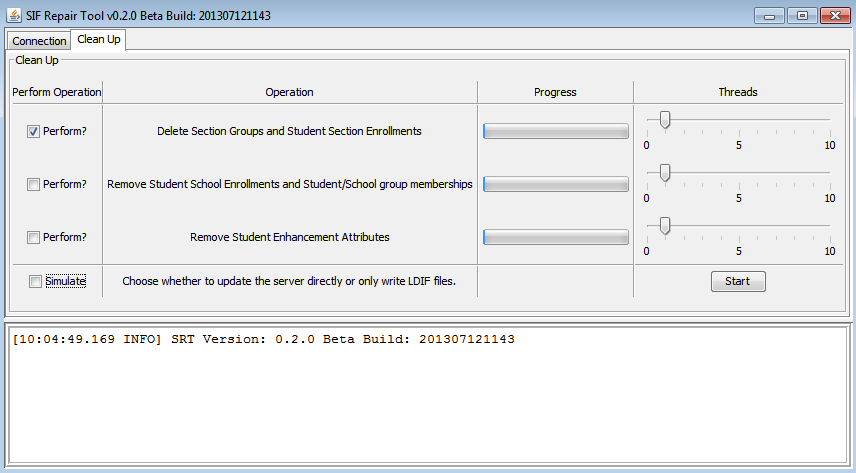
- Once the settings have been entered go to the “Clean Up” tab. And for the first run only check the box for “Delete Section Groups and Student Section Enrollments”. This step should be run first because we want to synchronize these group delete events to the connected systems. If you don’t want to synchronize the removal of the section groups to all connected systems then skip ahead to Concensus SIF Repair Tool (SRT): Starting and configuring SRT
- Use the Simulate box to prevent the SRT from writing to the eDirectory tree if you wish to review the changes it will make in advance (written to the LDIF files specified earlier), otherwise uncheck the Simulate box to allow the SRT to perform the operations directly to the eDirectory tree.
Otherwise Click Start when your screen looks like the example shown below.
Warning!!! When you click Start the groups will be deleted in the Identity Vault and the delete events will synchronize to the connected systems if those connectors are still running.
Once this is completed all the Section Groups should be removed from your Identity Vault. Wait until these events have synchronized to your connected systems prior to continuing.
Concensus SIF Repair Tool (SRT): Starting and configuring SRT
Prior to running the SIF Repair Tool it is essential to stop and disable connectors synchronizing with other systems. This is done to prevent changes being made by SRT from being synchronized to the connected systems until the new school year’s data starts to flow from SIF.
- Start by logging into the iManager that is installed on your IDM Server. The URL for this is usually https://{IP or DNS of IDM Server}:8443/nps .You should see something like the following.

- Click on the link for Identity Manager Overview if you don’t see this screen you should still be able to find the Identity Manager Overview under the Roles and Tasks screen under the Identity Manager role.
- The next screen allows you to search for the IDM driver set in your system. To do this click the Driver Sets tab and it will show you a list of all driver sets in your system. Select the link to open the driver set overview for the driver set containing the drivers to be disabled.

- The screen below is a sample Driver Set Overview. The Concensus SIF driver is the only one displayed in the sample. However, if you have other drivers configured in your system they will show up here. These other drivers are the ones to be stopped and disabled.
- On each Driver listed we will need to stop them and then disable them. Disabling a driver prevents the IDM engine from caching changes that the SIF Repair Tool will be making to the IDVault. Repeat the following sub steps for each driver in your system.
- Click the green circle and select Stop Driver .
- Click the red circle and select Edit Properties. Find the Startup Option section and change the driver to Disabled.
- Start the SIF Repair Tool following the steps outlined in Concensus SIF Repair Tool (SRT). The SRT should display as shown below.
- Enter the configuration settings for the SIF Repair Tool following the steps outlined in Concensus SIF Repair Tool (SRT). If you have saved settings from Part 1, load the settings you saved from before and enter the password. The SRT should look similar to the example shown below.
- Once the configuration settings have been entered or loaded go to the Clean Up tab. Check both the second and third options under the perform list: Remove Student School Enrollments and Student/School Group Memberships and Remove Student Enhancement Attributes. Click “Start” when your screen looks like the example below.
- Now we have cleaned up all the information from last years SIF data.
Synchronize New School Year Data to the Identity Management System
The SIS rollover has been done and the SRT has been run, the IDVault is cleared out of all the old data and the Student Information system has been rolled over to the new school year. We are now ready to start migrating the data to the IDVault.
There are two main steps in the migration.
- Synchronize the data from the SIS to the IDVault
- Synchronize the data to the connected systems.
This will give us a chance to check the data before it affects any downstream system.
Synchronize Data to the Identity Vault
- Log into the iManager that is installed on your IDM Server. The URL for this is usually https://{IP or DNS of IDM Server}:8443/nps .You should see Identity Manager Administration screen.
- Click on the link for Identity Manager Overview if you don’t see this screen you should still be able to find the Identity Manager Overview under the Roles and Tasks screen under the Identity Manager role.
- The screen that comes up will allow you to search for the IDM driver set in your system. To do this click the Driver Sets tab and it will show you a list of all driver sets in your system. Select the link to open the driver set overview for the selected driver set.
- The Driver Set Overview will be displayed. In the sample shown below the Concensus SIF driver is the only driver displayed. However, there may be other drivers in your system. The following steps only deal with the Concensus SIF driver.
- The SIF driver needs to be re-enabled, registered with the ZIS, and then started up. To do this left click the red circle on the driver and select Edit Properties. Under Startup Option check the Auto Start option. On the Driver Configuration tab scroll to the bottom section called Driver Parameters and in the ZIS Registration option change the setting to Register With ZIS. Now click OK on the driver properties screen.
Now click the red circle
 and select Start Driver
 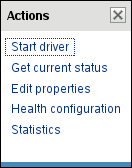 and wait for the driver to start completely. The driver should be registered with the ZIS and running. Any change from the Student Information System will be sent to the IDVault.
- Before migrating new school year information from the SIS, start any “loopback or service” drivers. We are not going to enable any connected system but any driver that is used to handle settings in the IDVault needs to be started. Examples of these types of drivers are “User Application”, “LoopBack”, “Null”, etc.. Basically any driver that is not connected to a specific database or system for example “Active Directory” or “Google Apps” would not be part o f this because they are connected to actual systems. They are not utility drivers. For each of these drivers follow these steps:
- Click the red circle
 and select Edit Properties . Then find the Startup Option section and change the setting to Auto Start and make sure to check the box next to Do not automatically synchronize the driver. And click OK.
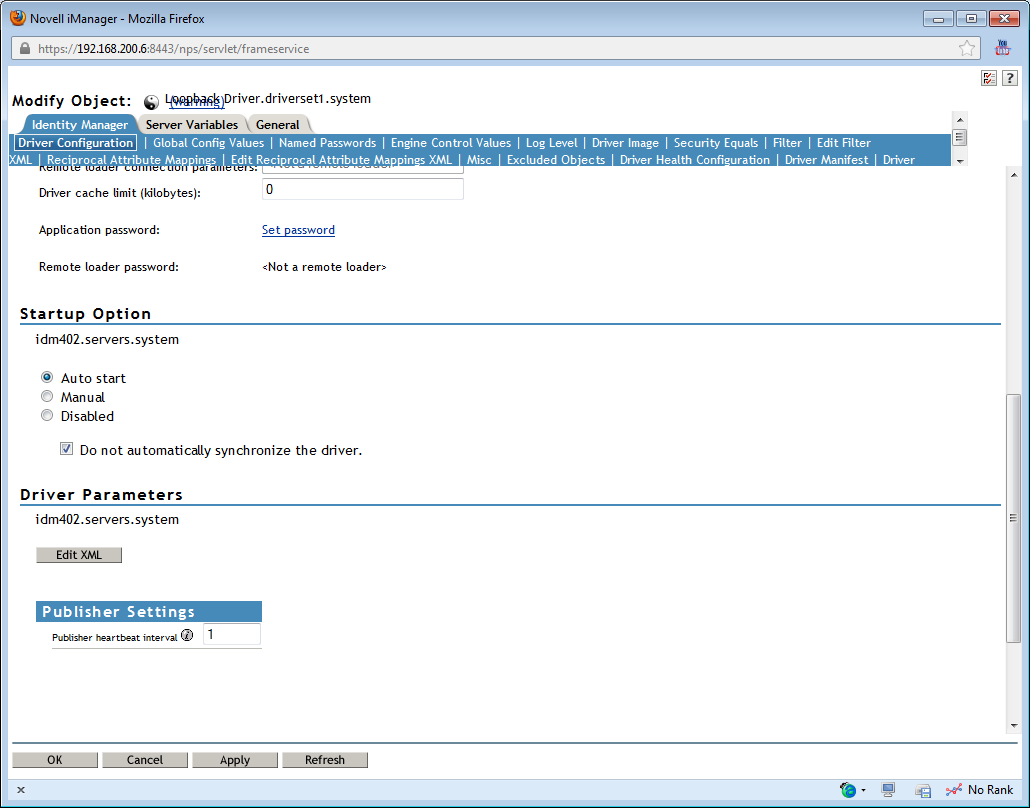
- Now click the red circle and select Start driver and wait till the driver starts up.
- Repeat for next service driver.
- Now click the red circle
- Start a refresh of all the data for the new school year. To do this we use some built in functions to migrate the objects.
Click the SIF Driver icon itself to open the driver advanced section to the right on the overview screen. You should see something like this.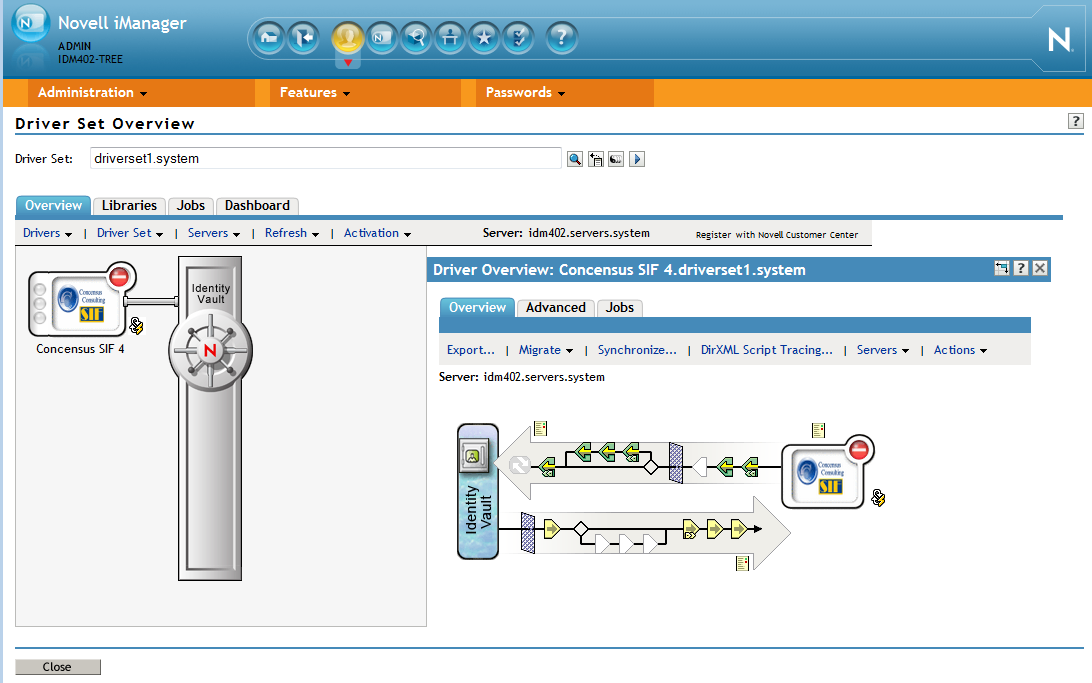
- Now on the right side of the screen you should see a TAB labeled Jobs this is different than the Jobs tab above the IDVault diagram on the left. This is the jobs that are specific to this driver. You should see the following list of jobs.
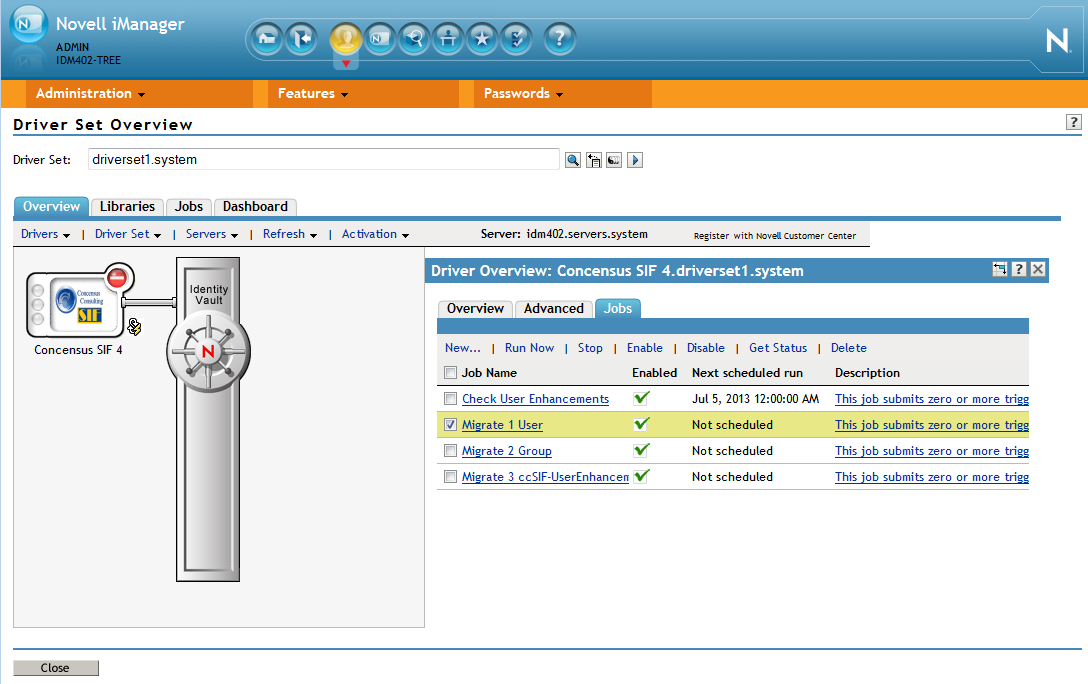
- The jobs that we are going to use are the numbered ones listed 1-3 Groups, Users, and Enhancements. It is essential to run the jobs in that order. To run a job select the checkbox next to the job you wish to run, for ex. “Migrate 1 Users”, and click the Run Now from the menu above.
- The Users job will re-migrate all the Student Personal and Staff Personal objects from the Student Information System. This will get any changes to each user’s personal information and new students and Teachers.
- The Groups job will re-migrate the School Info groups, the School Course Info groups, the Room Info groups, and finally the Section Info groups. There should not be many changes in the School Info, School Course Info, or the Room Info groups but the Section Info groups are all going to be recreated, because the Sections are different every year. Even if you have an English 10 class taught at the same school by the same teacher at the same time, it is a different section than it was last year.
- The Enhancements job is used to migrate the Student School Enrollments and the Student Section Enrollments. These are the objects that tell when a student is enrolled in school and what classes they are taking. Warning!! This job can take a couple days to complete.
- Check the data in the IDVault to make sure it is accurate and based on the new school year after the migration is complete.
Synchronize Data from the Identity Vault to Connected Systems
- Log into the iManager that is installed on your IDM Server. The URL for this is usually https://{IP or DNS of IDM Server}:8443/nps .You should see something like the following.
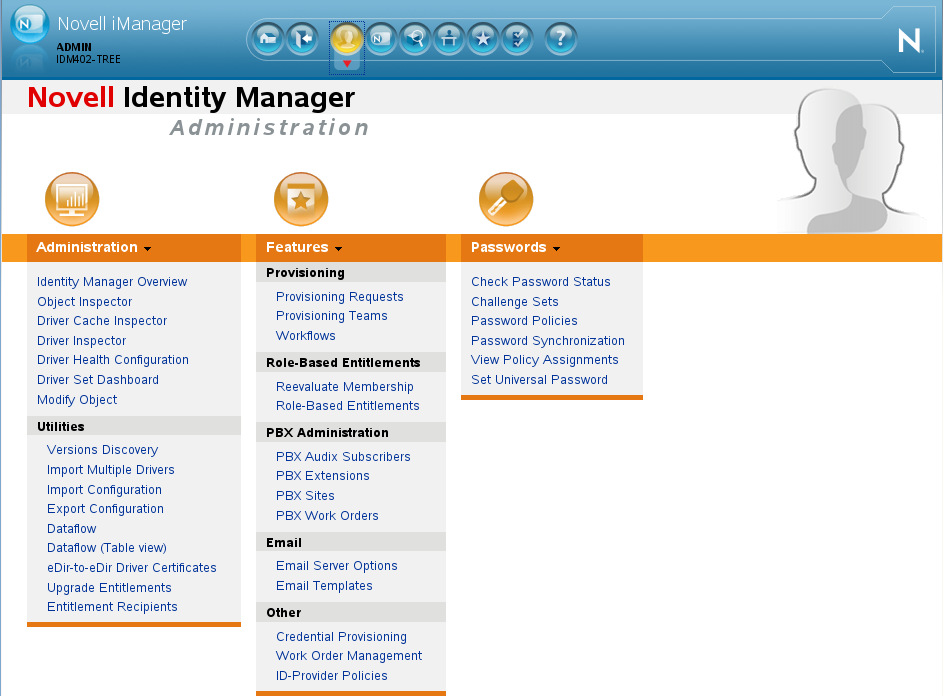
Click on the link for Identity Manager Overview. If you don’t see this screen you should still be able to find the Identity Manager Overview under the Roles and Tasks screen under the Identity Manager role.
The screen that comes up will allow you to search for the IDM driver set in your system. To do this click the Driver Sets tab and it will show you a list of all driver sets in your system. Select the link to open the driver set overview for the selected driver set.

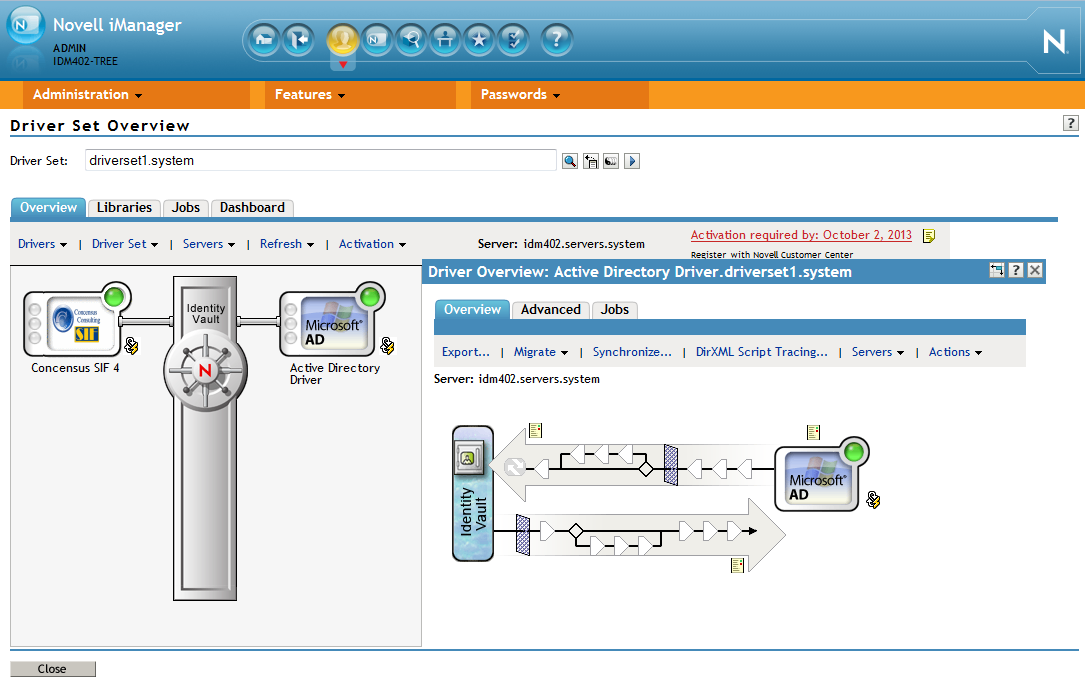
- The Driver Set Overview will be displayed. A sample Driver Set Overview is shown below. The following steps deal with all drivers other than the Concensus SIF Driver. The sample steps will show an “Active Directory” connector.

- Click the red circle
 and select Edit properties.
Then find the Startup Option section and change the setting to Auto Start and make sure to check the box next to Do not automatically synchronize the driver. And click OK.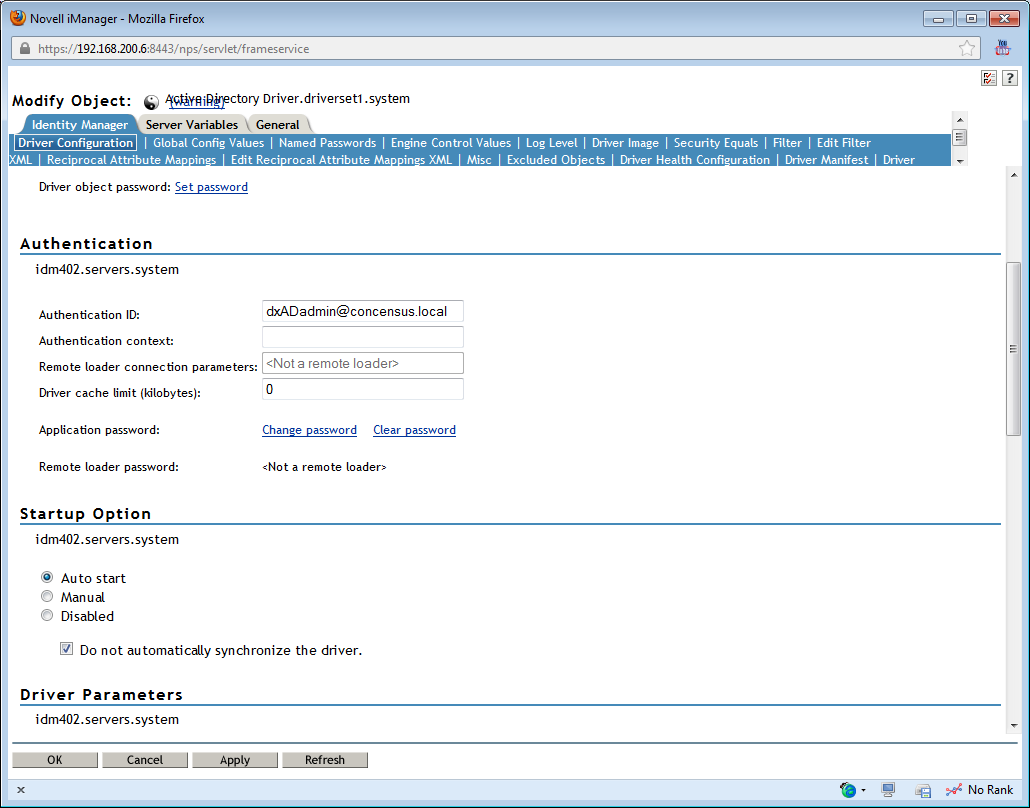
- Click the red circle and select Start driver. and wait until the driver starts.
- Now click the driver icon to open the advanced section to the right on the overview screen. You should see something like the sample shown below.
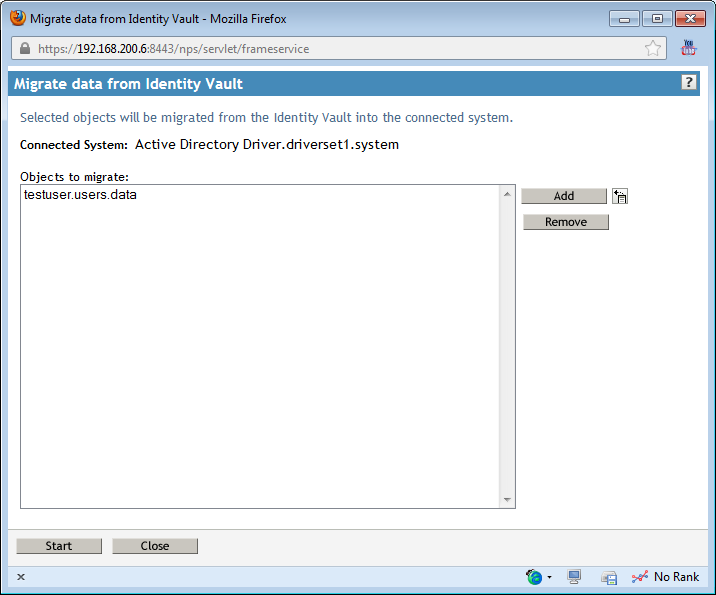
- From this screen click the Migrate menu and select Migrate from Identity Vault. From here you can select an individual object or container. We recommend migrating a few objects to test that everything is correct in the connected system. When you are satisfied with the test results proceed with migrating the entire container of users and groups.
- Repeat the steps for each Driver to a connected system until all drivers are running.
- Click the red circle
- After all drivers are running the SIF connector should now synchronize any enrollment changes or new students for the school year.
- The rollover process is complete.